
A California Central Coast classic, this meal is the perfect complement to a warm summer evening spent near the grill with friends and family.
Time: 60 – 90 Minutes
Level: Intermediate
Cost: $6-8/plate
Serves: 4-6
About This Meal
Tri-tip is a California classic cut of beef that comes from the bottom of the sirloin. It is flavorful and tender and does not need a lot of complicated marinades or spice rubs to make it delicious. Most grocery stores in California carry it year round, as does Costco. It usually ranges anywhere from $4.99 – $7.99/lb. In this meal the major expense is the beef; everything else is relatively inexpensive.
The key to grilling a delicious tri-tip is to go “low and slow” (i.e., low temp, long cooking time) – it’s really more of a roast than a steak. This will require setting up a 2-zone fire (cool side, hot side) on your grill so you can sear it well on the outside over high heat and then let it come up to temp on the cooler side.
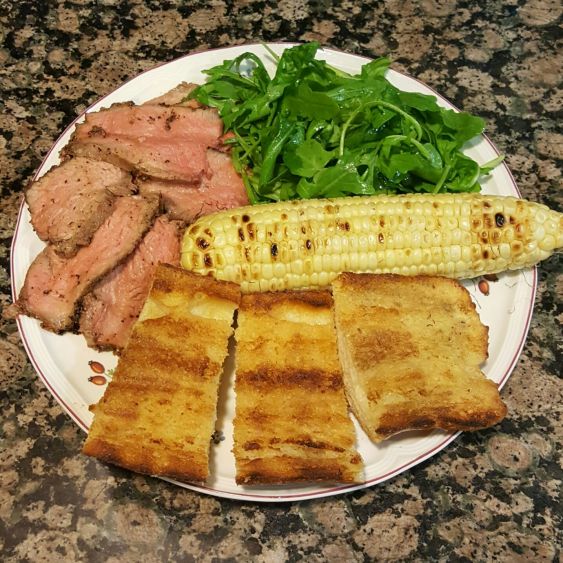
In this meal, the succulent beef is complemented by grilled sourdough garlic toast, sweet grilled corn, and a lemon-peppery arugula salad for a jolt of freshness and acidity. It pairs well with a strong California Cabernet or Zinfandel.
Stuff You’ll Need (Equipment)
- Grill
- Instant Read Thermometer
- Cutting Board
- Aluminum Foil
- Tongs
- Sharp Knife (both for trimming meat as well as carving at the end)
Ingredients
- 2 Tri Tip Roasts, trimmed of excess fat, 2-3lbs each
- Classic Santa Maria Rub (Recipe follows)
- 2/3 cup Olive Oil, plus some for drizzling
- 1 loaf sourdough bread, halved lengthwise
- Clove of Garlic
- 1/4 cup Mayonnaise
- 1 tbsp Dijon Mustard
- 10oz fresh baby arugula
- 1 lemon
- Grated Parmesan cheese
- 4 Ears Corn, on the cob, completely shucked
- Smoking Wood Chips or Chunks (optional)
For the Santa Maria Rub
Couldn’t be easier. 2 parts granulated garlic powder to 1 part kosher salt, to 1 part coarsely ground black pepper. Make it by the Tablespoon and you should have enough for two, 2lb Tri-Tips.
 To Prepare the Grill
Build a 2-zone fire, or if using gas, light only one or two burners. Place some wood chunks in a small cast iron skillet or smoker box (available from Home Depot) over the lit burners/hot charcoal. I prefer chunks over chips because they last longer. In terms of what wood to use, my typical go-to is a combination of pecan and apple. Hickory and Oak would work well with this recipe too (but beware – Hickory makes everything taste like bacon… which is either good or bad). On my grill, I usually use only one grill grate – that way I can slide the meat from hot to cool side without having to pick up the meat itself. It also allows me access to the smoker box if I want to add more wood half way through the cook.
To Prepare the Tri-Tip
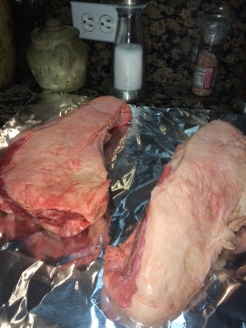
Begin with two, 2lb(ish) tri-tip steaks. Chances are that even if you bought them “trimmed” some additional trimming will be necessary. Most tri-tips are sold with a pretty thick fat-cap on one side of the meat that will need to be mostly removed. While you may have heard it said that “fat = flavor” this is only partially true. Marbled, internal fat (like you would find on a ribeye) does impart some flavor, but thick layers of outer fat won’t break down in the time that it takes to cook a tri-tip and the result will be flare-ups and your guests just cutting away all the fat – and the delicious rub – with it at the dinner table. So trim it off.

To do this, simply take a sharp knife in one hand and begin to lift the fat-cap with the other. Run the blade between the meat and the fat; if you trim off some meat in the process, that’s okay – the key is to use long, smooth cuts rather than short quick ones. If you do the latter, your meat will look like someone attacked it with a machete.

Once you’ve got it trimmed up, you’ll want to season it with your Santa Maria Rub. First, drizzle a tiny bit of olive oil onto each tri-tip and rub it all over so there’s something for the seasoning to stick to. I usually prefer to do this over and sheet of aluminum foil – easy clean up. Next, use one hand to sprinkle the rub over the meat and the other hand to rub it on. You’ll need to go pretty heavy – when you’re done, it should almost look like it’s been rolled in sand.
Important Tip: Your beef should be at the same temperature throughout when you put it on the grill. You may have read that you ought to throw it out on the counter to let it come up to room temperature, but don’t do that unless you have time to get it up to room temperature all the way through. The reason for this? If you only get the first 1/4 to 1/2 inch up to room temperature, that part will cook a hell of a lot faster then the still-cold center. That will create a ring of gray, overdone meat around the outside. If you want it to be nice and crusty on the outside and perfect medium rare through the center, just leave it in the fridge until you’re almost ready to throw it on the grill. It will take longer to cook through, but not that much longer, and the results will be way better.
Now, off to the grill.
 The Cook
Start by searing the tri-tip over high heat on the hot side of the grill. Contrary to popular belief, this has absolutely nothing to do with “searing in the juices.” A piece of meat is not a balloon; it won’t pop if you stick a thermometer in it to check the internal temperature. The purpose of searing a piece of meat is to create a beautiful, delicious crust on the outside thanks to a nifty scientific thing called the Maillard reaction. Sear each side for about 5 minutes, with the lid closed, or until a nice crust has developed, and then move the tri-tip to the cool side of the grill. The temperature at grate level on the cool side of the grill should be around 300F – You may need to turn down the heat a bit to accomplish this. Also, spend the $5 on a cheap oven thermometer at Home Depot and place it on the grill grate to be sure you’ve got this right.
 Once you’ve got the tri-tips nice and browned on each side and moved them to the cooler side of the grill, you’ll want to place the fatter ends toward the heat source, and the skinny ends away from the heat source so that everything cooks evenly.
At this point, assuming you’ve got your temperature stabilized at grate-level, move the smoker box to the middle of the grill (as pictured above) to maximize smokiness, and shut the lid. You’ll want to check the tri-tips in about 15-20 minutes with an instant read thermometer. You’re shooting for an internal temperature of 135F. Remember: Better to check more often than not – once you go over, you can’t go backwards. That being said, tri-tip is a pretty forgiving piece of meat, so anything between 130F – 140F will be fine. Less than 130F, and you’ll get gelatinous raw; over 140F, shoe leather.
The Salad, the Bread, and the Corn
 While you’re waiting for the meat to come up to temp, it’s a good opportunity to wash a few dishes and then begin preparing your sides. Begin by dumping the arugula into a large bowl and set it aside (you’ll want to dress it at the last minute – more on that below).
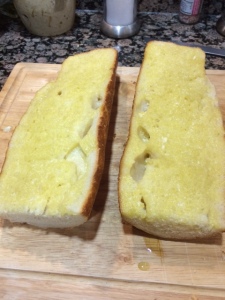
Half your sourdough loaf lengthwise and lay face-up on a cutting board. Combine the Olive Oil, Mayo, and Mustard in a small bowl, whisk to combine, and brush it onto the sourdough halves.
Shuck the corn and discard the husks.
Back to the grill.
Once you’ve achieved an internal temperature of around 135F on your tri-tips, pull them off the grill, transfer them to a carving board, and cover them with aluminum foil. You’ll want to let them rest for 15-20 minutes, which is about the amount of time it will take to grill the corn and the bread.

Begin with the corn, and grill it naked over high heat. At this point, you’ll want to turn on another burner on your gas grill or stoke your coals a bit to get the temperature back up. I’m convinced that this is the best way to grill corn. You’ll want to grill it for about 12 minutes, rotating it every so often to ensure even cooking. Once the kernals start to pop and turn brown, and the corn turns a deep yellow color, it’s ready to come off the grill. Transfer it to a plate and wrap tightly with aluminum foil to allow it to finish cooking in its own steam.
Once you’ve got the corn wrapped up, it’s time to toast the bread. This is arguably the most difficult part of this whole process because the oil in the bread is going to want to start fire and burn everything to a crisp when it drips off the bread through the grill grates. To offset this problem, here’s what I do: First, lay the bread face up on the hot grill to allow the oil to sink into the bread a bit. Leave it there, covered, for 1 minute. Then, flip it over and watch it like a hawk. If it tries to burn, move it to the cool side of the grill. Move it back once any flare-ups are out. Continue this process for another 3-5 minutes until it’s golden brown. Once inside, cut a clove of fresh garlic in half and rub the cut side all over the warm bread.
Lastly, drizzle 1/4 cup olive oil over the arugula, add the juice of 1 lemon, season with salt and pepper, add the grated Parmesan cheese (to taste) and toss.
And there you have it. Let me know how it turns out for you. It was pretty damn good for me and the family last night.
Good Luck!
The Intrepid Gourmet

Merely wanna admit that this is invaluable, Thanks for taking your time to write this.
LikeLiked by 1 person