
It’s that time of year again!
Fire in the fireplace, pets curled up on the rugs, presents under the tree… and the general terror associated with totally f*#&ing up an $80 piece of meat. Fear not! I bring you good tidings of great joy – the Perfect Holiday Roast
Last Updated 12/01/2024
Okay, just in case it’s Christmas Day, and you’re trying to figure this out, here’s TL;DR –
You Will Need:
- A 12 inch Cast Iron Skillet, such as this one from Lodge Logic or Sauté Pan
- A sturdy set of tongs
- A Wire Rack and Baking Sheet Combo – or a grill grate set on top of your skillet… or just cook the thing IN the skillet; not ideal, but it’ll be fine
- A Probe Thermometer or Instant Read Thermometer – even a cheap one from the grocery store is better than nothing, but without it, it’s like trying to drive blindfolded; you literally have no idea what’s happening. You have to have this.
Method:
- 5 – 7lb Roast, well trimmed, straight out of the fridge (no bringing up to room temp – forget it)
- Rub it down with olive oil; season aggressively with kosher salt and pepper, and whatever else makes you happy (herbs, Aleppo pepper, etc).
- Score (meaning lightly slice through about 1/8 inch deep) the remaining fat cap to prevent the roast from curling up in the pan when you sear it off
- Tie with twine to ensure even shape
- Open all your windows, get ready to wave at your smoke alarms, and set your overhead fan to high if you have one.
- Set a cast iron skillet or sauté pan over high heat. Wait a couple minutes and add a high smoke-point fat (vegetable oil, ghee, grapeseed oil, etc).
- Sear the roast on all sides, turning occasionally to ensure browning, not burning.
- Once nicely browned all around, remove roast from heat. Place on a wire rack, set over a baking sheet, into a 250°F oven – about 2 hours (see rough timeline below, but remember, we cook with temperature, not time, so…
- Insert your probe thermometer in the deepest, coldest part of the roast (my roast last year, pictured above, had an initial start temp of 42°F). If using an instant read thermometer, you’ll have to just take it’s temperature once in a while – more frequently as you get closer to your target temperature, which is…
- Between 123°F and 125°F – take your roast out of the oven; it will carry over to perfection.
- Rest for a minimum of 30 minutes, or better yet, until the temperature ceases to rise and drops by a degree or two. Again, last year, I pulled my roast at 124°F, it took 45 minutes for it to carry over to 131°F and it was damn near perfect
Timeline:
- 15 minutes to prep and sear
- 2 hours in the oven at 250°F – but remember, cook with TEMPERATURE not TIME. Pull between 123°F and 125°F
- 45 minute rest
- Three hours TOTAL – so if you want to eat at 7pm, start working on your roast at 4pm
Happy Holidays everyone!
Okay – The Interesting Read If You’ve Got Time:
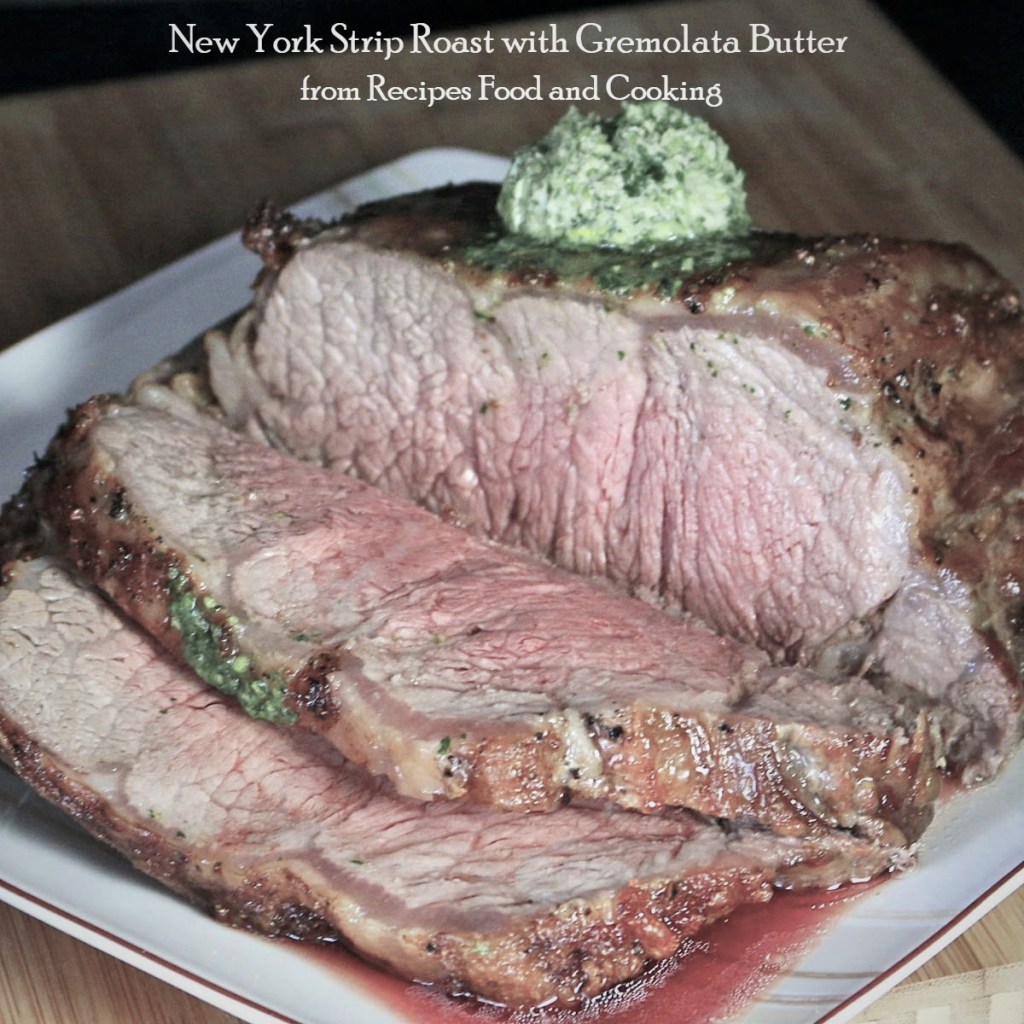
As a general primer, you may wish to read this article first, but it’s not entirely neccessary. Anyway, here’s the deal: What you’re looking for is a perfect, rosy medium-rare bumper to bumper, end to end – NOT striations of doneness, or a situation where the top 1/3 of your roast is gray, and sad, and awful.
The sheer number of even professional cooks who think that gray, sad and awful is just the way it is is astounding to me. A quick google image search will confirm this.
Don’t believe me? I present to you Exhibit A, this travesty:
It made me shudder to even post it – the top third of the roast completely ruined shoeleather, the middle third medium well, and maybe a bit of medium at the bottom… and all those juices running out – Oh! The horror! The horror…

Anyway, moving on… What you’re going for is this:


And here’s how to get there:
Rule #1: Do NOT use the Reverse Sear Method
You may have read about reverse searing – where you slowly bring a piece of meat up to within a few degrees of it’s final temperature and then blast it with super-high heat to develop a nice browned crust. This method works great for smaller cuts of meat (think sous vide steaks) but when you do this with a larger cut of meat you’re inevitiably going to put too much heat into it too fast right at the end, and it will carry over to well done before it’s even begun to brown. The one exception here might be if you had a culinary torch, and you had the patience to go over your entire roast inch-by-inch, but seriously, who’s got time for that? Not me.
Rule # 2: DO tie your roast with twine to ensure even cooking
Tie your roast up with some cooking twine to ensure that it’s a uniform shape – this will help ensure even cooking.
Rule # 3: DO NOT take your roast out of the fridge early in an attempt to bring it up to room temperature
Again, this works fine with smaller cuts of meat, like steaks, but with a larger roast, even after a couple hours, the middle of the roast is still going to be stone cold. You’d have to leave it out for hours on end to get the whole thing up to room temperature, by which time you’d be starting to flirt with a serious food safety problem. Additionally, if the first 1/4 of the roast is room temperature, and the rest of it is ice cold, guess what you get? Bands of gray, overdone meat – again.
Rule # 4: DO sear your roast in a large sauté pan on the stove top
So, pull your roast out of the fridge, trim it well, rub it down with a little olive oil, sprinkle with kosher salt and fresh ground black pepper, and then drop it into a screaming hot sauté pan or large cast iron skillet (open a window). Rotate it around using a pair of tongs until it’s well browned on all sides.
Rule # 5: Do NOT use a roasting pan
You want your roast to cook evenly all around – using a roasting pan is not conducive to this end, because it doesn’t allow the hot air in the oven to circulate all around the roast. Using a roasting pan creates a situation where the top part of the roast will be overdone, and the bottom part of the roast will be underdone.
Rule # 6: DO use a wire rack set on top of a baking sheet
Using a wire rack set on top of a baking sheet allows the roast to cook evenly. Line the baking sheet with aluminum foil for easier clean up.
The key is this: The whole roast needs to be roughly the same temperature throughout when it goes into the oven. A roast that’s the same temperature through and through (regardless of what that temperature is) when it goes into the oven will be the same temperature through and through when it comes out – so guess what you get? Rosy medium rare through and through. Bingo.
So skip the whole countertop thing and go straight from fridge, to searing, to oven.
Rule # 7: DO go low-and-slow
Cooking your roast for a longer period of time at a lower temperature ensures, once again, that the whole roast comes up to temperature evenly. It also reduces the amount of carryover cooking at the end, so there’s less risk of putting too much heat into the roast too quickly. I reccomend cooking your roast at about 250°F which will take about 2 hours for a roast in the 5lb range.
BUT – always cook with TEMPERATURE not TIME – which brings me to my next point:
Rule #8: Cook with TEMPERATURE not TIME
You’ll need a reasonably reliable probe thermometer (I use this one, which is like $20 on Amazon). Insert the probe thermometer into the deepest, coldest part of the roast (you may need to try several stabs to find that magic place). Perfect medium rare is around 130°F, but even going low and slow will still result in some carry over with a large roast, so pull it around 125° for a 5lb roast and about 123° for a 7lb roast (the larger the roast, the more it will carry over).
Rule #9: DO let your meat rest once it comes out of the oven
It’s super important to let your roast rest, lightly tented with foil for a bare minimum of 30 minutes, although an hour is better. Don’t worry, your roast won’t be cold – it will retain a lot of heat for a long time. Resting your roast allows the protiens which have been wound up super tight during the cooking process to relax, and thus allows the juices to redistribute throughout the roast so they’re in the roast, not on the cutting board.
Want to get really sciency about it? Leave the thermometer in the roast while it rests. Let it continue to carry over. When the temperature stalls, and then drops a degree or two, your roast is ready to carve.
Discover more from The Intrepid Gourmet
Subscribe to get the latest posts sent to your email.
