

Stainless steel: The cookware that strikes fear into the hearts of even the most experienced cooks, largely because it’s known as the cookware that everything sticks to. This post is about why that happens, how to avoid it, and why you should actually cook with stainless steel most of the time.
Post Last Updated 11/30/2024
Note: The technique described in this post only applies to browning and searing – it does NOT apply to, say, sautéing vegetables or garlic or making a pan sauce for pasta; in those cases, add your oil along with the other ingredients and bring everything up to temperature slowly over medium-low heat.
The Short Version
Rule # 1: Hot pan, cold oil, don’t flip too soon… nothing will ever stick.
Rule #2: You must know how hot your cooking surface is. I would highly recommend getting an infrared thermometer – they’re inexpensive, and will help ensure that your pan is hot enough. Also invaluable for such tasks as determining how hot your grill grate is, how hot your cast iron skillet is (think searing steaks), etc – I literally use it almost every time I cook
Rule#3: You must use a tri-ply (3 layer) pan. All-Clad is the gold standard for stainless steel cookware, and they do make lovely products. Personally, I’ve found that Tramontina also makes an excellent product, and is generally available at a lower price. Full transparency – I’ve got one of each!
The Full Story
I’ve been there. We’ve all been there: You put some oil into a stainless steel pan, bring it up to temp, lay your chicken skin-side down into the skillet. You hear the satisfying sizzle, see the bubbling fat and visions of perfectly crispy chicken dance in your head… until you realize it’s stuck to the pan. Give it a minute, you think to yourself, it will release when it’s ready. At least that’s what I’ve been told.
And so you wait.
And you wait some more.
Five minutes. Ten minutes.
You smell your chicken start to burn. Still stuck to the pan, you violently attack your chicken with a metal spatula in a vain attempt to scrape it off before it’s too late, but it’s really on there. You finally manage to pry it loose from the stainless steel skillet, leaving half the chicken still stuck to the bottom of the pan, and a horrible mess to contend with to boot.
To hell with it, you think to yourself, I’m just going back to using my good old non-stick pan forever. And into the forgotten recesses of the cabinet goes your stainless steel pan.
Here’s why that happens:
Stainless steel, at the microscopic level, is actually a very porous material. It may look smooth, but it isn’t. In fact, it’s a very wavy, rough surface, filled with troughs and peaks. And as stainless steel heats, those waves begin to ebb and flow, each one becoming a steel jaw waiting to clamp onto whatever is in that pan with a wicked death grip that will never let go.
That being said, stainless steel is unquestionably the preferred cookware for professional chefs – it heats more evenly that anything non-stick, retains heat better, is oven-safe to a higher temperature, browns protein more deeply and more evenly that non-stick ever could, and leaves you with beautiful fond which is the base for making a glorious pan sauce. Using stainless steel cookware is one of those things that separates professional chefs from home cooks and part of the reason home cooking doesn’t taste like restaurant food.
Professional chefs don’t have the jaws-of-death problem with stainless steel, and it’s not because they’re practicing some kind of dark magic where they sold their soul to the devil to defy the laws of physics. They just use it properly. And so can you.
Here’s how:
First, you must charge (preheat) your stainless steel pan with nothing in it. As the pan heats, the porous waves in your pan begin to ripple. It is this rippling that causes the jaws-of-death, so you don’t want anything in your pan at this time. However, as the heat increases, the speed of the rippling also increases. At a certain point, that rippling will become so rapid that those microscopic teeth, rather than clamping down on whatever is in the pan, will in fact begin to bounce whatever is in the pan away from the surface, making it both very hot AND very non-stick.
Consider the following:
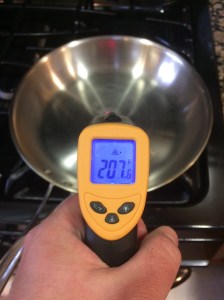
At just above 200°F, that stainless steel surface is more non-stick than any teflon-coated non-stick pan could ever wish to be. Thanks to physics (a phenomenon known as the Leidenfrost Effect, to be exact), not only is your pan ripping hot and ready to sear, but nothing is going to stick to it.
If you’re going to make the leap to cooking with stainless steel (which I highly recommend you do), I suggest charging (preheating) your pan to somewhere around 200°F – this will ensure that even if the pan drops a few degrees because of what you put into it, the pan itself won’t drop below the necessary temperature to maintain the Leidenfrost Effect.
The Dark Magic in Summary:
- Take whatever protein you’re going to cook out of the fridge and let rest on the counter for 10-15 minutes so that its surface temperature is closer to room temperature. You don’t want the temperature of your pan to drop too much when the items are added to the pan.
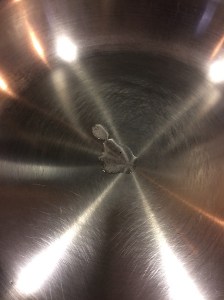
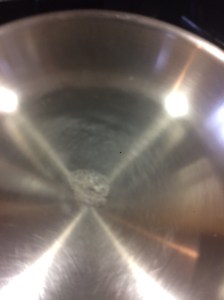
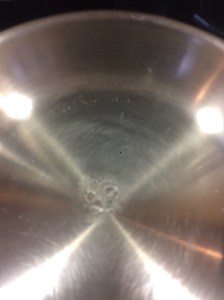
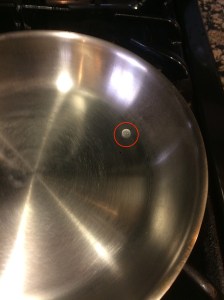
- Preheat your pan to somewhere around 200°F. Use an infrared thermometer or the water droplet test to verify. If using the water droplet test, once the desired result is achieved, which will happen just above 200°F, the droplet should ball up like mercury.
- Add a clean, high smoke-point fat to the pan at this time. Vegetable oil, ghee (clarified butter), avocado oil or canola oil are all good choices. Regular butter, bacon fat, and olive oil will just burn on contact. Keep in mind that as soon as that fat hits the pan, the surface temperature is going to jump WAY up – somewhere in the 400°F – 500°F range.
- Once the hot fat is added and is distributed evenly over the surface of the pan, add the protein to the pan. Do not crowd the pan lest the temperature of the pan drop too much. Once it’s in there, lower the heat a bit and allow protein to sear, undisturbed. Also, if you move it too soon, it might stick to the pan. So remember this: Once you’ve got your protein in the pan… No touching!

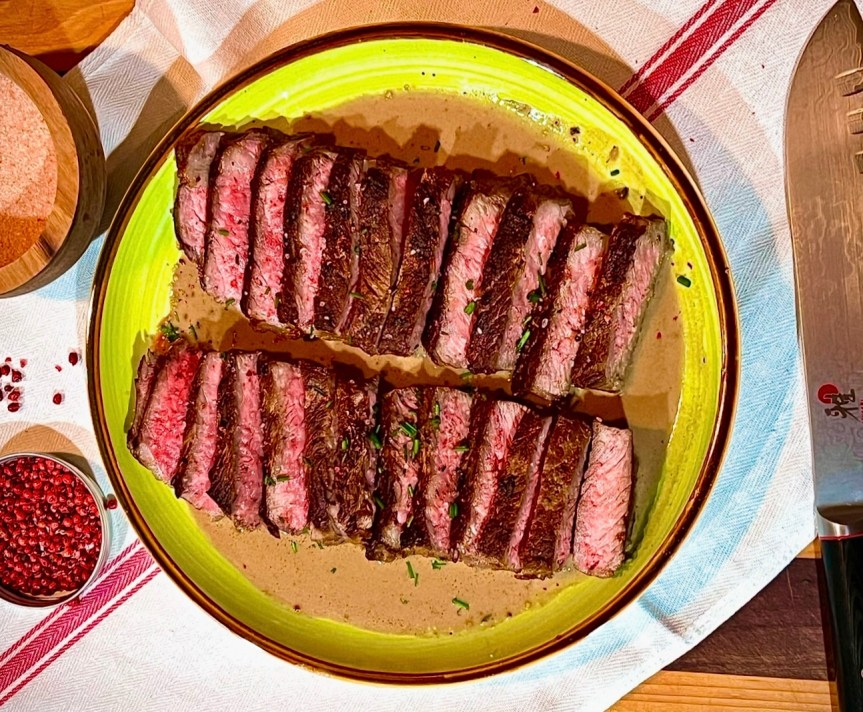
For at least 7-8 minutes for chicken with skin on, 3-5 minutes for steak, pork, or skinless chicken. Brown means brown. That’s where the flavor is.
Good things come to those who wait – like this perfectly browned, perfectly cooked steak.
Discover more from The Intrepid Gourmet
Subscribe to get the latest posts sent to your email.

Very good article! We will be linking to this great content on our website.
Keep up the great writing.
LikeLiked by 1 person
Does the high heat not damage the pan?
LikeLike
No, high heat won’t damage stainless steel or cast iron. Some non-stick or teflon pans probably can’t handle that kind of heat, however.
LikeLike
Thank you for writing such an informative and humorous post, I found this really helpful!
LikeLike
Glad you found it helpful (and funny!). Happy cooking!
LikeLike
Me too, nice to find someone who can talk the talk based on experience. Thank you
LikeLike
What an informative article! I’d like to switch to stainless steel for health reasons but don’t want to have to use a lot more fat. I currently try to stick to 1-2 tsp for a 12″ skillet. Does this sound possible in stainless or would I need more fat even if I followed your instructions on pre-heating?
LikeLike
Hey Jess!
The amount of fat you need will depend on what you’re cooking. Switching to stainless steel or cast iron is a great way to cook if you don’t want to use teflon coated or other non-stick coated pans. Totally up to you, but I might also consider not just the AMOUNT of fat you’re using, but also the TYPE – fats like Avocado Oil or Grapeseed oil are clean, high-smoke-point, and obviously have less calories than something like, say, butter or duck fat 🙂
LikeLike
Great read and great material, now looking forward to switching to stainless pans for most of my cooking after lifelong Teflon pan user
LikeLiked by 1 person
Shouldn’t that be 200 Centigrade and not Fahrenheit? Also, little trick I made for C to F conversion is double C (200×2=400) then subtract all but last digit (400-40=360) and finally add 32 (360+32=392) which is easier than trying to do C×9/5+32 in your head.
LikeLike
Hey Ken! Thanks for the comment! Really helpful conversion trick between C and F too – you’re right, multiplying/dividing by 9/5 is a pain. To answer your question, no – you’re looking at around 200F; essentially, the Liedenfrost Effect referenced here occurs at the boiling point of water (so, 212F or 100C). Always appreciate the second set of eyes though – I’ve definitely screwed up before and appreciate when my readers call me out. Hope you’re enjoying the blog!
LikeLike
hi seeing as you said it’s 200F wouldn’t that indicate that it would be okay to use olive oil as that’s meant to have a smoke point of 390F to 470F
LikeLike
Hey Ross!
Depends on the olive oil and how pure it is, which is a whole other conversation (maybe I should do a post on cooking oils/fats!) Main thing to keep in mind here is that if you’ve charged your pan properly, it’s retained a lot of heat – and as soon as your oil hits the pan, that oil is going to absorb a lot of that retained heat… so your surface temp will go from like 175F in a dry pan to like 375°F – 400°F in a dang hurry. But to answer your question, yes – anything with a smoke point over 375°F should be fine. Happy Cooking, and Happy New Year!
LikeLike