Nothing says comfort food like Spaghetti & Meatballs. In this recipe, you’ll prepare Classic Marinara Sauce as well as scrumptious, tender meatballs that will stick to your ribs, and possibly put you into a food coma on a cold winter’s night.
Time: 60 minutes Level: Easy Cost: About $4-6 per plate Serves: 4-6
Ingredients:
For the Meatballs:
3/4 lb ground beef (either 80/20 or 70/30, but too lean and your meatballs will dry out and fall apart)
1 lb ground pork
4oz bacon, finely diced
5-6 cloves garlic, minced
2 eggs
1 cup grated Parmesan or Romano cheese (fresh is best!)
1-2 TBSP freshly chopped Italian parsley
2 cups classic bread crumbs (or 1 cup Panko, if you prefer)
salt and pepper
1 TBSP powdered oregano (I like a lot of oregano, adjust accordingly)
Add ingredients 11-13 in a medium bowl and allow to soak for 10 minutes.
While soaking, combine first 10 ingredients in a large mixing bowl.
Remove bread from milk/water and add to meat mixture.
Mix together well using your hands. Add water or milk, a few splashes at a time, until the mixture becomes sticky but not overly wet. You want it just moist enough that it sticks together and that’s it. Remember, once you add the water, you can’t take it out! Don’t overwork the meat.
Once the mixture is the desired consistency, begin making your meatballs by rolling a portion of the mixture into balls between the palms of your hands. I prefer my meatballs to be about 2.5″ in diameter, but form them to whatever size you like.
Pat them dry-ish, and transfer them to a wire rack set on a rimmed baking sheet lined with aluminum foil. Transfer them to 450°F oven and bake until brown, 10 – 15 minutes. If they don’t brown enough, you can turn the broiler on for a couple minutes. Once browned, turn the oven off and allow meatballs to finish in residual heat.
Once the marinara sauce has reduced to desired consistency, remove the meatballs from the oven and place them in the sauté pan with the marinara sauce. Using tongs, gently rotate them in the sauce to coat and simmer on low for 5-10 minutes, or until meatballs are cooked through (internal temp should be 165°F). Serve over spaghetti.
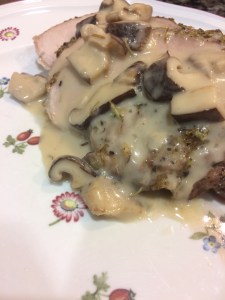
This method for roasting a pork loin is the best I’ve found so far. It yields a juicy, tender roast accented by savory garlic and herbs. Served with Shiitake Mushroom gravy and mashed potatoes it makes the perfect autumn dinner for those first few crisp, cool nights. Although it takes a couple of hours to prepare from start to finish, most of that time is just waiting for the pork to roast in the oven while you enjoy its savory scent. Save this recipe for a weeknight when you’ve got a little extra time or, even better, a weekend evening at home with a football game to watch in the background.
Time: 120 minutes
Level: Easy/Intermediate
Cost: About $4-6 per plate
Serves: 6-8
2 TSP each, dried: oregano, basil, thyme and rosemary
1 14oz can beef broth
2 140z can chicken broth
For the Shiitake Mushroom Gravy
Pan drippings and broth from pork loin (above)
1/2 cup all purpose flour
1/2 cup dry Sherry
2 tablespoons butter
2 cloves garlic, finely minced
1 small shallot, finely minced
12 ounces fresh shiitake mushrooms, stemmed, sliced (dried ones work too, just be sure to reconstitute them ahead of time – if using dried, follow the instructions on the package for how to do this)
(about) 1/3 cup whipping cream
Instructions
For the Pork:
Preheat oven to 275F
Take whatever pan you plan to make the gravy in (I prefer a large sauté pan) and add all three cans of broth. Place a cooling rack (or spare grill grate) on top of the pan.
Crush garlic cloves and herbs together using a mortar and pestle or in a bowl with a wooden spoon. Add butter and continue to crush/mix until formed into a relatively smooth paste.
Using cooking twine, tie the pork loin up in several places, getting it as cylindrical as possible to ensure even cooking. Slather pork loin on all sides with garlic-herb-butter mixture and place on top of the cooling rack which is on top of the sauté pan. Pop the whole assembly into the oven on the center rack and roast for 2-2.5 hours, or until the internal temperature of the pork loin registers 155F. Use an instant-read thermometer or probe thermometer to ensure correct temperature (you DO have at least one of these tools in your kitchen, right? If you don’t, order one now!)
Sit down with a beer and watch a football game.
When the internal temperature of the pork reaches 155F, remove the roasting assembly from the oven (careful, it will be HOT). Place the sauté pan on the stove top. Transfer the pork loin to a baking sheet. Change oven setting from BAKE to BROIL – HIGH and pop the pork loin on the baking sheet under the broiler for 3-5 minutes to brown the herbs. Keep an eye on it; you want the herbs to brown not burn. Once the herbs are browned, remove the pork loin from under the broiler, transfer to a carving board and allow to rest under loosely tented aluminum foil while you make the gravy. Don’t forget to turn the oven off!
For the Gravy
Mix flour and sherry together to form a smooth paste. Try to eliminate any large clumps of flour – the smoother the better!
In a separate frying pan (not the one that was in the oven), melt butter over medium-high heat until foamy and add shallot and mushrooms. Sauté until most of the butter is absorbed into the mushrooms and shallots are mostly translucent, 3-4 minutes. Add garlic and sauté until fragrant, 1-2 more minutes. Add mixture into the pan with the drippings and broth. Stir in flour-sherry mixture and bring to a boil, stirring often. Boil until thickened into gravy, about 10 minutes. Add cream, and allow gravy to return to a simmer. Continue to stir frequently until gravy reduces to desired consistency.
Slice pork loin into 1/4 inch thick medallions. Serve with gravy, mashed potatoes, and green beans.
Nothing says Autumn like hearty soups and stews… and here in SoCal, the temperature is often still in triple digits at the end of October (not very Fall-like). The solution? A spicy, hearty stew that’s tasty all the time: Cajun Jambalaya! The observant chef will notice that this dish bears a striking resemblance to paella, but somewhat simpler and with different ingredients.
Note: This dish also works well served over pasta. While not traditional, it’s quite delicious. Simply leave out the rice and cook the pasta of your choice according to package directions.
Time: 60 minutes
Level: Easy/Intermediate
Cost: About $4-6 per plate
Serves: 6-8
Ingredients
1 TBSP olive oil
2 TBSP butter, divided
1 TBSP Creole Seasoning (I just use Emeril Lagasse’s version, found here
2-3 chicken breasts, cubed
12oz – 1lb Andouille sausage, sliced into 1/4 inch thick rounds
1/2 lb medium shrimp, peeled and deveined (optional)
1 large Spanish (or yellow) onion, diced (see How to Chop an Onion to streamline this process)
1 large green bell pepper, diced
Roughly 1.5 – 2 cups celery, chopped
4-5 cloves garlic, finely minced
1 tsp Worcestershire sauce
1 tsp hot sauce (any kind will do depending on your flavor preference and heat tolerance)
1 14oz can petite diced tomatoes, drained
4 cups chicken stock
2 cups white rice
Instructions
Mix about 1/2 TBSP creole seasoning with chicken in one bowl, and in another bowl mix the remaining 1/2 TBSP with the shrimp. Mix well. Cover, and reserve in refrigerator.
Heat a medium saute pan or large skillet over medium high heat. Add 1 TBSP butter and 1 TBSP olive oil to the pan. When butter is melted, add sausage and brown nicely on all sides, 5-7 minutes. Remove with slotted spoon and reserve.
In the same pan, add chicken. Brown nicely all around. Remove with slotted spoon and reserve.
Reduce heat to medium and add remaining 1 TBSP butter. Once butter is melted, add onion bell pepper and celery. Sauté, stirring constantly, until very fragrant and onions are mostly translucent, about 3 minutes. Add garlic and sauté until fragrant, 1-2 more minutes. Add hot sauce, Worcestershire sauce and canned tomatoes. Cook all these ingredients together for about another 7 minutes stirring constantly to ensure nothing burns or gets stuck to the bottom of the pan.
Add rice and continue to stir into mixture for about 1 minute. Add the chicken stock and bring to a boil, scraping up any brown bits stuck to the bottom of the pan. Add chicken, sausage and any drippings back into the pan and give everything a good stir. This is the last time you’ll stir it.
Cover, and reduce heat to a low simmer, about 30 minutes until the rice has filled the pan and is no longer crunchy. (You can test the doneness of the rice by removing a grain or two with a spoon – if it’s crunchy but all the liquid has absorbed, add about 2 TBSP of water, give everything a good shake, recover the pan and wait another 5 minutes or so. Repeat this process until rice is cooked, if neccessary).
Once the rice is cooked and has reached the desired consistency, tuck the shrimp into the mixture and cook, covered for about 5 – 7 minutes, until they are a nice orange color and no longer translucent.
A one-pot wonder ready in less than an hour, this dish is a riff on the classic French dish Coq Au Vin. It is also a somewhat lighter dish, with a slightly tangy but still rich flavor profile, due in part to the use of Riesling, a white wine, rather than a French red. Classic Coq Au Vin takes several hours to prepare (or if you follow Julia Child’s Recipe it will take you all day… still worth trying though!), but this dish should take you considerably less time.
Time: Around 60 minutes Level: Advanced Cost: About $8 per plate Serves: 4- 6
4 chicken breasts, halved crosswise (or 8 chicken thighs, or 2 halved breasts and 4 thighs)
2 TBSP olive oil, divided
1-2 TBSP butter (or clarified butter, also known as ghee)
6 TBSP flour
Salt and Pepper
2 TSP paprika
3 shallots, diced (see how to chop an onion, this trick works for shallots too!)
3-4 garlic cloves, minced
8oz Cremini or Bella brown mushrooms, halved or quartered, depending on their size
Optional: 1/4 cup brandy, for flambé
2 cups dry or off-dry Riesling white wine (in a pinch, any dry white will do, and cheap is fine as long as you’d drink it).
1 cup decent, low sodium chicken broth
1 cup heavy cream
1 bunch chopped parsley
Instructions
Mix flour, salt and pepper, and paprika in a medium bowl and whisk together. You’ll be using this to dredge the chicken in a minute.
In a large, heavy bottomed skillet, heat 1 TBSP olive oil over medium-high heat. Add the bacon lardons and sauté until lightly browned but not crispy, and some of the fat has rendered.
Add shallots and sauté until mostly translucent. Add garlic and sauté until fragrant, 1-2 more minutes.
Don’t burn the shallots and the garlic! If you’re not sure if the pan is too hot, before dumping all the shallots into the pan you can test for temperature by tossing in one little piece of shallot. If it doesn’t react much, it’s probably a good temperature. However, if it crackles loudly, or if hot fat spatters everywhere, or if it jumps out of the pan, it’s too hot. Reduce the temperature before adding in the rest of the shallots and garlic.
Sauté shallots, garlic and lardons until shallots are somewhat translucent and garlic is very fragrant, about 3-5 minutes.
Remove lardons, shallots and garlic with a slotted spoon and reserve in a medium bowl, leaving the fat behind in the pan.
Dredge chicken pieces in flour mixture. Shake off the excess and place each piece into the hot pan with the bacon fat. Brown chicken on all sides, remove and reserve.
You may need to work in batches; that’s okay – overcrowding the pan will reduce the overall temperature of the pan and make it harder to brown the chicken. You may need to add about 1 TBSP of fat – either butter or olive oil – between batches; that’s okay too. Also, note that the chicken doesn’t need to be cooked through at this point – it will finish cooking in the sauce at the end.
Once the chicken has been browned, removed from the pan and reserved, you should still have at least 1 TBSP of fat in the pan. If you don’t, add 1 TBSP of butter and melt over medium heat.
Add mushrooms and continue to sauté over medium-high heat until they have absorbed most of the fat and begin to caramelize just a bit.
You can use a match or grill lighter to do this. Simply add the liquor and then ignite your flame and hold it OVER the pan. The vapors will ignite generating an impressive flame. Don’t freak out! Simply remove the pan from the heat and shake vigorously back and forth until the flames subside. For safety reasons, I’d recommend keeping a lid nearby to extinguish any flames, should they become out of control, although this is unlikely to happen. If this step causes you any trouble and you don’t get flames, don’t worry… just cook everything down for a minute or two until the raw alcohol has evaporated.
Add the Riesling wine and chicken stock to deglaze the pan. Continue to stir with a wooden spoon and scrape up any brown bits stuck to the bottom of the pan (this stuff is called fond and it’s delicious). Bring to a boil and return chicken and any drippings to the pan.
Add reserved shallots, bacon and garlic back to the pan.
Partially cover, lower heat to a simmer, and allow to cook for about 45 minutes, keeping an eye on the liquid level of the pan – you don’t want it to reduce too much.
After about 45 minutes, the chicken will be cooked through and very tender, and the liquid will have reduced somewhat. Remove chicken (again) from the pan and stir in the heavy cream. Reduce by 25-30%, stirring often, until sauce is desired level of thickness. Return chicken to pan (again) and cook for 2 minutes more. Sprinkle with chopped parsley.
Serve over mashed potatoes, egg noodles, or with a loaf rustic french bread. Anything to soak up that sauce!
_________
*My original post omitted this step. It still will work great without it. However, this step adds a depth of flavor that is quite enjoyable. In either case, don’t worry about it too much!
This classic gaucho-style steak is a sure crowd-pleaser and is a unique way to serve grilled steak on a warm summer evening. Because it uses an inexpensive cut of meat, it’s also easy on the wallet.
1 bunch flat leaf Italian parsley, leafless part of stems removed
4-6 cloves fresh garlic, pressed or minced into a chunky paste
1 heaping tablespoon powdered dry oregano (I actually prefer the powdered version better for this recipe as it mixes into the sauce more easily)
1 tsp crushed red pepper flakes (or less, if you want to tone it down)
juice of 2 lemons
2-3 TBSP red wine vinegar
1 small shallot, minced
2-3 grinds each salt and freshly ground pepper
About 1/2 cup olive oil
For the Bread:
1 long french sourdough baguette, sliced into 1/4 inch thick pieces
2 garlic cloves, halved
Drizzle of olive oil
Freshly ground course salt (or in a pinch Kosher salt)
For the Steak:
1-2 London Broil steaks, depending number of people and their appetites.
Salt and pepper, to taste
Dash of cayenne pepper
Drizzle of olive oil
Directions
For the Chimichurri Sauce:
Combine all ingredients EXCEPT olive oil into a food processor or blender. Hit ‘pulse 5 or 6 times to give everything a few good chops. Add about 1/3 of the olive oil and hit pulse 5 or 6 more times. Then, with the motor running, slowly drizzle the remaining olive oil into the mixture until desired consistency is achieved. Pour into a serving bowl, cover, and refrigerate for at least 30 minutes. Can be made up to two days in advance.
For the Bread:
Slice bread into 1/4 inch thick slices. Brush both sides with olive oil. Toast bread on both sides on grill until golden brown, or alternatively, place on a baking sheet and broil on high for 1-2 minutes each side (if you choose the broiling method, watch it like a hawk – I’ve incinerated my fair share of crostini’s this way). While bread is still warm, salt with freshly ground coarse sea salt or Kosher salt and rub both sides of crostinis generously with cut side of garlic halves.
For the Steak:
Preheat grill to high heat on one side (1 to 2 burners lit). Pat steaks dry on both sides with paper towels. Again, on both sides, brush steaks lightly with olive oil and season generously with Kosher salt and freshly ground black pepper. Add a light dusting of cayenne pepper if desired. Grill steaks over direct, high heat, about 6 minutes per side for a 1 inch thick London Broil, or until internal temp reaches 115F- 120F.
Note:Trust me on the temperature thing here, this piece of meat is best served on the rare end, and its density picks up a lot of heat resulting in a surprising amount of carry-over cooking for such a small piece of meat. I’ve turned a lot of them into shoe leather because I took my eye off of them for a mere second. With this cut, over 125F = ruined.
Let rest for 10 minutes and slice thinly across the grain.
Final Assembly:
Place 1-2 strips of steak onto each crostini and top with chimichurri sauce (or allow guests to do this for themselves). Serve with Arugula Salad and a strong red wine, such as Malbec, Shiraz or Cabernet