
This classic gaucho-style steak is a sure crowd-pleaser and is a unique way to serve grilled steak on a warm summer evening. Because it uses an inexpensive cut of meat, it’s also easy on the wallet.
Time: 60 – 90 Minutes
Level: Easy
Cost: $6-8/plate
Serves: 4-6
Ingredients:
For the Chimichurri Sauce:
- 1 bunch flat leaf Italian parsley, leafless part of stems removed
- 4-6 cloves fresh garlic, pressed or minced into a chunky paste
- 1 heaping tablespoon powdered dry oregano (I actually prefer the powdered version better for this recipe as it mixes into the sauce more easily)
- 1 tsp crushed red pepper flakes (or less, if you want to tone it down)
- juice of 2 lemons
- 2-3 TBSP red wine vinegar
- 1 small shallot, minced
- 2-3 grinds each salt and freshly ground pepper
- About 1/2 cup olive oil
For the Bread:
- 1 long french sourdough baguette, sliced into 1/4 inch thick pieces
- 2 garlic cloves, halved
- Drizzle of olive oil
- Freshly ground course salt (or in a pinch Kosher salt)
For the Steak:
- 1-2 London Broil steaks, depending number of people and their appetites.
- Salt and pepper, to taste
- Dash of cayenne pepper
- Drizzle of olive oil
Directions
For the Chimichurri Sauce:
Combine all ingredients EXCEPT olive oil into a food processor or blender. Hit ‘pulse 5 or 6 times to give everything a few good chops. Add about 1/3 of the olive oil and hit pulse 5 or 6 more times. Then, with the motor running, slowly drizzle the remaining olive oil into the mixture until desired consistency is achieved. Pour into a serving bowl, cover, and refrigerate for at least 30 minutes. Can be made up to two days in advance.
For the Bread:
Slice bread into 1/4 inch thick slices. Brush both sides with olive oil. Toast bread on both sides on grill until golden brown, or alternatively, place on a baking sheet and broil on high for 1-2 minutes each side (if you choose the broiling method, watch it like a hawk – I’ve incinerated my fair share of crostini’s this way). While bread is still warm, salt with freshly ground coarse sea salt or Kosher salt and rub both sides of crostinis generously with cut side of garlic halves.
For the Steak:
Preheat grill to high heat on one side (1 to 2 burners lit). Pat steaks dry on both sides with paper towels. Again, on both sides, brush steaks lightly with olive oil and season generously with Kosher salt and freshly ground black pepper. Add a light dusting of cayenne pepper if desired. Grill steaks over direct, high heat, about 6 minutes per side for a 1 inch thick London Broil, or until internal temp reaches 115F- 120F.
Note: Trust me on the temperature thing here, this piece of meat is best served on the rare end, and its density picks up a lot of heat resulting in a surprising amount of carry-over cooking for such a small piece of meat. I’ve turned a lot of them into shoe leather because I took my eye off of them for a mere second. With this cut, over 125F = ruined.
Let rest for 10 minutes and slice thinly across the grain.
Final Assembly:
Place 1-2 strips of steak onto each crostini and top with chimichurri sauce (or allow guests to do this for themselves). Serve with Arugula Salad and a strong red wine, such as Malbec, Shiraz or Cabernet

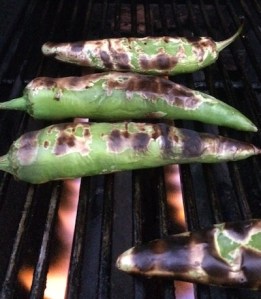 Roast your Hatch/Anaheim chiles over high heat on the grill, or under a broiler set on high – I do mine on the grill over Mesquite wood. Wait for the skins to blister and are mostly blackened (yes, don’t be afraid to burn them, that skin is coming off anyhow), then flip and repeat on the opposite sides. Once thoroughly roasted, place them in an airtight container (Tupperware, or simply a large bowl with a plate on top)- this will steam them in their own heat. After about 20 minutes, remove the chiles from the container and transfer to a cutting board. Peel the skins off and remove seeds and stems; if you blackened your chiles well, the skins should come off quite easily; if not, you can try peeling them under cold running water. Consider using rubber gloves for the peeling process if you’re using Hatch Chiles- hot pepper hands are the worst!