Thai Red Coconut Curry with Chicken

This delicious Thai dish is full of fresh, bright flavors and is the perfect balance between spicy, sweet and savory.  It also comes together in about 30 minutes, making it the perfect dish for a busy weeknight or some time when you don’t want takeout but aren’t wanting to spend a ton of time in the kitchen either.  Enjoy!

Ingredients

  1. 2-3 lbs chicken breasts, thinly sliced
  2. 2 TBSP red curry paste
  3. 1 small onion, diced
  4. 1 small shallot, diced
  5. 1 red bell pepper, sliced
  6. 1 orange bell pepper, sliced
  7. 1 zucchini, halved lengthwise and thinly sliced
  8. 4-5 cloves garlic, minced
  9. Zest of 2 limes
  10. 1 TBSP fresh ginger, grated (or 2 tsp dried powdered)
  11. 1 TBSP anchovy paste or 2 TBSP Thai Fish Sauce (because umami!)
  12. 2 TBSP sweet Thai chili sauce
  13. 2 TBSP soy sauce
  14. 1 cup cheap saké (or chicken stock, if you don’t want to use alcohol), for deglazing
  15. 2 cans full-fat coconut milk
  16. juice of 2-3 limes
  17. 1 TBSP brown sugar
  18. 1 cup fresh basil, leaves roughly torn
  19. Garnish:  Freshly squeezed limes and cilantro (optional)
  20. White rice, for serving

Mise-En-Place

  1. In a medium bowl, mix curry paste and cubed chicken and set aside
  2. Prepare ingredients 3-7, combine, and set aside in a medium bowl (this is your base)
  3. Prepare ingredients 8-10, combine, and set aside in a small bowl (these are your aromatics)
  4. Prepare ingredients 11-13, combine, and set aside in a small bowl (this is your umami bomb)
  5. Measure out saké or chicken stock
  6. Open cans of coconut milk
  7. Measure out brown sugar and lime juice and mix together in a small bowl
  8. Prepare basil and set aside

Cook

  1. Add about 2-3TBSP coconut or olive oil to a large saucepan and heat over medium-high heat until shimmering but not smoking.  Add chicken with curry paste and sauté until chicken is ever so slightly browned (it doesn’t need to be cooked through) and fragrant.  Remove with a slotted spoon and reserve (it’s fine to put it back in the same bowl, you’re going to finish cooking it in the sauce later anyway).
  2. Lower heat to medium.  Add your base (ingredients 3-7) and sauté until onions are translucent and peppers have become quite soft, 3-5 minutes.
  3. Add your aromatics (ingredients 8-10), and continue to sauté until very fragrant, 1-2 minutes
  4. Add saké or chicken stock (flambé if you like), and bring to a boil, scraping up anything stuck to the bottom of the pan.  Once boiling, reduce to a simmer.
  5. Add umami bomb (ingredients 11-13) and stir well to incorporate
  6. Stir in coconut milk and brown sugar/lime-juice-mixture, and continue to stir until sauce is well incorporated.  Bring sauce to a boil and allow to reduce by approximately 1/3
  7. Add chicken (and any juices) back to the sauce and stir in.  Allow to simmer, 8-10 minutes, until chicken is cooked through.
  8. In the last 2 minutes of cooking, stir in the fresh basil and cook for 1 minute.  Off the heat, cover, and allow to sit for 5 minutes to give flavors a chance to marry.
  9. Serve over white rice and garnish with a few squeezes of fresh lime juice and fresh cilantro.

Bouillabaisse

This delicious seafood stew hails from the French port city of Marseilles and represents the best of Provençal cooking: A mirepoix of onions, carrots and celery is sautéed in butter and oil, savory aromatics are added to the base along with white wine, stock and saffron and then a variety of fresh fish is gently poached to perfection.  This is not a cheap dish per se, but given all that goes into it it’s not horrendously expensive either.  The total ingredients should cost less than $40 and the dish easily serves 4-6.

Time:  60 – 90 minutes
Level: Easy
Cost: $10/plate
Serves: 4-6

Ingredients

  1. 2 TBSP olive oil
  2. 2 TBSP butter
  3. 1 medium yellow onion, diced
  4. 4 celery stocks, diced
  5. 6-8 large(ish) carrots, peeled and chopped into 1 – 1.5 inch pieces
  6. Approximately 1lb yellow or red potatoes, cut into 1 inch cubes
  7. 2 oz canned anchovie filets, drained
  8. 4 cloves garlic, finely minced
  9. 3-4 Roma tomatoes, diced and seeds removed if necessary (some tomatoes are juicer than others)
  10. 1 14oz can chicken or seafood stock (I use chicken stock, this dish is seafoody enough for me already, but do what you want)
  11. 1 package unflavored powdered gelatin (optional, to be added to stock)
  12. 1.5 cups dry white wine (about half a bottle, cheap is fine as long as you would drink it)
  13. Juice of 2 lemons
  14. 3 orange peel strips, 3-4 inches long, orange parts only (use vegetable peeler)
  15. 3 bay leaves
  16. Several sprigs fresh thyme
  17. .02oz, about 1/2 a gram, saffron threads (Trader Joe’s sells just this amount for $5.99)
  18. 1/2 teaspoon cayenne pepper
  19. 1/2 teaspoon powdered oregano (optional)
  20. 2lbs firm fresh fish of at least two types (salmon, red snapper, talapia, cod and tuna are all good choices), cut into chunks
  21. 1lb uncooked shrimp, peeled and deveined.

Prep and Mis-En-Place

  1. Dice onion, celery and carrots and combine in a medium sized bowl (this is your mirepoix)
  2. Slice potatoes into cubes that are approximately 1 inch in diameter
  3. Dice (and de-seed, if necessary) Roma tomatoes and place in a medium bowl
  4.  Mince garlic, and then, using a mortar and pestle or bowl and spoon, smush (that’s the technical term) garlic and anchovie filets together to form a paste
  5. Locate white wine and and chicken stock
    • Pro Tip:  I also add one package of unflavored powdered gelatin to my stock at this time; it makes for a richer, thicker sauce – I’ll explain why in another post
    • Pro Tip:  Since you’re going to dump the stock and wine into the pan at the same time, when it comes time to cook, dump the stock first and then use the empty can to measure out the wine.  For now, just make sure you’ve got the wine withing arm’s reach.
  6. Locate lemons and halve
  7. Tie orange peel strips, bay leaves and fresh thyme together using cooking twine to make a sachet
    • Pro Tip:  If you don’t have fresh thyme, use dried and tie the items up in a coffee filter or piece of cheese cloth.  You want the flavor of these items in your stew, but you don’t want them in your stew.
  8. Locate saffron, cayenne and oregano
  9. Prep fish:  Chunk firm fish into cubes and pieces; peel and devein shrimp

Cook

In a large sauté pan, melt butter in olive oil over medium heat.  Add celery, onion and carrots and sauté, stirring occasionally, until carrots are relatively soft and just barely beginning to brown around the edges, 10 minutes.

Add garlic and anchovie paste and stir to combine.  Sauté until fragrant, 1-2 minutes.

Add tomatoes and continue to cook gently.  Reduce heat if things are beginning to brown too much.  Cook, stirring occasionally, until all ingredients are incorporated, approximately 5 more minutes.

Add stock, wine and lemon juice and stir.  Add sachet (the orange peel/bay leave/thyme thing), oregano (if using) and saffron to the pan and stir to incorporate.  Add potatoes.  Increase heat and bring to a boil, then lower heat to a simmer.  Continue to cook until potatoes are soft, 20 – 30 minutes and liquid has reduce by 1/3 – 1/2.

Once potatoes are soft, reduce heat to a bare simmer, add fish to the pan and cover.  Allow fish to cook for 5 minutes, then add the shrimp and cover again, cooking for five minutes more or until shrimp are no longer translucent.  Off the heat and allow to rest, covered, 5 minutes more.

Serve with crusty french bread and a nice wine.


Chicken Chili II (Updated Version)

Recipes change over time.  As we spend more time in the kitchen and become better cooks, we learn new things; as we learn new things, we incorporate them into the dishes we already know how to make.  That’s ultimately how a dish becomes “ours” – when we’ve come to know it so well through years of making it that is truly our own.  In my mind, though, even when a dish has become “ours” it has never reached perfection – and even after nearly 20 years, I’m still learning new things.
This has the same ingredient list (with the addition of 3 TBSP of flour, a couple of other spices, and some celery) as my original recipe, but the ingredients are treated differently and cooked differently to maximize depth of flavor.  The primary difference is that this method involves browning the chicken breasts first along with a spice mixture whereas in the original the chicken is not browned and the spices are dumped in just prior to adding the broth and reducing liquid.
This is how I’m making my chili these days:

The Prep time in this dish is a bit long since there’s a lot of chopping involved; use a sharp knife to make things a bit easier.  As always, give yourself a good head start on the prep.  If you have, say, 15 extra minutes, roast your chiles (only the Hatch/Anaheim ones) ahead of time.  It will bring out their sweet smokey spicy flavor.

Time: 60 – 90 Minutes
Level: Easy
Cost: $6-8/plate
Serves: 4-6

Ingredients:

  • 3 lbs boneless, skinless chicken breasts (about 6 breasts)
  • 3 TBSP flour
  • 3 TBSP cumin powder (you read that right, it’s not a typo, I mean Tablespoons)
  • 1 TBSP paprika
  • 2 tsp cayenne pepper
  • Salt and pepper
  • 2 TBSP vegetable or canola oil
  • 2 TBSP olive oil
  • 1 large Spanish or yellow onion
  • 4 jalepeño peppers, stems and seeds removed, minced
  • 1 large green bell pepper, diced
  • 1 cup celery, diced (about 3 stalks)
  • 5-6 cloves garlic, peeled and minced
  • 4 TBSP (about half a bunch, not including stems) fresh cilantro, finely chopped
  • 4 Hatch Chile Peppers (Anaheim Chile Peppers will also work), roasted and peeled (optional), diced.  Note:  Alternatively, pre-diced, canned green chilies work fine as well – you’ll need 3, 3.5oz cans 
  • 1-2 tsp hot sauce (or to taste, optional – I use Dave’s Insanity Sauce because I like it spicy!)
  • 1  can/box (32oz) of low-sodium chicken broth
  • 2 cans (14oz each) white beans (NOT cannellini!), drained.
  • Optional: For serving – tortilla strips, corn bread, sour cream, shredded Mexican Cheese

Optional Preparation Step (not required but it makes a big difference): 

chiles
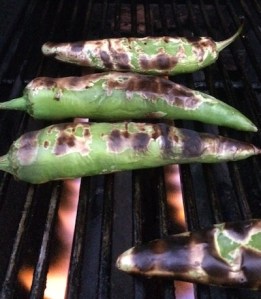
Roast your Hatch/Anaheim chiles over high heat on the grill, or under a broiler set on high – I do mine on the grill over Mesquite wood.  Wait for the skins to blister and are mostly blackened (yes, don’t be afraid to burn them, that skin is coming off anyhow), then flip and repeat on the opposite sides.  Once thoroughly roasted, place them in an airtight container (Tupperware, or simply a large bowl with a plate on top)- this will steam them in their own heat.  After about 20 minutes, remove the chiles from the container and transfer to a cutting board.  Peel the skins off and remove seeds and stems; if you blackened your chiles well, the skins should come off quite easily; if not, you can try peeling them under cold running water.  Consider using rubber gloves for the peeling process if you’re using Hatch Chiles- hot pepper hands are the worst!


Main Preparation Instructions

  1. Dice onion, jalepeños, green bell pepper and celery; combine in a medium bowl and set aside.
  2. Mince garlic and chop cilantro – combine and reserve in a small size bowl and set aside.
  3. Dice Hatch (or Anaheim) chiles and reserve in a separate bowl (or open cans thereof).
  4. Open two cans of white beans, drain.
  5. Get chicken broth ready.
  6. In a large tossing or mixing bowl, add chicken breasts (whole).  Drizzle with olive oil and toss to coat.  Add flour, cumin, paprika, cayenne, a pinch of kosher salt and a few generous grinds of fresh black pepper.  Toss to coat again.

Cooking Instructions

In a large stock-pot (or very large skillet or saucepan), add vegetable and olive oil and heat over medium heat.  When oil is hot and shimmering, but not quite smoking,  Carefully add 2 -3 of the coated chicken breasts and brown, 3-4 minutes on each side, without overcrowding the pan – you will probably need to work in batches.  Once all the chicken breasts are nicely browned, remove them from the pan and transfer to a carving board (note I did not say cutting board).  The chicken does not need to be cooked through at this point.  You will now have a beautiful, spicy fond on the bottom of your pan.

Lower the heat and add onion, celery, green bell pepper and jalapeño peppers to the pot (make sure the pan isn’t too hot when you do this).  Sauté over medium heat, stirring to prevent burning.

Note:  If you don’t have a lot of experience gauging how hot the pan is, you can test it by dropping ONE tiny piece of the diced onion into the pan.  If it sizzles loudly, crackles, or jumps out of the pot spattering hot oil everywhere, it’s too hot.  The onion should only react slightly.  If it turns out it’s too hot, remove the pan from the heat for a minute or two until it cools down a bit.

As the vegetables sweat out their moisture, scrape up the fond in the bottom of the pan and incorporate into the mixture.

Once vegetables have sweat out most of their moisture and most of the fond is incorporated, carefully add the cilantro and garlic to the mixture.  Continue to sauté until very fragrant, 2-3 minutes.


Add Hatch/Anaheim Chiles and hot sauce, if using.  Stir well to combine and lower the heat to low, stirring occasionally to allow flavors to marry, 5-7 minutes.

Meanwhile, while flavors are marrying, dice chicken breasts into cubes on cutting board (this may be a bit messy due to liquid having been released, so use a cutting board to catch the juices).

Add chicken to pot, along with any juices accumulated on the cutting board.

Add chicken broth and beans and stir well to combine – there should be enough liquid to cover everything in the pot once it’s been stirred together.  If there isn’t, add a bit of water until everything is covered by at least 1/4 inch of liquid.

Cover, and bring to a rolling boil.

Remove cover, reduce heat to medium-low, and allow to simmer down, 1 hr and 20 minutes, or until desired consistency is achieved.  Stir occasionally to prevent anything from sticking to the bottom of the pan.  If a lot of fat begins to accumulate on the top, you may wish to skim some of it off.  (Now is a good time to crack open a beer).

Just prior to serving, turn the heat off and stir continuously for 10 minutes, or until your arms fall off.  This will make it so that the chili is cool enough to eat; it also will break down the chicken into nice ‘strings’ giving it the consistency of pulled chicken.  It also aids in the final thickening to give it that nice chili texture.

Serve with Tortilla strips, sour cream, cheese and cornbread.


Traditional Coq Au Vin

This beautiful French classic is rustic country farmhouse cooking at its best.  While many of the recipes on this blog feature quick, 1 hour prep-and-cook dishes suitable for a weeknight when the temptation is just to grab fast food on the way home from work, the recipe in this post isn’t one of them.  To the contrary, this is a step-by-step (and there are a lot of steps) method for preparing a traditional French dish that has graced many a farmhouse table in France – and in America, thanks to Julia Child – for decades.  To that end, a few words are in order here:

First, don’t skim past this recipe.  I know, I know, the temptation is to just ‘swipe left’ and move on.  I do that when I’m researching recipes online too, but please, give this a try.

That being said, do wait until you have an afternoon off to try this – and you definitely SHOULD try this.  This recipe is a great way to experiment with all kinds of techniques – how to break down a whole chicken, sautéing, braising, deglazing, reducing, flambéing, thickening a sauce.

I’ve categorized this recipe as “Advanced” because of the sheer number of steps, but actually none of them are that hard – read the instructions over a few times to get a picture of the game plan and you’ll be fine.  However, there is quite a bit of prep and a lot of different pieces that have to come together in order for this dish to turn out right, so leave yourself a bit of time.  Cooking is supposed to be a joy, not a burden – so make this when you’ve got some time and are in the right frame of mine to spend a few hours in the kitchen.

Second, while the origins of this dish come from the days when some old rooster had outlived his usefulness and therefore in order to be made edible he would need to be braised for hours on end, this recipe only requires about 90 minutes of (inactive) braising time in a 350°F oven.  The reason for this is because the young chickens we buy in the grocery store these days are already so tender that if we were to braise them for 8 hours, they’d turn into mush.

Third, because this is rustic country cooking, there are no set rules on exactly what must (or must not) go in this dish.  Julia Child’s recipe doesn’t include carrots; Paul Bocuse’s recipe does include carrots; I like carrots, so I included them.  Julia Child calls for cooking the mushrooms, aromatics and onions separately, and then mixing them all into the dish at the end as a sort of garnish.  This makes sense if you’re going to be braising your tough old rooster for 8 hours – the mushrooms and onions would never survive – but we’re not using an old rooster here so in this recipe I recommend just cooking all the stuff in the pot at the same time to achieve a better marrying of flavors.

And so on – the point here is that this post is as much of a method as it is a recipe.  Learn the method and you can make all kinds of amazing stews, using whatever you have laying around – and that, at its heart, is what rustic country cooking is all about.

Lastly, the good news here is that this dish is cheap.  If you are an efficient shopper, you can probably get everything you need here to feed 8 people (or four people twice, or yourself for a week) for about $15.00.

Let’s get cooking!

Time: 3.5 hours (90 minutes inactive)
Level: Advanced
Cost: About $2.00 per plate
Serves: 8

Ingredients

For the Stew:

  1. 2 whole chickens, roughly 3-4lbs each, broken down into 8 parts
    • This is not that hard to do – don’t get scared, go for it!  Watch this this video a couple times and you’ll be fine.
  2. Approximately 3/4 of a bottle of drinkable red wine
    • 2 buck chuck is fine – it just has to be something you’d drink.
  3. 2 -3 sprigs fresh thyme
    • If you don’t have fresh thyme, make a little pouch using a coffee filter and some cooking twine.  Tie bay leaves (ingredient #4) and 2 TBSP dried thyme up in the coffee filter – you want the flavor of these herbs in your sauce, but you don’t want them IN the sauce per se
  4. 2 bay leaves
  5. 1 small shallot, minced
  6. 12-16 oz Crimini or brown mushrooms, quartered
  7. 6 carrots, roughly julienned
  8. 3 cloves garlic, minced
  9. 4 0z bacon, sliced into lardons
  10. 2-3 TBSP olive oil
  11. 1 lb boiler or pearl onions
  12. 1 140z can low sodium chicken broth
  13. 1/3 cup brandy
  14. 4 TBSP butter, divided (one set of 3 TBSP plus 1 TBSP)
  15. 6 TBSP flour, divided (two sets of 3 TBSP each)
  16. 2 TSP paprika
  17. Salt and Pepper
  18. 1 TBSP tomato paste

For Serving:

  1. 1 package egg noodles, prepared according to package directions.
  2. Crusty, rustic loaf of French bread

Part 1:  Prep

  1. Break down chickens into 8 parts; marinate chicken parts in red wine along with two sprigs thyme and two bay leaves, refrigerated, for about 1 hour (probably about how much time it will take you to complete steps 2-5 here in the Prep section and steps 1-5 in the following Cook section).
  2. Prepare veggies: Mince shallot, quarter mushrooms, julienne carrots, mince garlic
  3. Slice bacon into lardons
  4. Pearl Onions: Remove root end and slice a small X into the cut end (the same end you just removed) – this will help keep them in one piece
  5. Locate and prep: Chicken stock; brandy; pearl onions, butter
  6. In a small bowl, mix 3 TBSP butter and 3 TBSP flour into a fine paste and set aside.

Part 2:  Cook

  1. Preheat oven to 350°
  2. In a 2 quart sauce pan, bring 1 quart water to a rolling boil. Add the onions and boil for two minutes. Remove with a slotted spoon and rinse in a colander under cold water. When they are cool enough to handle, peel them by squeezing the intact end – the soft onions should slide right out of their skins.  Set aside.
  3. Blanch your bacon lardons in the boiling water – you want to remove the smoky flavor from the bacon or it will overpower the gentle flavor of the chicken (I skip this step when making beef stew, which is heartier and less delicate).  So, add your bacon lardons to the boiling water and while you are peeling the onions, allow bacon to boil for 10 minutes. Remove with a slotted spoon, pat dry, and transfer to a large heavy bottomed sauté pan.
  4. Remove chicken from wine and pat dry with paper towels.  Reserve wine and herbs – do not discard.   In a large tossing bowl, season chicken with salt, pepper, paprika, 3 TBSP flour; toss to coat and set aside.
  5. Sauté bacon in sauté pan; once fairly browned and most fat has rendered, remove with a slotted spoon and transfer to a large, oven-safe Dutch oven, leaving bacon fat in sauté pan.  You should have about 1/8 inch deep fat in the pan; if not, add vegetable oil or clarified butter to get fat to 1/8 inch depth.
  6. In the same sauté pan, brown chicken on all sides (start skin-side down) in bacon fat, working in batches, about 5 minutes per side, and transferring to Dutch oven once browned.
  7. Fish thyme and bay leaves out of reserved wine and set aside.
  8. Deglaze the pan: Lower heat and slowly add reserved wine to pan. Add 14oz can chicken stock as well.  Bring liquid to a boil and scrape up any remaining fond (the brown bits on the bottom of the pan).
  9. Stir in 1 TBSP tomato paste and stir to incorporate, 3 minutes
  10. Dump liquid from pan into Dutch oven with chicken and bacon. Wipe pan dry.
  11. Add 2-3 TBSP olive oil to the pan and heat over medium heat
  12. Add carrots and onions and sauté, stirring occasionally until browned around the edges, about 10 minutes, then lower the heat.
  13. Add shallots and sauté until translucent, 3-5 more minutes, being careful not to brown.
  14. Add garlic and sauté until fragrant, 2 more minutes, being careful not to brown.
  15. Transfer carrots, onions, shallots and garlic from pan to dutch oven with chicken, bacon and wine.
  16. Add mushrooms and 2 TBSP butter and sauté until browned and the mushrooms have absorbed most of the liquid in the pan (the pan should look fairly dry), 2 -3 minutes.
  17. Add 1/3 cup brandy and flambé
  18. Transfer mushrooms and any liquid in the pan to the Dutch oven with chicken, bacon and wine.
  19. Give everything a good shake to settle.
  20. Add reserved thyme and bay leaves.
  21. Mostly cover (IMPORTANT:  Leave lid slightly askew with about a 1/4-1/8 inch gap on one side to allow steam to escape, which will prevent liquid from boiling over in oven), and cook in 350°F oven for 90 minutes.
  22. Intermission:  While the chicken braises, treat yourself to a glass of wine (possibly that last 1/4 bottle?) or a beer, and possibly some nuts or a nice hunk of brie – if you made it this far, you’ve earned it!
  23. After 90 minutes, carefully remove from oven. Remove lid and fish out thyme and bay leaves; discard.
  24. Using the lid as a strainer (so, slightly askew with about a ¼ inch gap), pour liquid in pan through a wire mesh into a saucepan. Return any little pieces caught in the strainer to the Dutch oven. Leave covered at room temperature.
  25. Bring braising liquid in the saucepan to a boil; reduce to a simmer, skim off any fat that accumulates at the top (alternatively, use a fat separator in step #24).
  26. Stir in butter/flour mixture (from step 6 in the prep section, remember that?) to thicken, 10 minutes. Taste for seasoning and make sure raw flour taste is gone.
  27. Add thickened sauce back to Dutch oven. Allow to sit at a bare simmer while preparing noodles and bread

To Finish:

Serve stew over egg noodles with a generous ladle full of sauce and bread on the side.  Serve with a robust red wine.


Hearty Beef Stew with Red Wine

Perfect for a cold winter’s night, this hearty stew takes about 30 minutes to prep and then cooks all day (or part of the day, depending on your method).  The addition of red wine makes it quite similar to beef bourginon, but this version also includes potatoes.  It can be made in the slow cooker or in the oven.

Time: 30 minutes (active prep), 4-8 hours (in the slow cooker), 4 hours in the oven.
Level: Easy
Cost: About $4 per plate
Serves: 4- 6

Ingredients

  1. 3 lbs chuck roast (to be cubed after browning it; more on that later)
  2. 1-2 TBSP olive oil or clarified butter
  3. 4-60z bacon, sliced into lardons
  4. Salt and Pepper to taste
  5. 2 lbs white potatoes, cubed
  6. 1 yellow onion, diced
  7. 4-5 celery stocks, chopped into 1.5 inch pieces
  8. 2 lbs carrots, peeled and chopped into 1.5 inch pieces
  9. 4-5 garlic cloves, minced
  10. 8 oz Crimini or Baby Bella mushrooms, halved or quartered depending on their size
  11. 1/4 brandy (optional, for flambé)
  12. 1 cup sturdy red wine (such as Cabernet, Shiraz, or Zinfandel)
  13. 1/2 cup concentrated beef stock
  14. 3 TBSP all purpose flour
  15. 2 TBSP Worcestershire sauce
  16. 1 TBSP Soy Sauce
  17. 1-2 tsp cayenne pepper, depending on how much zing you want to add, optional

Instructions

Note:  If going the slow cooker route, every time the instructions say “Remove and reserve” you can just dump whatever it is into the slow cooker.

Preheat oven to 275°F (or if using slow cooker, coat the bottom of the slow cooker with cooking spray).

Begin by heating bacon and 1 TBSP olive oil or clarified butter in a large skillet or dutch oven over medium heat.  Sauté bacon until fairly crispy and most of the fat has rendered.  Remove with a slotted spoon and reserve.

Next, pat the roast dry with paper towels and season aggressively with salt and pepper on all sides.  Sear the roast on all sides until golden brown.  Remove roast and allow to rest on a cutting board while continuing to the next steps.

Add onion, celery and carrots to the pot and sauté until onions are translucent and vegetables begin to soften, 5- 7 minutes, scraping up any brown bits that may begin to loosen as the onions begin to sweat.  Add garlic and sauté until fragrant, 1-2 more minutes.  Remove all items from the pan with a slotted spoon and reserve.

Add mushrooms to the pan and sauté until lightly caramelized and they have absorbed most of the fat/liquid in the pan (mushrooms are like little flavor sponges).  Once the pan is beginning to look a bit dry on the bottom, add 1/4 cup brandy and flambé.

Add bacon, onions, celery, carrots and garlic back into the pan with the mushrooms.  Add soy sauce, Worcestershire sauce and cayenne pepper and stir to combine.

Add red wine and beef stock and bring to a boil, continuing to stir to scrape up anything that might still be on the bottom of the pan.  Stir in flour.  Reduce heat and allow liquid to simmer, reducing by about 1/3 to 1/2.

Meanwhile, while the liquid in the pan is reducing, cube the beef on the cutting board and add it directly back into the pot.  Add potatoes.

If finishing in the oven, give everything a good stir to combine and then cover and place in a 275 degree oven for 3-4 hours.

If finishing in a slow-cooker, dump the whole mess into the slow-cooker, give everything a good stir to combine, and cook on LOW for 8 hours or HIGH for four hours.  Personally, I have found the low, slow 8 hour cook in the slow cooker to yield the best results.