Seared Lamb Loin with Garlic and Lemon

Lamb tends to be one of those things that people either love or hate.  For a long time, I hated it because the only way I’d ever had it prepared was slow braised in a crockpot, stew-style, and served with mint jelly.  While that may be some people’s cup of tea, it wasn’t mine.  Then I figured out that lamb could be prepared much like steak – served medium rare.  When served like this, it has a rich, complex flavor that makes an excellent alternative to beef.

Time: 60 Minutes
Level: Easy
Cost: $8-10/plate
Serves: 4-6

This particular recipe uses lamb loins although lamb chops would work just as well.  Lamb loins look like tiny T-bone steaks – which is essentially what they are, just from a lamb instead of a cow (i.e., tenderloin on one side and strip steak on the other).  As such, they are totally delicious.  Because they’re small, they don’t have a lot of meat on them.  My boys and I can easily polish off about four; my wife will eat two.  Even still, if you can find them on special it makes for a pretty economical meal.  Also, this recipe is SUPER easy.

Ingredients

  1. 12 – 16 Lamb Loins (serves 3-4 hungry folks)
  2. 3 TBSP Olive Oil
  3. 6-8 garlic cloves (finely minced or pressed)
  4. juice of one lemon
  5. kosher salt and freshly ground black pepper, to taste.


Method

Consider trimming a bit of fat off the outside of the lamb loins if they’re particularly fatty.  1/4 to 1/8 inch or so is probably good.  I probably should have done that for this recipe; I will next time.  In either case, no biggy – they came out great.

Place lamb loins in large tossing bowl and add olive oil.  Toss to coat.  Add garlic, lemon, salt and pepper.  (Note:  Normally I don’t like garlic presses, but in this case I’ll usually opt to press my garlic because it’s easier than mincing them into a paste, which is really what needs to happen).  Cover and refrigerate for as little as 20 minutes or as long as 12 hours.

If preparing in the kitchen, preheat the oven to 300F.  Line a baking sheet with oven-safe parchment paper for easier clean up.  Add 1 TBSP olive oil to a cast iron or copper skillet, and heat to very hot until oil is shimmering and smoking slightly.  Sear lamb loins in batches, 2-3 minutes per side or until nicely browned.  Don’t overcrowd the pan.  Transfer lamb loins to baking sheet and bake 15-20 minutes or until an instant read thermometer reads 130F for medium-rare.  Let rest for 10 minutes before serving.

If preparing on the grill, build a 2-zone charcoal fire or alternatively, on a gas grill,  light one or two burners only.  Shoot for 300F at grate level on the cool side (don’t rely on your grill’s thermometer, spend $5 on an oven thermometer at Home Depot and place it on your grill grate to ensure an accurate reading).  Add a couple of mesquite wood chunks, if you like (mesquite is perfect for this meal because of it’s strong flavor and the short smoking time involved).

Sear lamb loins on hot side of grill with the lid open for 3-5 minutes per side or until nicely browned.  Transfer to cool side and close the lid.  Grill for 15-20 minutes or until an instant read thermometer reads 130F for medium-rare.  Let rest for 10 minutes before serving.

Remember:  In order to achieve a piece of meat that is perfect medium-rare end to end and seared on the outside (see picture) the meat needs to be the same temperature throughout when the cooking process begins.  I recommend going straight from the fridge to the grill/pan without letting it come up to temp on the countertop.  For more information see The Secret to Perfect Beef Roasts and Steaks.

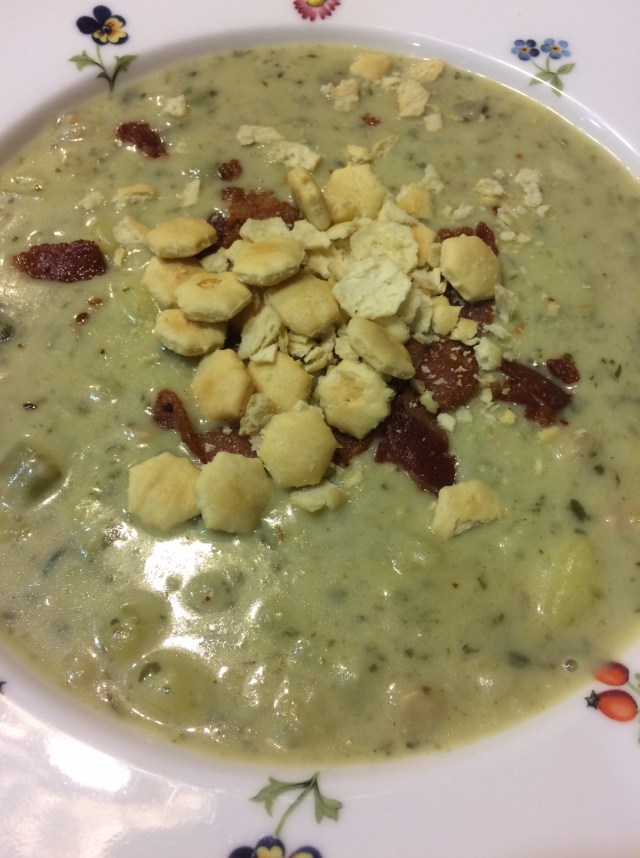
Serve with steamed asparagus or green beans and rice pilaf.

Pairs well with Malbec (Argentina), Shiraz (Australia) or Red Zinfandel (California)


BBQ Chicken Quarters with ‘Bama White Sauce

Served with an authentic but lesser-known Alabama White Sauce, this BBQ chicken is succulent and tender on the inside with crispy, bite through skin on the outside.  Daintily eat with knife and fork, or gnaw off the bone caveman style.  Your choice.

Time: 120 Minutes
Level: Intermediate
Cost: $2-3/plate (chicken only and sauce only)
Serves: 4-6


I think one of the reasons people don’t like to eat chicken skin (my wife being one of these people; she pulls it off no matter what) is the general frustration associated with it.  There’s nothing worse than biting into a nice piece of BBQ chicken and having all the skin pull off all at once, dangling unattractively out of your mouth and covering your chin.  You know what I’m talking about.  This leaves eaters one of two choices:  Remove the skin and forget about eating it, or eat it by itself.

There is, however, a third option – bite through skin.  You get just want you want, nothing more, nothing less; this is the Holy Grail of BBQ Chicken – so much so, in fact, that professional competition BBQ teams will often go to great lengths to achieve it, using time consuming techniques including, but not limited to, all kinds of crazy things, like removing it, cooking it separately, and putting it back on.  Like I said, crazy.  Also unnecessary if you know the one trick in this post.

The secret to achieving bite-through skin is simply doing a reverse sear and then, during the searing process, making sure the skin has good contact with the cooking surface.  Chicken skin has a lot of fat in it, and underneath it, which is why if you sear first (especially on a BBQ grill) it’s all just going to cause flare-ups and catch fire before anything else has even had the chance to warm up.  What you’ve got to do is render 99% of the fat out of the meat before searing it, and at the last minute expose the chicken skin side down to a hot surface.  This can be done on the grill, or in the kitchen; both techniques are included here.

Ingredients

For the Chicken

  • 6-8 chicken quarters, trimmed of excess fat and skin
  • 2 TBSP (Tablespoons) olive oil
  • Classic BBQ Rub, to taste (I usually use 3-4 TBSP, click for the recipe)

For the Sauce*

  • 3/4 cup mayonnaise
  • 1/3 cup apple cider vinegar
  • Juice of 1 Lemon
  • 1/4 cup apple juice
  • 1 TBSP granulated garlic
  • 2 TBSP prepared horseradish
  • 1 TBSP coarsely ground black pepper
  • 1/2 – 1 TBSP Dijon mustard (not that yellow crap)
  • 1/4 TSP (teaspoon) Kosher salt
  • Ground cayenne pepper, just a dusting

Special Equipment

  • Bricks or a heavy cast iron griddle or skillet, for pressing chicken
  • Grill (you can do this in the kitchen, see bottom of post)
  • Disposable aluminum drip pan
  • Oven thermometer
  • Decent instant-read thermometer

How To: On the Grill

If using charcoal, build a 2-zone fire, banking the coals all to one side.  If using gas, light one or two burners only.   Toss a few wood chunks (I prefer a mixture of apple and pecan, no need to soak them first) onto the coals or into a smoker box.   Underneath the grill grates, on the cool side of the grill, place a disposable baking tray filled 1/2 – 3/4 of an inch of water; remember, a lot of fat is going to render so we want something to catch it in and cool it off immediately.  I typically remove one of the grill grates during 2-zone cooking (which, for me, is most of the time) so that I can slide the meat from one side of the grill to the other (cool to hot) without actually having to pick it up and move it around too much.

Shoot for a temperature of 275F – 300F at grate level (invest in an oven thermometer to be sure you’ve got an accurate read; even if you have a thermometer built into your grill, chances are it’s off by as much as 50F).

While the grill is coming up to temp, pull your chicken out of the fridge and place in a large mixing bowl with olive oil.  Toss to coat (you need something for the rub to stick to).  Add the Classic BBQ Rub and toss again.  (Alternatively, rub the chicken with olive oil on both sides and then rub the rub onto it, on both sides – tossing is easier).

Place the chicken on the cool side of the grill, skin side up, and cover.  Depending on the temp of your grill and how much chicken you’ve got on there, it could take anywhere between 1-2 hours to hit an internal temp of 160F, so start checking after about an hour or so.  During this time, make the sauce – simply whisk all the ingredients together in a small bowl and refrigerate.

About halfway through the cooking time (when the chicken’s internal temp is about 140F, use an instant read thermometer to test this), pour off a bit of your White Sauce into another container and head out to the grill.  Baste the chicken generously with the sauce and shut the lid.

When the chicken is up to about 160F, most of the fat should be rendered out of it, flip it over, skin side down, place something heavy on top of it to ensure good contact with the grill grates (I use a large cast iron griddle, but you could also use bricks or a heavy skillet – whatever works) and leave it to cook 10 minutes more on the cool side of the grill.  By this time it’s basically safe to eat, so you’re not going to screw anything up – we’re just perfecting the skin.  After about 10 minutes, slide the chicken over to the hot side of the grill and sear for 5 – 10 minutes.  Remove, and place on a serving platter skin side up.  Baste again with sauce.

Serve remaining sauce (the stuff still in the fridge, not what you used to baste) as a dipping sauce, if you like.

How To:  In the Kitchen

If you don’t have access to a grill, you can still make this delicious recipe in the kitchen (I’ve done it this way too, you just miss out a bit on the smokey flavor).  Begin by preheating your oven to 300F.  Fill a disposable aluminum tray with 1 inch water.  Place a cooling rack on top of that.  Place the chicken, skin side up, on the cooling rack and bake until chicken’s internal temp is about 160F.  When it hits the 160F mark, flip it over and plonk something heavy on top and return it to the oven for about 10 minutes.  During this time, heat a cast iron skillet or copper pan to very hot, over high heat.  After the ten minutes skin-side down in the oven, transfer the chicken to the skillet and brown for about 2-3 minutes, skin side down, and set aside.  Work in batches if necessary; don’t overcrowd the chicken quarters in the skillet.

Usually I’ll opt to drink a dry, crisp IPA with this meal, but the other night I drank a fairly robust Cabernet, and that was pretty good too.

Good luck!


*I would be remiss not to credit Amazing Ribs for the sauce recipe. As the author, Meathead, points out, this is just one version of what is an Alabama favorite. I’ve only modified his recipe ever so slightly. To check out his version, click here.  His version is pretty damn good too.


New Mexico Style Chicken Chili Verde

I’ve been making this for 20 years – it was the first thing I ever learned to make.  I hope you enjoy it as much as my family, friends and I do.
I was inspired to figure out how to make this on a high school trip to New Mexico.  Being from New England, I was used to a lot of “beef-and-potatoes” – fairly bland stuff.  I’ll never forget getting off the plane in Albuquerque, NM at the age of 16 and heading straight to a little hole-in-the-wall joint in Gallup called Sadie’s.  It was my first exposure to (somewhat) spicy food and I never knew that food could taste like this.  I’ll always remember my friends being scared to even try it, but I couldn’t resist wolfing it down even though it made my eyes water and my nose run.  These days, I don’t find it that spicy – and it’s really not – only for a New England boy who never knew that food was supposed to taste like something.

The Prep time in this dish is a bit long since there’s a lot of chopping involved; use a sharp knife to make things a bit easier.  As always, give yourself a good head start on the prep.  If you have, say, 15 extra minutes, roast your chiles (only the Hatch/Anaheim ones) ahead of time.  It will bring out their sweet smokey spicy flavor.

Time: 60 – 90 Minutes
Level: Easy
Cost: $6-8/plate
Serves: 4-6

Ingredients:

  • 1 tbsp butter
  • 2 tbsp olive oil
  • 5-6 cloves garlic, peeled and minced
  • 1 large Spanish or yellow onion
  • 1 bunch fresh cilantro, finely chopped (reserve some for garnish, if you like)
  • 4 Hatch Chile Peppers (Anaheim Chile Peppers will also work), roasted and peeled (optional), diced.  Note:  Alternatively, pre-diced, canned green chilies work fine as well – you’ll need 3, 3.5oz cans 
  • 4 jalepeño peppers, stems and seeds removed, minced
  • 1 large green bell pepper, diced
  • 2 tsp hot sauce (or to taste, optional – I use Dave’s Insanity Sauce)
  • 3 lbs boneless, skinless chicken breasts, diced
  • 1  can/box (32oz) of low-sodium chicken broth
  • 2 cans (14oz each) white beans (NOT cannellini!), drained.
  • 3 tbsp cumin powder (you read that right, it’s not a typo, I mean Tablespoons)
  • Optional: For serving – tortilla strips, corn bread, sour cream, shredded Mexican Cheese


Optional Preparation Step (not required but it makes a big difference): 

chiles
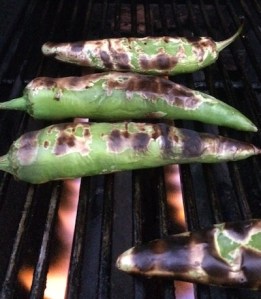
Roast your Hatch/Anaheim chiles over high heat on the grill, or under a broiler set on high – I do mine on the grill over Mesquite wood.  Wait for the skins to blister and are mostly blackened (yes, don’t be afraid to burn them, that skin is coming off anyhow), then flip and repeat on the opposite sides.  Once thoroughly roasted, place them in an airtight container (Tupperware, or simply a large bowl with a plate on top)- this will steam them in their own heat.  After about 20 minutes, remove the chiles from the container and transfer to a cutting board.  Peel the skins off and remove seeds and stems; if you blackened your chiles well, the skins should come off quite easily; if not, you can try peeling them under cold running water.  Consider using rubber gloves for the peeling process if you’re using Hatch Chiles- hot pepper hands are the worst!

Main Preparation Instructions

Dice onion; mince garlic; chop cilantro (this mixture is also known as a sofrito) – combine and reserve in a medium size bowl and set aside.  Dice Hatch (or Anaheim) chiles, jalapeños, bell pepper – combine and reserve in a separate bowl.  Dice chicken, set aside and reserve.  Open two cans of white beans, drain.  Locate cumin, set aside.

Cooking Instructions

In a large stock-pot (or very large skillet or saucepan), add butter and olive oil and melt over medium high heat.  When butter is just barely melted, reduce heat to medium and stir gently to coat the bottom of the pot.  Carefully add onion and cilantro and sauté until onions are mostly translucent, 3-4 minutes.  Add garlic and sauté until fragrant, 1-2 more minutes.

Note:  It is very important not to burn the garlic-onion-cilantro mixture (the sofrito).  If you don’t have a lot of experience gauging how hot the oil/butter mixture is, you can test it by dropping ONE tiny piece of the diced onion into the pan.  If it sizzles loudly, crackles, or jumps out of the pot spattering hot oil everywhere, it’s too hot.  The onion should only react slightly.  If it turns out it’s too hot, remove the pan from the heat for a minute or two until it cools down a bit.

Stir the sofrito continuously to ensure nothing gets stuck to the bottom of the pan and sauté until mixture begins to meld together, 3-5 minutes more.  (Did I say don’t let it burn?).

Add Hatch/Anaheim Chiles, jalapeños, and bell pepper and continue to saute until no longer stiff and crunchy, another 5-7 minutes.

Add hot sauce, if using.

Add chicken to pot and mix everything together well.  Continue stirring until chicken turns white all around.

Add cumin and mix in well.

Add chicken broth and beans – there should be enough liquid to cover everything in the pot once it’s been stirred together.  If there isn’t, add a bit of water until everything is covered by at least 1/4 inch of liquid.

Cover, and bring to a rolling boil.

Remove cover, reduce heat to medium-low, and allow to simmer down, 1 hr and 20 minutes, or until desired consistency is achieved.  (Now is a good time to crack open a beer).

Just prior to serving, turn the heat off and stir continuously for 10 minutes, or until your arms fall off.  This will make it so that the chili is cool enough to eat; it also will break down the chicken into nice ‘strings’ giving it the consistency of pulled chicken.  It also aids in the final thickening to give it that nice chili texture.

Note:  If the chicken isn’t breaking down to the desired texture, you can speed the process up using a potato masher.

Serve with Tortilla strips, sour cream, cheese and cornbread.