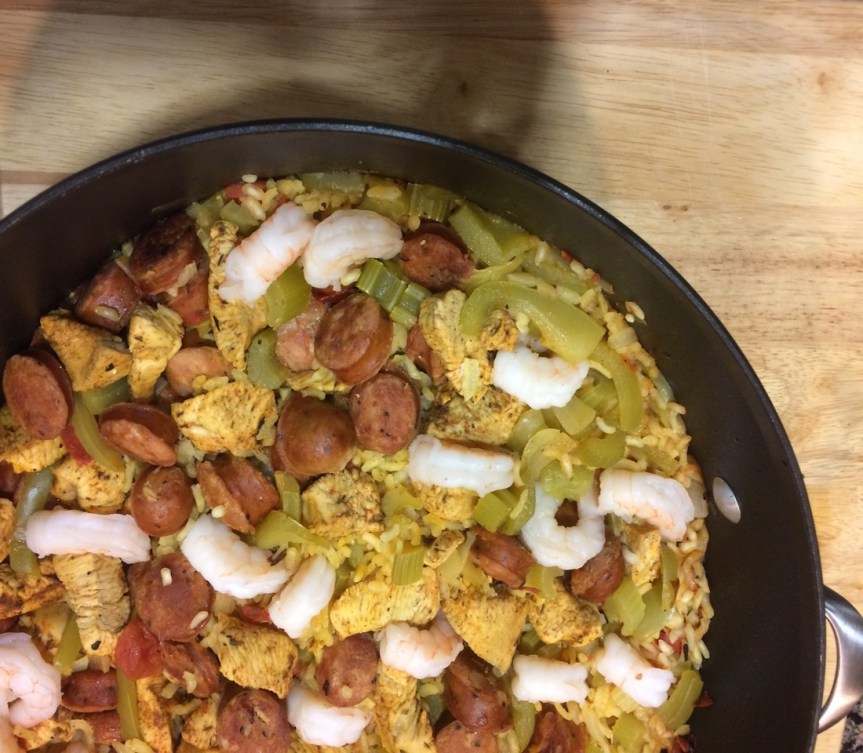
Cajun Jambalaya

Nothing says Autumn like hearty soups and stews… and here in SoCal, the temperature is often still in triple digits at the end of October (not very Fall-like).  The solution?  A spicy, hearty stew that’s tasty all the time: Cajun Jambalaya!  The observant chef will notice that this dish bears a striking resemblance to paella, but somewhat simpler and with different ingredients.

Note:  This dish also works well served over pasta.  While not traditional, it’s quite delicious.  Simply leave out the rice and cook the pasta of your choice according to package directions.

Time: 60 minutes
Level: Easy/Intermediate
Cost: About $4-6 per plate
Serves: 6-8

Ingredients

  1. 1 TBSP olive oil
  2. 2 TBSP butter, divided
  3. 1 TBSP Creole Seasoning (I just use Emeril Lagasse’s version, found here
  4. 2-3 chicken breasts, cubed
  5. 12oz – 1lb Andouille sausage, sliced into 1/4 inch thick rounds
  6. 1/2 lb medium shrimp, peeled and deveined (optional)
  7. 1 large Spanish (or yellow) onion, diced (see How to Chop an Onion to streamline this process)
  8. 1 large green bell pepper, diced
  9. Roughly 1.5 – 2 cups celery, chopped
  10. 4-5 cloves garlic, finely minced
  11. 1 tsp Worcestershire sauce
  12. 1 tsp hot sauce (any kind will do depending on your flavor preference and heat tolerance)
  13. 1 14oz can petite diced tomatoes, drained
  14. 4 cups chicken stock
  15. 2 cups white rice

Instructions

Mix about 1/2 TBSP creole seasoning with chicken in one bowl, and in another bowl mix the remaining 1/2 TBSP with the shrimp.  Mix well.  Cover, and reserve in refrigerator.

Heat a medium saute pan or large skillet over medium high heat.  Add 1 TBSP butter and 1 TBSP olive oil to the pan.  When butter is melted, add sausage and brown nicely on all sides, 5-7 minutes.  Remove with slotted spoon and reserve.

In the same pan, add chicken.  Brown nicely all around.  Remove with slotted spoon and reserve.

Reduce heat to medium and add remaining 1 TBSP butter.  Once butter is melted, add onion bell pepper and celery.  Sauté, stirring constantly, until very fragrant and onions are mostly translucent, about 3 minutes.  Add garlic and sauté until fragrant, 1-2 more minutes.   Add hot sauce, Worcestershire sauce and canned tomatoes.  Cook all these ingredients together for about another 7 minutes stirring constantly to ensure nothing burns or gets stuck to the bottom of the pan.

Add rice and continue to stir into mixture for about 1 minute.  Add the chicken stock and bring to a boil, scraping up any brown bits stuck to the bottom of the pan.  Add chicken, sausage and any drippings back into the pan and give everything a good stir.  This is the last time you’ll stir it.

Cover, and reduce heat to a low simmer, about 30 minutes until the rice has filled the pan and is no longer crunchy.  (You can test the doneness of the rice by removing a grain or two with a spoon – if it’s crunchy but all the liquid has absorbed, add about 2 TBSP of water, give everything a good shake, recover the pan and wait another 5 minutes or so.  Repeat this process until rice is cooked, if neccessary).

Once the rice is cooked and has reached the desired consistency, tuck the shrimp into the mixture and cook, covered for about 5 – 7 minutes, until they are a nice orange color and no longer translucent.

Serve in bowls with crusty bread.  Enjoy!


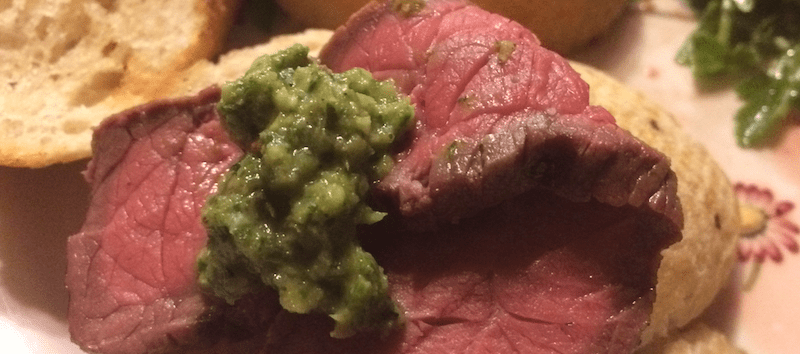
Argentine Steak with Chimichurri on Crostinis

This classic gaucho-style steak is a sure crowd-pleaser and is a unique way to serve grilled steak on a warm summer evening.  Because it uses an inexpensive cut of meat, it’s also easy on the wallet.

Time: 60 – 90 Minutes
Level: Easy
Cost: $6-8/plate
Serves: 4-6

Ingredients:

For the Chimichurri Sauce:

  • 1 bunch flat leaf Italian parsley, leafless part of stems removed
  • 4-6 cloves fresh garlic, pressed or minced into a chunky paste
  • 1 heaping tablespoon powdered dry oregano (I actually prefer the powdered version better for this recipe as it mixes into the sauce more easily)
  • 1 tsp crushed red pepper flakes (or less, if you want to tone it down)
  • juice of 2 lemons
  • 2-3 TBSP red wine vinegar
  • 1 small shallot, minced
  • 2-3 grinds each salt and freshly ground pepper
  • About 1/2 cup olive oil

For the Bread:

  • 1 long french sourdough baguette, sliced into 1/4 inch thick pieces
  • 2 garlic cloves, halved
  • Drizzle of olive oil
  • Freshly ground course salt (or in a pinch Kosher salt)

For the Steak:

  • 1-2 London Broil steaks, depending number of people and their appetites.
  • Salt and pepper, to taste
  • Dash of cayenne pepper
  • Drizzle of olive oil


Directions

For the Chimichurri Sauce:

Combine all ingredients EXCEPT olive oil into a food processor or blender.  Hit ‘pulse 5 or 6 times to give everything a few good chops.  Add about 1/3 of the olive oil and hit pulse 5 or 6 more times.  Then, with the motor running, slowly drizzle the remaining olive oil into the mixture until desired consistency is achieved.  Pour into a serving bowl, cover, and refrigerate for at least 30 minutes.  Can be made up to two days in advance.

For the Bread:

Slice bread into 1/4 inch thick slices.  Brush both sides with olive oil.  Toast bread on both sides on grill until golden brown, or alternatively, place on a baking sheet and broil on high for 1-2 minutes each side (if you choose the broiling method, watch it like a hawk – I’ve incinerated my fair share of crostini’s this way).  While bread is still warm, salt with freshly ground coarse sea salt or Kosher salt and rub both sides of crostinis generously with cut side of garlic halves.

For the Steak:

Preheat grill to high heat on one side (1 to 2 burners lit).  Pat steaks dry on both sides with paper towels. Again, on both sides, brush steaks lightly with olive oil and season generously with Kosher salt and freshly ground black pepper.  Add a light dusting of cayenne pepper if desired.  Grill steaks over direct, high heat, about 6 minutes per side for a 1 inch thick London Broil, or until internal temp reaches 115F- 120F.

Note: Trust me on the temperature thing here, this piece of meat is best served on the rare end, and its density picks up a lot of heat resulting in a surprising amount of carry-over cooking for such a small piece of meat.  I’ve turned a lot of them into shoe leather because I took my eye off of them for a mere second.  With this cut, over 125F = ruined. 

Let rest for 10 minutes and slice thinly across the grain.

Final Assembly:

Place 1-2 strips of steak onto each crostini and top with chimichurri sauce (or allow guests to do this for themselves).  Serve with Arugula Salad and a strong red wine, such as Malbec, Shiraz or Cabernet


Easy New England Clam Chowder

This version of a New England classic is as easy as it is delicious.  Perfect for a cold night, it is garnished with bacon bits and oyster crackers and is best served with a rustic, crusty bread (for dipping) or warm biscuits.
Growing up in Massachusetts my family and I used to take an annual vacation down to a little island called Planting Island just off of Cape Cod.  I remember gathering clams from the muck in the shallow, brackish waters behind the causeway that led to the island.  My cousin would then make a delicious chowder.  This recipe, however, uses canned clams rather than fresh ones because fresh ones are an enormous pain in the rear end to gather, scrub, steam and de-sand.  A true New Englander would probably shoot me, but being a California transplant fresh clams are in short supply and I’ve never noticed an appreciable difference.  Without further ado, here goes:

Time: 60 Minutes
Level: Easy
Cost: $4-6/plate
Serves: 4-6

Ingredients

  • 2 Tbsp butter, divided
  • 4 slices bacon, chopped
  • 1 large white onion, diced
  • 1.5 – 2 cups celery, diced
  • 3-5 cloves garlic, minced or pressed
  • 1 bunch fresh parsley, finely chopped
  • 2 tsp tobasco (optional)
  • 1/2 tsp cayenne pepper (optional)
  • 2 lbs Yukon Gold potatoes, peeled and chunked
  • 1 15oz can low sodium chicken broth
  • 1 bottle clam juice
  • juice from 4 (4oz) canned clams (3 cans minced, 1 chopped)
  • 1 cup heavy cream
  • 2 Tbsp cornstarch dissolved in 2 Tbsp cold water (optional for thickening; this is called a slurry, by the way) OR
  • Optional for roux, if you like a really thick chowder…
    1. 1/4 cup vegetable oil
    2. 1/4 cup flour

Instructions

  1. In a large saucepan, sauté bacon until nearly all the fat is rendered and bacon is well browned (Note:  You’re going to brown it a lot more than you would when you’re cooking breakfast, you want to be able to crush it in your hands to make bacon bits!)  Remove bacon from pan with slotted spoon and set aside on paper towels to drain.
  2. Remove pan from heat and melt 1 Tbsp butter in bacon fat.  Reduce heat to medium and return the pan to the stove
    1. Note:  Make sure the fat has cooled somewhat; you don’t want hot bacon grease splattering everywhere in the next step!  Also, it will burn your ingredients and the whole meal will taste burnt.  This is really important, and is the only place where you can really screw up this recipe.  If you’re not sure how hot the fat is, toss ONE little piece of onion into the fat; if it crackles loudly and grease spatters everywhere, it’s still too hot.  You basically don’t want anything to react when you toss it in the pan.
  3. Add onion, celery and parsley to pan and sauté in bacon fat until onion is translucent, 3-5 minutes.  (This combination of stuff is called a sofríto, by the way).
  4. Add garlic and sauté until fragrant, 1-2 more minutes.
  5. If using, add Tabasco and cayenne and saute until fragrant, 1 minute (Trust me on this, use these ingredients – I know it sounds crazy in clam chowder but it adds a nice zing without being overpowering)
  6. Add potatoes, chicken broth, bottle of clam juice, and juice from canned clams.  If there isn’t enough liquid to cover the potatoes by at least 1/2 inch, add warm water until the potatoes are submerged.  Cover, bring to a rapid boil, remove cover, reduce heat to a simmer, and allow liquid to reduce and sauce to thicken until potatoes are cooked through, 20 – 30 minutes (test the potatoes by sticking a fork in them).
  7. Once sauce has reached desired consistency and potatoes are done, stir in clams, cream, and remaining butter.  Bring to a simmer and allow to cook for 5 minutes more (clams don’t take long to cook).
  8. If your chowder isn’t thick enough, add the slurry of cornstarch and water OR
  9. Optional, if you like a really thick chowder:  Heat 1/4 cup vegetable oil in a small saucepan and slowly whisk in the flour all while continuously whisking.  Incorporate the flour and continue to stir, until the mixture becomes a light blond color.  Remove from heat and continue to whisk vigorously.  After 1-2 minutes, add 1/4 cup of the soup mixture to the roux and continue to whisk vigorously (did I mention to whisk vigorously?  Don’t stop whisking!)  Once the soup mixture is incorporated into the roux, add the contents of the sauce pan back into the chowder and stir.  It will thicken tremendously.
  10. Turn off heat and stir for 3 -5 minutes to aid the cooling process and help flavors marry.

Serve into bowls and garnish with reserved bacon bits and oyster crackers.  Serve with bread or biscuits.

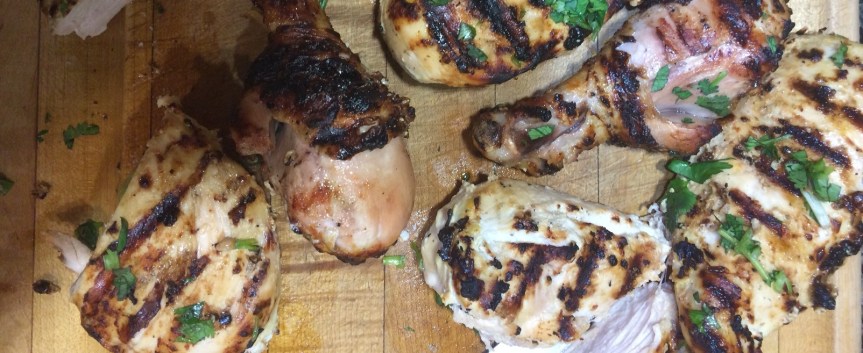
The Best Grilled Chicken

Chicken – especially chicken breast – is one of those things that tends to strike fear into the heart of every enthusiastic backyard griller.  Grilled chicken though, should be moist and delicious and a simple alternative to burgers and dogs.  Never fear, this fool-proof recipe can take as little as 45 minutes to prepare start to finish, and is a guaranteed crowd pleaser.

Time: 60 – 90 Minutes
Level: Easy
Cost: $6-8/plate
Serves: 4-6

Ingredients

  • 6 boneless, skinless chicken breasts
  • 4 chicken drumsticks (if you have a few people who like dark meat)
  • 2 cups plain Greek Yogurt (I prefer the original stuff, not the low fat stuff)
  • Juice of 2 lemons
  • 2 TBSP olive oil
  • Pinch saffron or saffron salt (Trader Joe’s sells a decent little jar of Saffron for about 6 bucks)
  • 1 TBSP Dijon mustard (not that yellow crap)
  • 3-4 cloves fresh garlic, minced
  • bunch fresh cilantro

Instructions

Whisk all ingredients except chicken and cilantro in a large bowl until well combined.  Marinate chicken in mixture for at least 20 minutes, or up to 1 hour.  (You can do this by dumping the chicken in a freezer bag with the marinade, tossing it in the bowl with the marinade, etc – whatever works.  The key is making sure the chicken is well coated and gets to sit with the acidity of the marinade for a minimum of 20 minutes).

Set up grill for 2-zone cooking, shooting for 400F at grate-level on the hot side.  Lightly oil grill grates to ensure chicken doesn’t stick (if it does, it isn’t the end of the world – it just means you didn’t wait long enough before trying to flip it).  Using tongs, remove chicken from marinade, shaking of the excess, and grill on the hot side of the grill until nicely charred, 7-10 minutes (discard excess marinade).  Flip chicken with tongs and repeat on the other side.  Transfer chicken to cool side of grill and allow to cook through until an instant-read thermometer registers 155F – 160F for white meat chicken, or, for dark meat chicken, shoot for 165F- 170F – if you’re doing both, give the dark meat a 10 minute head start.  Remove chicken from grill, cover with foil, and allow to rest for 10 minutes.  While chicken is resting, finely chop cilantro.  Sprinkle chopped cilantro over chicken and serve.

I like to serve this dish Mediterranean style with rice pilaf, pita bread, and hummus on the side.

Note:  The yogurt marinade is a little messy on the grill.  For this recipe in particular, I recommend leaving the grill on high or medium high while the chicken is resting to allow the excess to burn off, and then scraping down the grill grates while they are still hot.

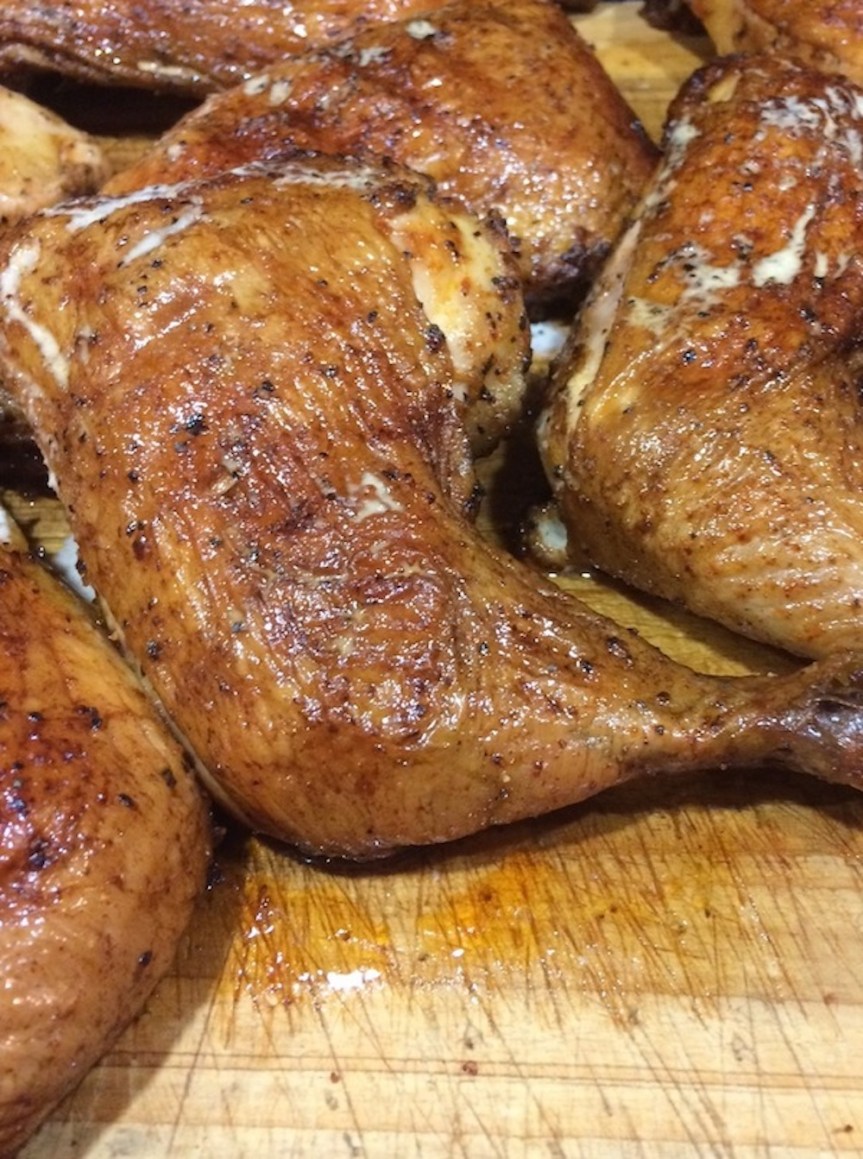
BBQ Chicken Quarters with ‘Bama White Sauce

Served with an authentic but lesser-known Alabama White Sauce, this BBQ chicken is succulent and tender on the inside with crispy, bite through skin on the outside.  Daintily eat with knife and fork, or gnaw off the bone caveman style.  Your choice.

Time: 120 Minutes
Level: Intermediate
Cost: $2-3/plate (chicken only and sauce only)
Serves: 4-6


I think one of the reasons people don’t like to eat chicken skin (my wife being one of these people; she pulls it off no matter what) is the general frustration associated with it.  There’s nothing worse than biting into a nice piece of BBQ chicken and having all the skin pull off all at once, dangling unattractively out of your mouth and covering your chin.  You know what I’m talking about.  This leaves eaters one of two choices:  Remove the skin and forget about eating it, or eat it by itself.

There is, however, a third option – bite through skin.  You get just want you want, nothing more, nothing less; this is the Holy Grail of BBQ Chicken – so much so, in fact, that professional competition BBQ teams will often go to great lengths to achieve it, using time consuming techniques including, but not limited to, all kinds of crazy things, like removing it, cooking it separately, and putting it back on.  Like I said, crazy.  Also unnecessary if you know the one trick in this post.

The secret to achieving bite-through skin is simply doing a reverse sear and then, during the searing process, making sure the skin has good contact with the cooking surface.  Chicken skin has a lot of fat in it, and underneath it, which is why if you sear first (especially on a BBQ grill) it’s all just going to cause flare-ups and catch fire before anything else has even had the chance to warm up.  What you’ve got to do is render 99% of the fat out of the meat before searing it, and at the last minute expose the chicken skin side down to a hot surface.  This can be done on the grill, or in the kitchen; both techniques are included here.

Ingredients

For the Chicken

  • 6-8 chicken quarters, trimmed of excess fat and skin
  • 2 TBSP (Tablespoons) olive oil
  • Classic BBQ Rub, to taste (I usually use 3-4 TBSP, click for the recipe)

For the Sauce*

  • 3/4 cup mayonnaise
  • 1/3 cup apple cider vinegar
  • Juice of 1 Lemon
  • 1/4 cup apple juice
  • 1 TBSP granulated garlic
  • 2 TBSP prepared horseradish
  • 1 TBSP coarsely ground black pepper
  • 1/2 – 1 TBSP Dijon mustard (not that yellow crap)
  • 1/4 TSP (teaspoon) Kosher salt
  • Ground cayenne pepper, just a dusting

Special Equipment

  • Bricks or a heavy cast iron griddle or skillet, for pressing chicken
  • Grill (you can do this in the kitchen, see bottom of post)
  • Disposable aluminum drip pan
  • Oven thermometer
  • Decent instant-read thermometer

How To: On the Grill

If using charcoal, build a 2-zone fire, banking the coals all to one side.  If using gas, light one or two burners only.   Toss a few wood chunks (I prefer a mixture of apple and pecan, no need to soak them first) onto the coals or into a smoker box.   Underneath the grill grates, on the cool side of the grill, place a disposable baking tray filled 1/2 – 3/4 of an inch of water; remember, a lot of fat is going to render so we want something to catch it in and cool it off immediately.  I typically remove one of the grill grates during 2-zone cooking (which, for me, is most of the time) so that I can slide the meat from one side of the grill to the other (cool to hot) without actually having to pick it up and move it around too much.

Shoot for a temperature of 275F – 300F at grate level (invest in an oven thermometer to be sure you’ve got an accurate read; even if you have a thermometer built into your grill, chances are it’s off by as much as 50F).

While the grill is coming up to temp, pull your chicken out of the fridge and place in a large mixing bowl with olive oil.  Toss to coat (you need something for the rub to stick to).  Add the Classic BBQ Rub and toss again.  (Alternatively, rub the chicken with olive oil on both sides and then rub the rub onto it, on both sides – tossing is easier).

Place the chicken on the cool side of the grill, skin side up, and cover.  Depending on the temp of your grill and how much chicken you’ve got on there, it could take anywhere between 1-2 hours to hit an internal temp of 160F, so start checking after about an hour or so.  During this time, make the sauce – simply whisk all the ingredients together in a small bowl and refrigerate.

About halfway through the cooking time (when the chicken’s internal temp is about 140F, use an instant read thermometer to test this), pour off a bit of your White Sauce into another container and head out to the grill.  Baste the chicken generously with the sauce and shut the lid.

When the chicken is up to about 160F, most of the fat should be rendered out of it, flip it over, skin side down, place something heavy on top of it to ensure good contact with the grill grates (I use a large cast iron griddle, but you could also use bricks or a heavy skillet – whatever works) and leave it to cook 10 minutes more on the cool side of the grill.  By this time it’s basically safe to eat, so you’re not going to screw anything up – we’re just perfecting the skin.  After about 10 minutes, slide the chicken over to the hot side of the grill and sear for 5 – 10 minutes.  Remove, and place on a serving platter skin side up.  Baste again with sauce.

Serve remaining sauce (the stuff still in the fridge, not what you used to baste) as a dipping sauce, if you like.

How To:  In the Kitchen

If you don’t have access to a grill, you can still make this delicious recipe in the kitchen (I’ve done it this way too, you just miss out a bit on the smokey flavor).  Begin by preheating your oven to 300F.  Fill a disposable aluminum tray with 1 inch water.  Place a cooling rack on top of that.  Place the chicken, skin side up, on the cooling rack and bake until chicken’s internal temp is about 160F.  When it hits the 160F mark, flip it over and plonk something heavy on top and return it to the oven for about 10 minutes.  During this time, heat a cast iron skillet or copper pan to very hot, over high heat.  After the ten minutes skin-side down in the oven, transfer the chicken to the skillet and brown for about 2-3 minutes, skin side down, and set aside.  Work in batches if necessary; don’t overcrowd the chicken quarters in the skillet.

Usually I’ll opt to drink a dry, crisp IPA with this meal, but the other night I drank a fairly robust Cabernet, and that was pretty good too.

Good luck!


*I would be remiss not to credit Amazing Ribs for the sauce recipe. As the author, Meathead, points out, this is just one version of what is an Alabama favorite. I’ve only modified his recipe ever so slightly. To check out his version, click here.  His version is pretty damn good too.