
Category: Beef and Lamb
Frenched Rack of Lamb
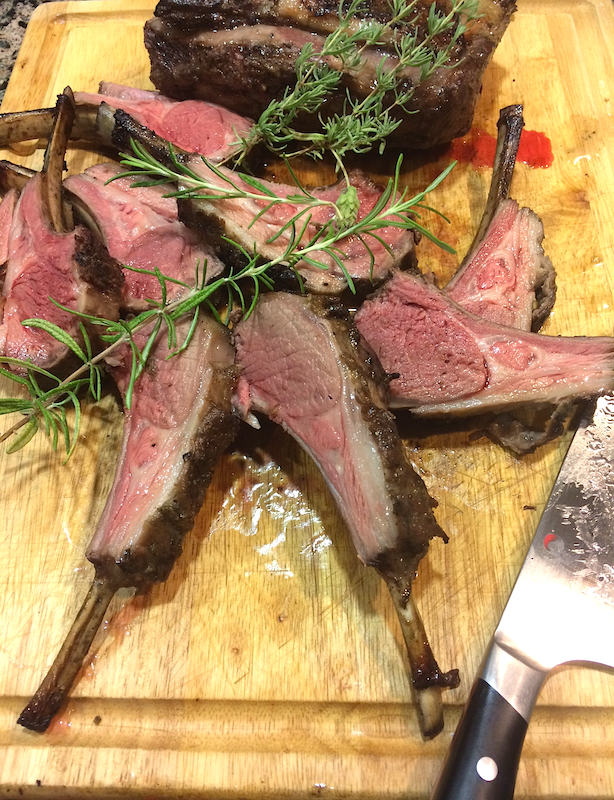
This method will rival the best French Restaurants, yet is simple and easy enough for any home cook.
The hardest part is finding a Frenched rack of lamb. Ask your butcher to do it for you, or keep in mind that lamb chops and lamb loin chops, or even a boneless leg of lamb will all work just as well. This technique utilizes sous vide but remember: You can get nearly the same results going low-and-slow. The simple marinade is really the key to this dish.
Steaks Sous Vides – The Perfect Steak
 It doesn’t get much better than this people.
If you’ve spent much time reading this blog, you know that I’m all about temperature, because temperature is the only reliable way to gauge how your food is going to turn out.
Of course temperature and heat are different things. Heat is about how much energy you’re putting into your food whereas temperature is a way to read how much heat is in food already.
Think about it like this: If you decide to slow-roast a piece of meat on your smoker or in your oven at a low temperature over a period of hours, you’re putting a little bit of heat into it over a long period of time. Conversely, if you sear a steak over a hot grill or in a hot cast iron pan, you’re putting a lot of heat into it very rapidly.
The reason it’s hard to cook that perfect steak, which is medium rare bumper to bumper with a crusty, golden edge is because there’s almost no way to cook it on low enough heat for it to turn out truly perfect. Even slowly bringing your steak up to temperature in a 200°F oven before searing it (the method I generally recommend) is going to leave striations of doneness to a small degree. Put too much heat in and it’ll be a bullseye of doneness with only the very center cooked correctly.
Enter the Sous Vide cooker – the solution to all of your protein problems. No more striations of doneness, no more raw centers, no more accidentally-well-done food. Just perfect, all the time.
How does this work? Basically, when you cook something sous vide you hold the entire piece of protein at exactly the temperature you want for an extended period of time so no matter how much time it takes, you never overcook it.
So, what exactly is sous vide? Sous vide is the process of cooking something in a water bath which is set to an exact temperature. Essentially, what you do is you vacuum seal you protein in a plastic bag, either using a vacuum sealer or the water displacement method (I use the latter method; it’s cheaper and has never caused me any problems) to get all the air out of the bag and drop it in a pot of water that’s being held at a constant temperature until it’s cooked through; then you simply finish it off over high heat to sear the outside and there you have it – perfectly cooked food.
This is, in fact, the way high end steakhouses typically cook their steak. Ever wonder how a table of five can order three different cuts of steak, one rare, two medium-rare, one medium, and one medium-well and they all arrive at the table at the same time, perfectly cooked, exactly as ordered, edge to edge? The answer is sous vide. They’ve had those steaks sitting in different water baths at different temperatures for hours, waiting to be finished off on a hot grill and brought to your table.
That’s the secret.
You can achieve these results at home too. There are three ways to do this:
- Stove top method. Heat water in a large pot to exactly the temperature you want, verify using a thermometer, and constantly fiddle with the temperature for hours until you’ve got whatever it is you’re making cooked through. Forget it. Too much time, too hard.
- Beer Cooler method. This works astonishingly well. Essentially, you get your water bath to a few degrees higher than your cooking temperature and the insulated walls of the cooler should hold your water at a relatively constant temperature for a few hours; long enough to cook a steak. J. Kenji Lopez-Alt describes the process here.
- Purchase a sous vide immersion circulator. It used to be that these things were too pricey for the average home cook, but due to the popularity of the sous vide method of cooking they are becoming increasingly affordable. Generally, they’ll run you anywhere from $75-$150. I got mine at Aldi for $49.99. So far so good.
No matter what method you use, you really owe it to yourself to try cooking something sous vide the next time you have a couple hours. Here’s a short recipe for the steak featured above.
Ingredients
For the Garlic-Herb Butter:
- 1 stick salted (yeah, i know) butter, room temperature
- 3 tablespoons fresh parsley, minced
- 2 tablespoons fresh basil, minced
- 3 sprigs fresh thyme, minced
- 2 cloves garlic, smashed into a paste (or squished in a garlic press)
For the Steak:
- 2 steaks (filet, strip, or ribeye), 1.5 – 2 inches thick (the thicker the better, ask your butcher to cut you a few steaks if the ones in the case are less than 1.5 inches thick – remember, you’re searing these off at the end and it is possible to overcook your steak during that process).
- 2 cloves garlic, smashed
- Fresh herbs (such as rosemary, thyme, etc), optional
- Kosher salt and freshly ground black pepper
Instructions:
For the Garlic-Herb Butter:
- Mix all ingredients together in a small bowl until very well combined.
- Using plastic wrap, roll the butter into a log shape and twist the ends off (like a tootsie roll)
- Refrigerate until needed.
For the Steak:
- Heat a water bath to 130°F for medium rare (135° for medium, anything past that forget the whole sous vide thing and just incinerate it on your stovetop; it’s easier that way).
- Season steaks generously with salt and pepper. Toss each steak individually in a food-grade gallon size freezer bag along with the smashed garlic clove and herbs, if using.
- Using the water displacement method, seal the steaks in their bags.
- Introduce steaks to water bath and make sure they’re fully submerged, weighing them down if necessary.
- Hold steaks in the water bath at a constant temperature for at least 2 hours and not more than 4 hours.
- Remove steaks from bags and pat very dry with paper towels (Note: they will look really weird – grayish brown and mushy – after coming out of the water bath; don’t worry, all is well).
- Sear the steaks over high heat, either in a cast-iron pan or ripping hot grill (surface temperature of heating surface should be 400°F – 500°F), 15-30 seconds per side.
- Remove steaks from heating surface and allow to rest; while resting, top steaks with sliced rounds of garlic herb butter and tent lightly with foil until butter is melted, 3-5 minutes
- Slice and serve
Boeuf Bourguignon

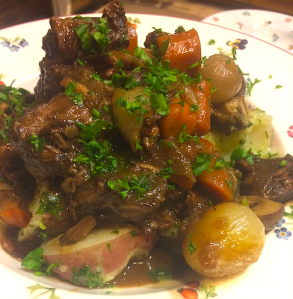
Another beautiful rustic French classic, the method for this dish bears a resemblance to Traditional Coq Au Vin. When I made this for the first time, I followed Julia Child’s recipe to the letter, and I remember thinking about halfway through the process “This woman was insane.” Now that I’ve made it a few times, I actually don’t think she was that crazy – it takes a bit of practice to get it down, but actually despite the fact that the whole process takes about 5 hours, there’s really probably only about 90 minutes of active time. Still, it’s not the kind of thing you can whip up on a week night; you’ll have to wait for a day off to make it, but most of that day can be spent relaxing or doing other things while the delicious smell of beef braised in red wine permeates your home.
This recipe follows Julia’s recipe very closely, but has a few tweaks that are mainly to my personal preference, including the addition of celery and also an umami bomb.
Time: 5 hours (90 minutes inactive)
Level: Advanced
Cost: About $5.00 per plate
Serves: 6
Ingredients
- Approximately 3 lbs chuck roast, trimmed of any fat or gristle, but left in large pieces
- Kosher Salt and Freshly Ground Black Pepper
- Vegetable or grape seed oil
- 12oz thick-cut bacon, sliced into lardons
- 1/4 cup all purpose flour
- 1 14oz can low sodium beef stock, divided
- 4 stalks celery, cut into 1 inch pieces
- 5 carrots, peeled and cut into 1 inch pieces
- 1 large onion, sliced
- 3 cloves garlic
- 3 tablespoons tomato paste
- 2 tablespoons soy sauce
- 1 tablespoon anchovy paste
- 2 bay leaves
- Several sprigs fresh parsley
- Several sprigs fresh thyme
- 1 750ml bottle dry red wine (cheap is fine, I use Aldi’s Winking Owl shiraz, $2.59)
- 12 small boiler onions
- 8 oz crimini or baby bella mushrooms, halved if large
- 1 shot brandy
- 2 lbs small roasting potatoes (which will actually be boiled)
- 1/2 cup chopped parsley, for garnishing
Prep and Mise En Place
- Preheat oven to 400°F
- Bring a large pot of water to a rolling boil (like you would for pasta)
- Prepare mirepoix (celery, onions, carrots) and combine in a medium bowl
- Prepare umami bomb (soy sauce, tomato paste, anchovy paste) and combine in a small bowl
- Mince garlic and reserve in a small bowl
- Trim beef and season aggressively with Kosher salt and freshly ground black pepper
- Slice bacon
- Measure out flour
- Open can of beef stock
- Open bottle of wine
- Prepare Bouquet Garni: bundle thyme, parsley and bay leaves together and wrap in cheesecloth (a coffee filter tied shut will work in a pinch)
- Slice the stem end (not the root end) off the boiler onions but leave them unpeeled
- Prepare mushrooms
- Measure out shot of brandy
Instructions
- Blanch boiler onions (not sliced ones) in boiling water for 7 minutes, remove with a slotted spoon and, using a colander rinse under cold running water until cool. Once cool, pinch the ends to peel onions under running water; the skins should slide right off. Remove root end of onions with a paring knife, transfer to a bowl, and refrigerate.
- Blanch bacon in boiling water for 10 minutes, remove with a slotted spoon, and transfer to a plate lined with paper towels. Pat dry. (You want it dry – the more water there is in/on the bacon, the more angry popping and spattering you’ll get when you fry it).
- Into a large sauté pan over medium heat: Add two tablespoons of vegetable or grape seed oil along with bacon to a large saute pan and fry bacon until brown and slightly crispy, 5-7 minutes. Remove bacon with a slotted spoon and transfer to a plate with paper towels to blot up some of the grease
- Over high heat, brown beef in large chunks in bacon fat, approximately 2.5 – 3 minutes per side, until nicely browned and a lovely fond begins to form on the bottom of the pan. Remove beef to a cutting board and allow to cool.
- Add mirepoix (celery, onions, and carrots) to the pan. Reduce heat to medium. Sweat vegetables; as they begin to give up some of their moisture scrape up the fond from the bottom of the pan and incorporate. If vegetables don’t give up enough moisture or fond threatens to burn, lower the heat and deglaze pan with a bit of liquid – stock, wine, or water. Continue to sweat vegetables until they give up much of their moisture and begin to brown and caramelize slightly.
- Add garlic and sauté until fragrant, 30 seconds
- Add umami bomb (mixture of tomato paste, soy sauce and anchovy paste) and stir to incorporate, another 30 seconds
- Add about 1/3 of the bottle of red wine to finish deglazing the pan and stop the browning process. Reduce heat to low and simmer stirring occasionally and scraping up any remaining fond. Once all the fond is incorporated, off the heat entirely to prevent it from reducing too much.
- Meanwhile, while wine and vegetables are simmering, cube beef into 2-2.5 inch cubes (they’re going to shrink a lot when they cook in the oven) and add to a dutch oven or braising pot. Sprinkle the beef with flour and stir to ensure the beef is evenly coated. Place uncovered, in 400°F oven for 5 minutes. Remove from oven, stir, and return to the oven uncovered for another 5 minutes.
- Remove beef from oven. Add contents of sauté pan, bacon, remaining wine, 1/2 can of beef broth and bouquet garni to the beef in the dutch oven. Stir to make sure everything is well incorporated.
- Cover, and bring to a boil.
- Once boiling, off the heat on the stove and place dutch oven into the oven and mostly cover with a lid, leaving the lid slightly ajar with a 1/2 or so inch gap. Reduce oven temperature to 325°F.
- Allow stew to braise for 3-4 hours in the oven until beef is very tender. You shouldn’t need to babysit it too much.
- Approximately 1 hour before finishing, prepare potatoes and onions:
- Place potatoes in a large pot and fill with water so water is covering potatoes by 2 inches. Cover, and bring to a boil. Add a large pinch of Kosher salt and then uncover and reduce to a simmer. Simmer potatoes until they are soft and pierce easily with a fork, approximately 45 minutes.
- Meanwhile, add 2 tablespoons oil to a 10 inch skillet and sauté onions over medium high heat until lightly browned, 3-5 minutes. Add remaining beef stock to skillet and deglaze any onion fond that may have formed. Reduce heat to low and simmer for 45 minutes. Cover or partially cover if stock reduces too quickly (ultimately, you want all but a couple tablespoons of stock to reduce)
- 15 minutes before finishing, transfer onions and whatever liquid remains in the skillet to the dutch oven; replace in oven as it was before.
- Clean the skillet, if need be, and prepare the mushrooms: Melt 2 tablespoons unsalted butter over medium heat. Once foaming has subsided, add mushrooms and season with salt and pepper. Sauté mushrooms. You will observe that at first, the fat is absorbed into the mushrooms and the pan will look quite dry. Once the fat begins to come back out of the mushrooms and the mushrooms look slightly wet, add the shot of brandy and flambé.
- Remove the dutch oven from the oven and add the mushrooms. Replace the lid and leave a 1/4 inch gap. Using sturdy oven mitts or thick potholders, firmly grasp the dutch oven and dump the liquid out of the dutch oven, using the lid to catch any large pieces, through a fine mesh strainer (to catch the smaller pieces) and into a 4 quart saucepan. Cover the dutch oven and set aside.
- Simmer the liquid in the saucepan until reduced by 1/3 to 1/2, skimming off the fat as it rises to the top
- Meanwhile, drain the potatoes. Add 1 stick of unsalted butter to the potatoes along with 1/4 cup of parsley and toss until butter is melted.
- Return reduced liquid from saucepan to dutch oven and stir to reincorporate.
- Serve stew over potatoes
Steak Fajitas

Steak soaked in a zesty citrus marinade and then grilled to perfection; serve with pico de gallo, homemade gaucamole, sour cream, roasted peppers and onions and Mexican cheese. Easy, cheap and delicious.
Ingredients:
For the Steak
- 2.5lb London Broil or Tri-Tip Roast
- 1/2 cup orange juice
- 1/2 cup lime juice (approximately 6 limes)
- Zest of 1 lime
- 3-4 cloves garlic, minced
- 2 tsp chile powder
- 1/2 tsp cayenne pepper
- 1 TBSP kosher salt
- 1 TBSP coarsely ground black pepper.
- 1 cup mesquite wood chips (optional)
For the Pico de Gallo
- 1 Large yellow onion, finely diced
- 2-3 Roma tomatoes, finely diced
- Large pinch Kosher salt
- 2 jalapeño peppers, minced
- juice of one lime
- 2-3 TBSP cilantro, finely chopped
For the Guacamole
- 3-4 large, ripe Haas avocados (or 6-7 little organic ones)
- 1 jalapeño pepper, minced
- 1 3.5oz can hatch green chiles (optional)
- 4 TBSP pico de gallo (above)
For the Fajita Mix (peppers and onions)
- 2 TBSP olive oil
- 3-4 cloves garlic, minced
- 1 each: Red bell pepper, green bell pepper, yellow bell pepper
- 1 large yellow onion, halved and sliced into half-rings
For Serving
- Medium size yellow corn tortillas, 3-4 per person
- Freshly grated Cotijá cheese
- Shredded Mexican Cheese
- Sour Cream
Prep:
For the Steak
- Whisk ingredients 2-9 together in a medium size mixing bowl.
- Transfer steak to large 1-2 gallon ziplock bag. Add marinade to bag with steak and massage to incorporate well. Refrigerate for 2-4 hours, or up to 8 hours. Flip bag over half way through marinating process if possible.
For the Pico de Gallo
- Dice tomatoes first. Add to colander and sprinkle with Kosher salt. Toss gently to season and allow to sit in the sink 20 minutes. Tomatoes will give up much of their moisture making your pico less watery.
- Prepare onions, jalapeños, lime and cilantro. Stir to combine.
- Add tomatoes to mixture and stir to combine again. Cover and refrigerate until ready to serve.
For the Guacamole
- Halve avocados and remove pits. Spoon avocado out of shells into a medium to large mixing bowl.
- Add ingredients 2-4 and mash well using a potato masher. (Note: Guacomole is best served right away. If left in contact with air too long it will oxidize and turn brown. If preparing a couple hours in advance, smooth guacomole in bowl, drizzle with lime juice, and cover with plastic wrap with the plastic wrap in full contact with the guacamole).
For the Fajita Mix (peppers and onions)
- Prepare all ingredients as directed
- Add to a 10-12 inch cast iron skillet and stir (or toss if you’re strong enough; cast iron is heavy) to combine.
Cook
- Light 1 or 2 burners if using gas; if using charcoal light 1 chimney starter full of lump charcoal and set grill up for 2-zone cooking. Make sure the grill is good and hot. Just prior to grilling steak, add 1 cup mesquite wood chips, if using. Click HERE for more information on grilling and smoking.
- Remove steak from marinade and pat dry. Discard leftover marinade.
- Place steak down on hot side of grill and sear, approximately 5 minutes per side, until nicely browned. Transfer to cool side of grill.
- Add cast iron skillet to hot side of grill and close the lid. Sauté fajita mixture in cast iron until nicely caramelized and soft, 15 – 20 minutes. Stir occasionally. Steak and vegetables should finish at roughly the same time, but if they don’t just remove the one that is done and tent with aluminum foil.
- Once steak and Fajita mixture are done, remove and allow to rest for a few minutes
- Warm tortillas on a griddle or in a frying pan. Sprinkle with cotijá cheese and continue to toast until cheese is melted.
- Slice steak thinly across the grain on the bias using a sharp knife
Serve
Plate Steak, Pico de Gallo, Guacamole, Fajita mixture, shredded Mexican cheese and sour cream together. Have eaters assemble fajitas at table as desired.

