Steaks Sous Vides – The Perfect Steak

It doesn’t get much better than this people.

If you’ve spent much time reading this blog, you know that I’m all about temperature, because temperature is the only reliable way to gauge how your food is going to turn out.

Of course temperature and heat are different things.  Heat is about how much energy you’re putting into your food whereas temperature is a way to read how much heat is in food already.

Think about it like this:  If you decide to slow-roast a piece of meat on your smoker or in your oven at a low temperature over a period of hours, you’re putting a little bit of heat into it over a long period of time.  Conversely, if you sear a steak over a hot grill or in a hot cast iron pan, you’re putting a lot of heat into it very rapidly.

The reason it’s hard to cook that perfect steak, which is medium rare bumper to bumper with a crusty, golden edge is because there’s almost no way to cook it on low enough heat for it to turn out truly perfect.  Even slowly bringing your steak up to temperature in a 200°F oven before searing it (the method I generally recommend) is going to leave striations of doneness to a small degree.  Put too much heat in and it’ll be a bullseye of doneness with only the very center cooked correctly.

Enter the Sous Vide cooker – the solution to all of your protein problems.  No more striations of doneness, no more raw centers, no more accidentally-well-done food.  Just perfect, all the time.

How does this work?  Basically, when you cook something sous vide you hold the entire piece of protein at exactly the temperature you want for an extended period of time so no matter how much time it takes, you never overcook it.

So, what exactly is sous vide?  Sous vide is the process of cooking something in a water bath which is set to an exact temperature.  Essentially, what you do is you vacuum seal you protein in a plastic bag, either using a vacuum sealer or the water displacement method (I use the latter method; it’s cheaper and has never caused me any problems) to get all the air out of the bag and drop it in a pot of water that’s being held at a constant temperature until it’s cooked through; then you simply finish it off over high heat to sear the outside and there you have it – perfectly cooked food.

This is, in fact, the way high end steakhouses typically cook their steak.  Ever wonder how a table of five can order three different cuts of steak, one rare, two medium-rare, one medium, and one medium-well and they all arrive at the table at the same time, perfectly cooked, exactly as ordered, edge to edge?  The answer is sous vide.  They’ve had those steaks sitting in different water baths at different temperatures for hours, waiting to be finished off on a hot grill and brought to your table.

That’s the secret.

You can achieve these results at home too.  There are three ways to do this:

  1. Stove top method.  Heat water in a large pot to exactly the temperature you want, verify using a thermometer, and constantly fiddle with the temperature for hours until you’ve got whatever it is you’re making cooked through.  Forget it.  Too much time, too hard.
  2. Beer Cooler method.  This works astonishingly well.  Essentially, you get your water bath to a few degrees higher than your cooking temperature and the insulated walls of the cooler should hold your water at a relatively constant temperature for a few hours; long enough to cook a steak.  J. Kenji Lopez-Alt describes the process here.
  3. Purchase a sous vide immersion circulator.  It used to be that these things were too pricey for the average home cook, but due to the popularity of the sous vide method of cooking they are becoming increasingly affordable.  Generally, they’ll run you anywhere from $75-$150.  I got mine at Aldi for $49.99.  So far so good.

No matter what method you use, you really owe it to yourself to try cooking something sous vide the next time you have a couple hours.  Here’s a short recipe for the steak featured above.

Ingredients

For the Garlic-Herb Butter:

  1. 1 stick salted (yeah, i know) butter, room temperature
  2. 3 tablespoons fresh parsley, minced
  3. 2 tablespoons fresh basil, minced
  4. 3 sprigs fresh thyme, minced
  5. 2 cloves garlic, smashed into a paste (or squished in a garlic press)

For the Steak:

  1. 2 steaks (filet, strip, or ribeye), 1.5 – 2 inches thick (the thicker the better, ask your butcher to cut you a few steaks if the ones in the case are less than 1.5 inches thick – remember, you’re searing these off at the end and it is possible to overcook your steak during that process).
  2. 2 cloves garlic, smashed
  3. Fresh herbs (such as rosemary, thyme, etc), optional
  4. Kosher salt and freshly ground black pepper

Instructions:

For the Garlic-Herb Butter:

  1. Mix all ingredients together in a small bowl until very well combined.
  2. Using plastic wrap, roll the butter into a log shape and twist the ends off (like a tootsie roll)
  3. Refrigerate until needed.

For the Steak:

  1.  Heat a water bath to 130°F for medium rare (135° for medium, anything past that forget the whole sous vide thing and just incinerate it on your stovetop; it’s easier that way).
  2. Season steaks generously with salt and pepper.  Toss each steak individually in a food-grade gallon size freezer bag along with the smashed garlic clove and herbs, if using.
  3. Using the water displacement method, seal the steaks in their bags.
  4. Introduce steaks to water bath and make sure they’re fully submerged, weighing them down if necessary.
  5. Hold steaks in the water bath at a constant temperature for at least 2 hours and not more than 4 hours.
  6. Remove steaks from bags and pat very dry with paper towels (Note:  they will look really weird – grayish brown and mushy – after coming out of the water bath; don’t worry, all is well).
  7. Sear the steaks over high heat, either in a cast-iron pan or ripping hot grill (surface temperature of heating surface should be 400°F – 500°F), 15-30 seconds per side.
  8. Remove steaks from heating surface and allow to rest; while resting, top steaks with sliced rounds of garlic herb butter and tent lightly with foil until butter is melted, 3-5 minutes
  9. Slice and serve


The Best, Easiest Roast Chicken


Stick with me on this one people:  Trust me.

If you do, you will be rewarded with the juiciest, tenderest most succulent chicken with the crispiest, most delicious crackling skin you’ve ever had.

A good roast chicken should be both simple and delicious rather than fussy and difficult.  The method described in this post is, in my opinion, hands down the best way to roast a chicken.  In fact, it’s so easy, so good and so delicious that it is now the only way I roast a chicken.  Here’s the how and the why:

The traditional method of roasting a chicken involves stuffing the cavity, trussing the bird, and placing it breast side up in a deep roasting pan and roasting it at 325°F for about two hours.  This method is time consuming, and poses an additional problem:  Uneven cooking. 

You see, you want the chicken breasts to be moist and delicious, and you don’t really want pink thighs and drums.  But when you place a whole chicken in a roasting pan, the breasts are exposed to the full force of the oven’s heat, while the drums and thighs are deep in the roasting pan.  This means that the breasts are getting incinerated into dry stringy bits of grossness while the thighs and drums take their sweet time coming up to temp. 

I’ve seen all kinds of attempts to solutions to the problem, all the way from icing down the breasts first to constantly rotating the bird in the oven (which, by the way, every time you open the oven door your oven loses 25° worth of heat and you extend the process to like 3 hours or more).

What if I told you there was a way to perfectly roast a chicken in less than an hour? Well, there is…

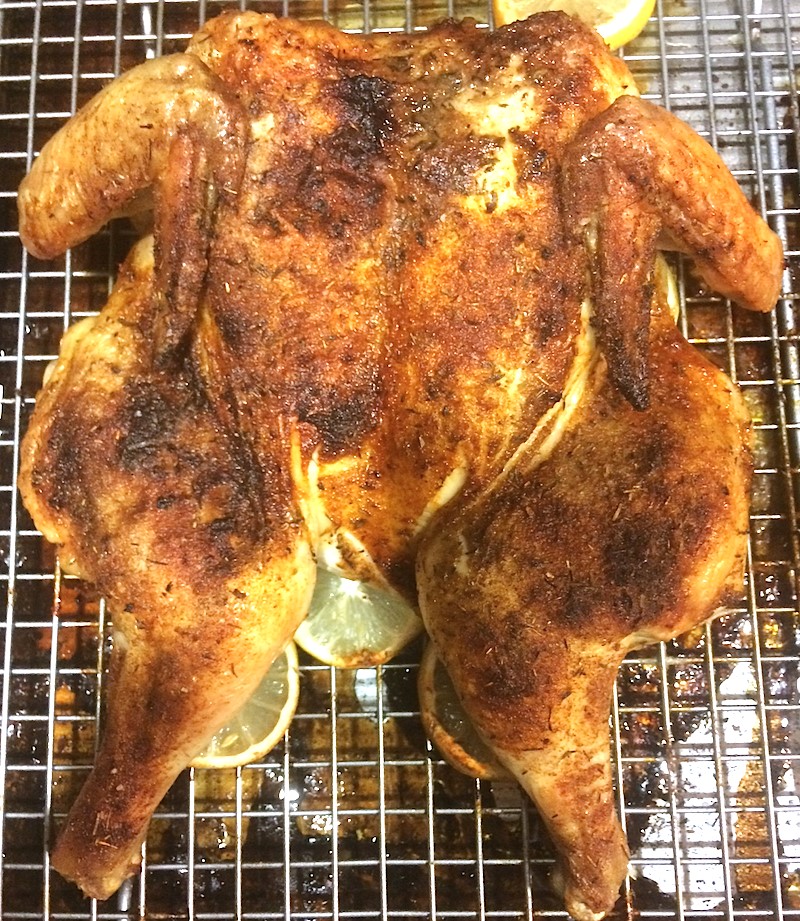
You may observe that the chicken in the cover picture looks a bit… flat.  That’s because it is.  In fact, it’s had its backbone removed and it’s been flipped over, breast-side up. 

A lot of people refer to this process as butterflying or spatchcocking.  It’s very simple to do. 

To spatchcock your chicken, use the following procedure:

  1. Remove your chicken from its bag and retrieve giblets and whatever else might be hiding in the cavity of the chicken.  Pat the chicken dry and transfer it to a large cutting board.
  2. If there are any giant pieces of skin or blobs of fat protruding from the tail end or neck end, trim them off.
  3. Place the chicken breast-side down on the cutting board, with the neck closest to you.
  4. Locate the chicken’s neck and tail, and feel along the back of the chicken to get an idea of where the backbone is (measure twice, cut once).
  5. Using a sharp boning knife or a sturdy set of kitchen or poultry sheers, remove the backbone from the chicken by starting on one side of the neck and snipping all the way down the spine to the tail.  Repeat on the other side.
  6. Snip the backbone into three pieces and reserve for making stock or a pan sauce
  7. Flip the chicken over breast-side up, and make sure the legs and thighs are flipped in such a way as to be fully exposed (like in the picture), not under the chicken.
  8. Using firm pressure, press down with your palm on the center of the chicken’s breast until it’s pretty flat, like you’re giving it CPR.  You may or may not hear the breastbone pop, but the idea here is to get it as flat as possible.
  9. Place your chicken breast-side up on a wire rack over a rimmed baking sheet that has been lined with aluminum foil.  You can put some lemon wedges under your chicken if you like.

Now, you ask, why have you gone to all the trouble of doing this?  Well, aside from making carving a cinch, having this nice flat chicken sitting on top of a wire rack rather than deep in a roasting pan means that the whole bird will come up to temperature at roughly the same rate.  In fact, pop the chicken into a 400°F – 450°F oven for about 45 minutes and, lo and behold, the breasts will be getting finished right around the time the thighs are up to temperature.  You’ve just saved yourself at least 90 minutes and your chicken will be juicy through and through.

A Word on Chicken and Temperature

If you’ve read enough of the posts on this blog you should have figured out by now that we always cook using temperature not time.  Speaking of temperature, the poor chicken is probably the most overcooked item on anyone’s regular rotation.  The reason for this is that chickens can house some really nasty bugs, not the least of which are salmonella and e. coli, both of which will leave you wretching up your guts for a few days – best case scenario.  Because we’re aware of this, we generally follow the USDA guidelines and roast our chicken until the internal temperature of the breast is 165°F and the thighs are 180°F – meaning that they are dry and sad and horrible, like this guy:

It does also, however, mean that even a total idiot can cook a chicken or a turkey and not poison anyone.  And that’s the audience that the USDA is shooting for: the general public, the total idiots, the lowest common denominator.  And that’s fine, because as a government organization, that’s their job – to protect the general public from themselves.

However, that is not my job.  My job is to help you get the juiciest, most delicious, succulent bird on the table that you can.  If you’re reading this blog, I’m assuming that you’re not a total idiot (if you are, and you’re still reading this blog, God help you).

So here’s the thing:  It’s not like salmonella (or anything bacteria, virus, amoeba, what have you) are alive at one temperature and then suddenly dead at the next.  The process of pasteurization, that is, the process of ensuring that food born pathogens are eliminated from food, is a matter of both time and temperature.  So the FDA (also a government organization whose job is to keep us safe from ourselves, but in this case it applies to restaurants and food vendors and producers, not individuals) has this to say about pasteurization and poultry:

FDA Pasteurization Time for Poultry

Temperature (°F)

Chicken

Turkey

13663.3 Minutes64.0 Minutes
14025.2 Minutes28.1 Minutes
1458.4 Minutes10.5 Minutes
1502.7 Minutes3.8 Minutes
15544.2 Seconds1.2 Minutes
16013.7 Seconds25.6 Seconds
165Instant<10 Seconds

What you will notice here is that the USDA recommends going all the way to 165°F because at that temperature, it’s a pretty much guaranteed fail-safe.  It’s also guaranteed nasty, dried out bird.  Bottom line here?  According to the FDA, a chicken that’s been held at 145°F for 8.4 minutes is every bit as safe to eat as a bird roasted to within an inch of incineration to 165°F.

Of course, 145°F for a chicken is a little on the rare side; it’ll still be a bit pink and gelatinous and people will know it isn’t cooked – at least to what they’re used to.  My recommendation is to insert a probe thermometer into the thickest, coldest part of your chicken when you put it into the oven, wait for it to hit 150°F, set a timer for 5 minutes, then pull it out of the oven.  That way, you’re well within FDA recommendations and just in case your probe thermometer is off by a degree or two or you didn’t get it all the way into the thickest, coldest part of your bird, you’ll still be fine.  I’ve been doing it this way for years and I’ve never poisoned anyone.  Do verify, using an Instant Read Thermometer, that BOTH the breast AND the joint between the leg and thigh BOTH read at least 150°F.

Okay.  With all that out of the way, here’s the recipe:

Ingredients:

For the Chicken:

  1. 1 Whole Chicken approximately 5 lbs (you can do two if you like, just make sure they’re about the same weight)
  2. Olive oil


For the Poultry Rub

  1. 2 teaspoons Kosher Salt
  2. 2 teaspoons coarsely ground black pepper
  3. 2 teaspoons MSG (yeah, yeah, it’s not gonna kill you, it’s perfectly safe, omit if you like, just double the salt… but trust me on this, use the MSG, sold as Accent and available in the spices section of most grocery stores)
  4. 2 teaspoons granulated garlic
  5. 2 teaspoons dried mustard
  6. 2 teaspoons dried powdered oregano
  7. 1 teaspoon dried thyme
  8. 1 teaspoon dried basil
  9. 1 teaspoon paprika
  10. 2 teaspoons baking powder (optional, for extra-crispy skin)

Special Equipment

  1. Wire rack set above baking sheet.  (Line baking sheet with foil for easy clean up.  No wire rack?  Use a grill grate).
  2. Probe thermometer
  3. Poultry sheers, sharp boning knife, or really sturdy scissors

Instructions

  1. Preheat oven to 450°F.  Arrange rack to be in the upper two-thirds of the oven.
  2. Combine poultry rub ingredients and whisk or shake to combine thoroughly.
  3. Spatchcock chicken according to instructions at beginning of post.
  4. Gently separate skin from breasts, thighs and legs by working your fingers underneath.  Leave in place though, do not remove.
  5. Drizzle chicken with olive oil; just enough for there to be something for the rub to stick to.  Season chicken with poultry rub from Step 2, above.  Be sure to get some of the rub underneath the skin also.
  6. Transfer chicken to wire rack on rimmed baking sheet.  Use an instant read thermometer to find the coldest part of the chicken breast.  Insert probe thermometer here.
  7. Place chicken into the oven, legs toward the back, and roast for 10 to 15 minutes.  Reduce oven temperature to 400°F and roast chicken until probe thermometer reads 150°F.  Turn off oven, set timer for 5 minutes.  Remove chicken and verify that the other breast and the joint between the thighs and legs on both sides are also at least 150°F.
  8. Let rest 10 minutes, then carve and serve.  Carry over cooking will bring your bird up to at least 155°F while resting, and that’s good enough for me.

Just look at the finished product:

BUT WAIT! THERE’S MORE!

If you’d like to make a pan sauce, do the following while your chicken is in the oven:

Ingredients (This is more of a method than anything else, use what you like or what you have on hand):

  1. 1 tablespoon butter
  2. 2 tablespoons olive oil
  3. Kosher Salt and Freshly Ground Black Pepper
  4. 3 chicken backbone pieces
  5. A few shallots, or 1/2 of a minced onion
  6. 2-3 cloves garlic
  7. 1 cup dry white wine or chicken stock
  8. Handful of fresh herbs
  9. Juice of 1 lemon

Instructions:

  1. Melt 1 tablespoon butter and 2 tablespoons olive oil in a 10-12 inch stainless steel skillet or sauté pan over medium-high heat.
  2. Season the chicken backbone pieces aggressively with Kosher salt and freshly ground black pepper.
  3. Once the pan is hot, add the chicken backbone pieces (remember those?) skin side down and sear until golden brown.  Allow to cook in the pan, undisturbed for 4-5 minutes – brown means brown.
  4. Once well browned, flip the backbone pieces over and continue to cook another 2-3 minutes and allow fat to render.
  5. Remove backbone pieces – you should now how some lovely fond built up in the bottom of your pan
  6. Add a few shallots or 1/2 a minced onion to the pan and sweat, scraping up the fond as the onion releases its moisture
  7. Add 2-3 minced garlic cloves and sauté with onion until fragrant
  8. Deglaze the pan with a cup or so of dry white wine or chicken stock and allow to reduce by 2/3
  9. Add a handful of fresh herbs (parsley, cilantro, thyme, whatever) along with the juice of a lemon (for acid) and continue to cook for another 2 minutes over low heat, or until sauce coats the back of a spoon and streaks the bottom of the pan when a spoon is dragged through it.
  10. Serve sauce over chicken.

Boeuf Bourguignon

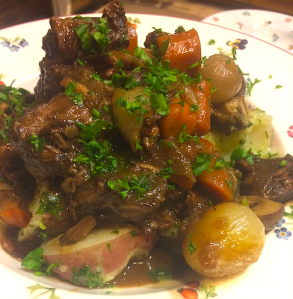
Another beautiful rustic French classic, the method for this dish bears a resemblance to Traditional Coq Au Vin.  When I made this for the first time, I followed Julia Child’s recipe to the letter, and I remember thinking about halfway through the process “This woman was insane.”  Now that I’ve made it a few times, I actually don’t think she was that crazy – it takes a bit of practice to get it down, but actually despite the fact that the whole process takes about 5 hours, there’s really probably only about 90 minutes of active time.  Still, it’s not the kind of thing you can whip up on a week night; you’ll have to wait for a day off to make it, but most of that day can be spent relaxing or doing other things while the delicious smell of beef braised in red wine permeates your home.

This recipe follows Julia’s recipe very closely, but has a few tweaks that are mainly to my personal preference, including the addition of celery and also an umami bomb.

Time: 5 hours (90 minutes inactive)
Level: Advanced
Cost: About $5.00 per plate
Serves: 6

Ingredients

  1.  Approximately 3 lbs chuck roast, trimmed of any fat or gristle, but left in large pieces
  2. Kosher Salt and Freshly Ground Black Pepper
  3. Vegetable or grape seed oil
  4. 12oz thick-cut bacon, sliced into lardons
  5. 1/4 cup all purpose flour
  6. 1 14oz can low sodium beef stock, divided
  7. 4 stalks celery, cut into 1 inch pieces
  8. 5 carrots, peeled and cut into 1 inch pieces
  9. 1 large onion, sliced
  10. 3 cloves garlic
  11. 3 tablespoons tomato paste
  12. 2 tablespoons soy sauce
  13. 1 tablespoon anchovy paste
  14. 2 bay leaves
  15.  Several sprigs fresh parsley
  16.  Several sprigs fresh thyme
  17. 1 750ml bottle dry red wine (cheap is fine, I use Aldi’s Winking Owl shiraz, $2.59)
  18. 12 small boiler onions
  19. 8 oz crimini or baby bella mushrooms, halved if large
  20. 1 shot brandy
  21. 2 lbs small roasting potatoes (which will actually be boiled)
  22. 1/2 cup chopped parsley, for garnishing

Prep and Mise En Place

  1. Preheat oven to 400°F
  2. Bring a large pot of water to a rolling boil (like you would for pasta)
  3. Prepare mirepoix (celery, onions, carrots) and combine in a medium bowl
  4. Prepare umami bomb (soy sauce, tomato paste, anchovy paste) and combine in a small bowl
  5. Mince garlic and reserve in a small bowl
  6. Trim beef and season aggressively with Kosher salt and freshly ground black pepper
  7. Slice bacon
  8. Measure out flour
  9. Open can of beef stock
  10. Open bottle of wine
  11. Prepare Bouquet Garni:  bundle thyme, parsley and bay leaves together and wrap in cheesecloth (a coffee filter tied shut will work in a pinch)
  12. Slice the stem end (not the root end) off the boiler onions but leave them unpeeled
  13. Prepare mushrooms
  14. Measure out shot of brandy

Instructions

  1. Blanch boiler onions (not sliced ones) in boiling water for 7 minutes, remove with a slotted spoon and, using a colander rinse under cold running water until cool.  Once cool, pinch the ends to peel onions under running water; the skins should slide right off.  Remove root end of onions with a paring knife, transfer to a bowl, and refrigerate.
  2. Blanch bacon in boiling water for 10 minutes, remove with a slotted spoon, and transfer to a plate lined with paper towels.  Pat dry.  (You want it dry – the more water there is in/on the bacon, the more angry popping and spattering you’ll get when you fry it).
  3. Into a large sauté pan over medium heat: Add two tablespoons of vegetable or grape seed oil along with bacon to a large saute pan and fry bacon until brown and slightly crispy, 5-7 minutes.  Remove bacon with a slotted spoon and transfer to a plate with paper towels to blot up some of the grease
  4. Over high heat, brown beef in large chunks in bacon fat, approximately 2.5 – 3 minutes per side, until nicely browned and a lovely fond begins to form on the bottom of the pan.  Remove beef to a cutting board and allow to cool.
  5. Add mirepoix (celery, onions, and carrots) to the pan.  Reduce heat to medium.  Sweat vegetables; as they begin to give up some of their moisture scrape up the fond from the bottom of the pan and incorporate.  If vegetables don’t give up enough moisture or fond threatens to burn, lower the heat and deglaze pan with a bit of liquid – stock, wine, or water.  Continue to sweat vegetables until they give up much of their moisture and begin to brown and caramelize slightly.
  6. Add garlic and sauté until fragrant, 30 seconds
  7. Add umami bomb (mixture of tomato paste, soy sauce and anchovy paste) and stir to incorporate, another 30 seconds
  8. Add about 1/3 of the bottle of red wine to finish deglazing the pan and stop the browning process.  Reduce heat to low and simmer stirring occasionally and scraping up any remaining fond.  Once all the fond is incorporated, off the heat entirely to prevent it from reducing too much.
  9. Meanwhile, while wine and vegetables are simmering, cube beef into 2-2.5 inch cubes (they’re going to shrink a lot when they cook in the oven) and add to a dutch oven or braising pot.  Sprinkle the beef with flour and stir to ensure the beef is evenly coated.  Place uncovered, in 400°F oven for 5 minutes.  Remove from oven, stir, and return to the oven uncovered for another 5 minutes.
  10. Remove beef from oven.  Add contents of sauté pan, bacon, remaining wine, 1/2 can of beef broth and bouquet garni to the beef in the dutch oven.  Stir to make sure everything is well incorporated.
  11. Cover, and bring to a boil.
  12. Once boiling, off the heat on the stove and place dutch oven into the oven and mostly cover with a lid, leaving the lid slightly ajar with a 1/2 or so inch gap.  Reduce oven temperature to 325°F.
  13. Allow stew to braise for 3-4 hours in the oven until beef is very tender.  You shouldn’t need to babysit it too much.
  14. Approximately 1 hour before finishing, prepare potatoes and onions:
    1. Place potatoes in a large pot and fill with water so water is covering potatoes by 2 inches.  Cover, and bring to a boil.  Add a large pinch of Kosher salt and then uncover and reduce to a simmer.  Simmer potatoes until they are soft and pierce easily with a fork, approximately 45 minutes.
    2. Meanwhile, add 2 tablespoons oil to a 10 inch skillet and sauté onions over medium high heat until lightly browned, 3-5 minutes.  Add remaining beef stock to skillet and deglaze any onion fond that may have formed.  Reduce heat to low and simmer for 45 minutes.  Cover or partially cover if stock reduces too quickly (ultimately, you want all but a couple tablespoons of stock to reduce)
  15. 15 minutes before finishing, transfer onions and whatever liquid remains in the skillet to the dutch oven; replace in oven as it was before.
  16. Clean the skillet, if need be, and prepare the mushrooms:  Melt 2 tablespoons unsalted butter over medium heat.  Once foaming has subsided, add mushrooms and season with salt and pepper.  Sauté mushrooms.  You will observe that at first, the fat is absorbed into the mushrooms and the pan will look quite dry.  Once the fat begins to come back out of the mushrooms and the mushrooms look slightly wet, add the shot of brandy and flambé.
  17. Remove the dutch oven from the oven and add the mushrooms.  Replace the lid and leave a 1/4 inch gap.  Using sturdy oven mitts or thick potholders, firmly grasp the dutch oven and dump the liquid out of the dutch oven, using the lid to catch any large pieces, through a fine mesh strainer (to catch the smaller pieces) and into a 4 quart saucepan.  Cover the dutch oven and set aside.
  18. Simmer the liquid in the saucepan until reduced by 1/3 to 1/2, skimming off the fat as it rises to the top
  19. Meanwhile, drain the potatoes.  Add 1 stick of unsalted butter to the potatoes along with 1/4 cup of parsley and toss until butter is melted.
  20. Return reduced liquid from saucepan to dutch oven and stir to reincorporate.
  21. Serve stew over potatoes

Bouillabaisse

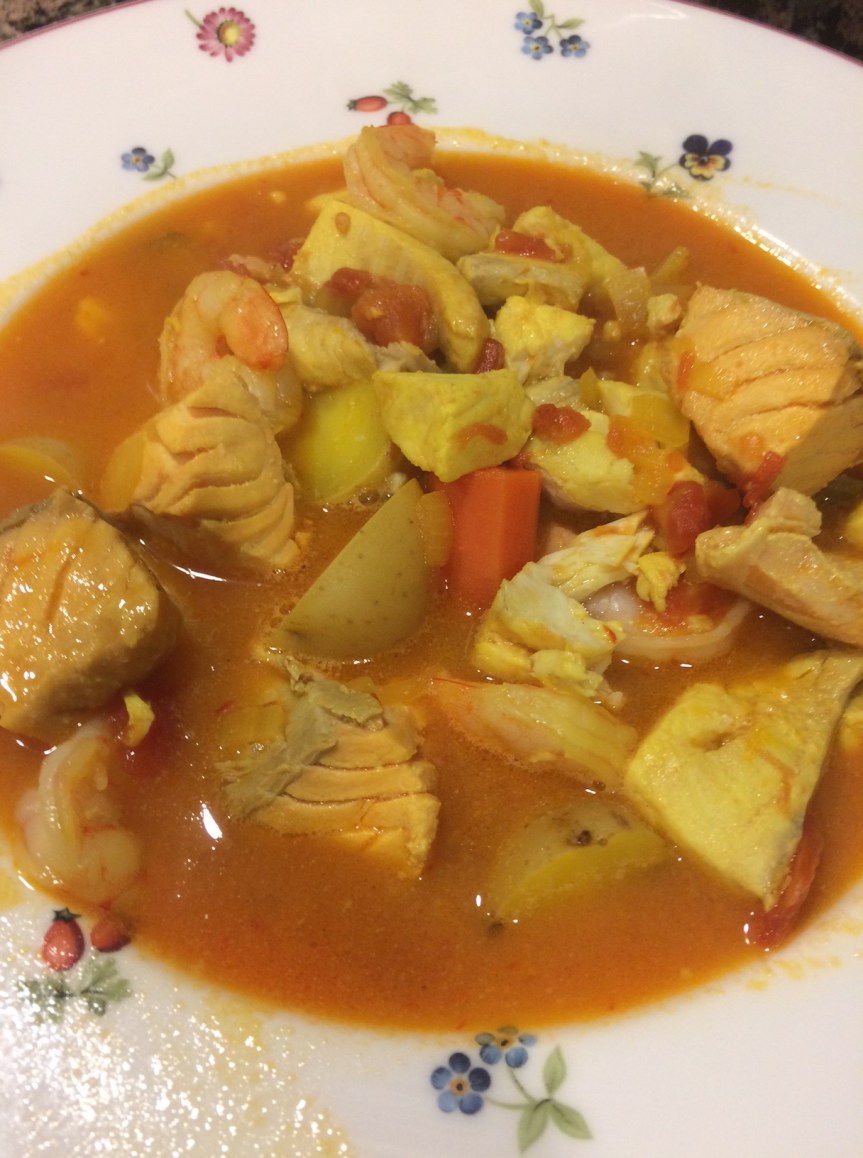
This delicious seafood stew hails from the French port city of Marseilles and represents the best of Provençal cooking: A mirepoix of onions, carrots and celery is sautéed in butter and oil, savory aromatics are added to the base along with white wine, stock and saffron and then a variety of fresh fish is gently poached to perfection.  This is not a cheap dish per se, but given all that goes into it it’s not horrendously expensive either.  The total ingredients should cost less than $40 and the dish easily serves 4-6.

Time:  60 – 90 minutes
Level: Easy
Cost: $10/plate
Serves: 4-6

Ingredients

  1. 2 TBSP olive oil
  2. 2 TBSP butter
  3. 1 medium yellow onion, diced
  4. 4 celery stocks, diced
  5. 6-8 large(ish) carrots, peeled and chopped into 1 – 1.5 inch pieces
  6. Approximately 1lb yellow or red potatoes, cut into 1 inch cubes
  7. 2 oz canned anchovie filets, drained
  8. 4 cloves garlic, finely minced
  9. 3-4 Roma tomatoes, diced and seeds removed if necessary (some tomatoes are juicer than others)
  10. 1 14oz can chicken or seafood stock (I use chicken stock, this dish is seafoody enough for me already, but do what you want)
  11. 1 package unflavored powdered gelatin (optional, to be added to stock)
  12. 1.5 cups dry white wine (about half a bottle, cheap is fine as long as you would drink it)
  13. Juice of 2 lemons
  14. 3 orange peel strips, 3-4 inches long, orange parts only (use vegetable peeler)
  15. 3 bay leaves
  16. Several sprigs fresh thyme
  17. .02oz, about 1/2 a gram, saffron threads (Trader Joe’s sells just this amount for $5.99)
  18. 1/2 teaspoon cayenne pepper
  19. 1/2 teaspoon powdered oregano (optional)
  20. 2lbs firm fresh fish of at least two types (salmon, red snapper, talapia, cod and tuna are all good choices), cut into chunks
  21. 1lb uncooked shrimp, peeled and deveined.

Prep and Mis-En-Place

  1. Dice onion, celery and carrots and combine in a medium sized bowl (this is your mirepoix)
  2. Slice potatoes into cubes that are approximately 1 inch in diameter
  3. Dice (and de-seed, if necessary) Roma tomatoes and place in a medium bowl
  4.  Mince garlic, and then, using a mortar and pestle or bowl and spoon, smush (that’s the technical term) garlic and anchovie filets together to form a paste
  5. Locate white wine and and chicken stock
    • Pro Tip:  I also add one package of unflavored powdered gelatin to my stock at this time; it makes for a richer, thicker sauce – I’ll explain why in another post
    • Pro Tip:  Since you’re going to dump the stock and wine into the pan at the same time, when it comes time to cook, dump the stock first and then use the empty can to measure out the wine.  For now, just make sure you’ve got the wine withing arm’s reach.
  6. Locate lemons and halve
  7. Tie orange peel strips, bay leaves and fresh thyme together using cooking twine to make a sachet
    • Pro Tip:  If you don’t have fresh thyme, use dried and tie the items up in a coffee filter or piece of cheese cloth.  You want the flavor of these items in your stew, but you don’t want them in your stew.
  8. Locate saffron, cayenne and oregano
  9. Prep fish:  Chunk firm fish into cubes and pieces; peel and devein shrimp

Cook

In a large sauté pan, melt butter in olive oil over medium heat.  Add celery, onion and carrots and sauté, stirring occasionally, until carrots are relatively soft and just barely beginning to brown around the edges, 10 minutes.

Add garlic and anchovie paste and stir to combine.  Sauté until fragrant, 1-2 minutes.

Add tomatoes and continue to cook gently.  Reduce heat if things are beginning to brown too much.  Cook, stirring occasionally, until all ingredients are incorporated, approximately 5 more minutes.

Add stock, wine and lemon juice and stir.  Add sachet (the orange peel/bay leave/thyme thing), oregano (if using) and saffron to the pan and stir to incorporate.  Add potatoes.  Increase heat and bring to a boil, then lower heat to a simmer.  Continue to cook until potatoes are soft, 20 – 30 minutes and liquid has reduce by 1/3 – 1/2.

Once potatoes are soft, reduce heat to a bare simmer, add fish to the pan and cover.  Allow fish to cook for 5 minutes, then add the shrimp and cover again, cooking for five minutes more or until shrimp are no longer translucent.  Off the heat and allow to rest, covered, 5 minutes more.

Serve with crusty french bread and a nice wine.


Pan Seared Lamb Loin Chops with Garlic Cream Sauce

The thing that makes this dish is the garlic cream sauce.  A fusion between Mediterranean and French flavor profiles, this dish is at the same time both tangy and mellow, sweet and savory and all-around amazing.

Time – Active: 60 minutes
Time – Inactive:  2-4 hours of marination for the lamb and 45 minutes to roast garlic
Level: Easy
Cost: $8-10/plate
Serves: 4-6

Ingredients

For the Lamb:

  1. 2-3 lbs Lamb Loin Chops (figure on 3 per person; they’re about 1/4lb each)
  2. Juice of two lemons (divided)
  3. 6-8 garlic cloves, minced
  4. Kosher salt and pepper
  5. 1/4 cup olive oil
  6. 2 TBSP clarified butter, Canola, or vegetable oil

For the Garlic Cream Sauce:

  1. 3 heads (that’s right, heads) of garlic
  2. 3 TBSP olive oil
  3. 2 TBSP unsalted butter
  4. 1 small shallot, minced
  5. 1/4 cup brandy
  6. 1/2 cup dry white wine
  7. 1 140z can low sodium chicken broth
  8. 1/4 cup heavy cream
  9. Salt, to taste
  10. Juice of 1 lemon.

Instructions

Combine 1/4 cup olive oil, minced garlic, juice of three lemons, salt and pepper, and lamb loin chops in a mixing bowl and toss to coat.  Cover and refrigerate.  Allow to marinate for 2-4 hours.

Preheat the oven to 400°F.

Remove most of the outer paper from your 3 heads of garlic.  Cut the top off the heads (opposite the root end), exposing the garlic cloves inside.  Drizzle 1 TBSP olive oil over each clove.  Place in an oven safe baking dish, cut side up, and cover tightly with aluminum foil.  Place in oven and roast until very soft and sweet, about 45 minutes.  (Begin checking after 30 minutes; use a cake tester or toothpick to test for softness).  Remove from oven and allow to cool, remaining covered.

Reduce oven temperature to 275°F.  Place marinated lamb loins on a wire rack set on a baking sheet, and bake until internal temperature is around 125°F, approximately 30 -45 minutes (cook with temperature not time; use an instant read thermometer to verify).

While the lamb is coming up to temp in the oven, use a butter knife to help coax the roasted garlic cloves out of the heads.  They will be soft and sticky so if they come apart a bit that’s okay.  Reserve the roasted cloves in a small bowl.

Once the lamb is up to temp, remove from the oven and allow to rest for a couple of minutes under loose foil.  Meanwhile, in a large heavy bottomed skillet or sauté pan, heat either 2 TBSP clarified butter, vegetable or Canola oil until very hot, around 400°F.  Carefully add the lamb loins to the hot pan, and sear, about 3 minutes on each side until deeply browned and you have a nice crust on your lamb and a beautiful fond in your pan.

Note:  Work in batches if you have to.  4-6 loins at a time is probably a good number, but remember:  each time you add a loin to the pan, you reduce the overall pan temperature somewhat.  Add too many and your lamb loins will steam, not brown.

Once you’ve got your lamb seared off, remove them from the pan and allow them to rest on the wire racked baking sheet loosely tented with aluminum foil while you make the garlic cream sauce.

Pour off the fat in the pan and lower the heat.  Melt 2 TBSP unsalted butter in the pan.  Once butter is melted but still slightly foamy, add the minced shallot and sauté until fragrant, 1 minute, being careful not to brown.  Add 1/4 cup brandy and flambé.  Add white wine and chicken broth and bring to a boil, scraping up any remaining fond from the bottom of the pan.  Add 1/4 cup heavy cream and reduce sauce until thickened to desired consistency, 8 – 10 minutes.  Once sauce is thickened, off the heat and stir for 2-3 minutes to bring down the overall temperature.

 Note:  For a smoother, creamier sauce, use an immersion blender to pureé or transfer contents of the pan to a blender and blend until smooth.

Squeeze juice of one lemon into sauce and stir to incorporate.  Taste for seasoning and adjust with salt and/or pepper as necessary.

Note:  Lemon and cream taste great together, but they are not friends.  If you add the lemon while the sauce is still too hot, the acidity in the lemon will curdle your cream sauce, and that will suck.  So make sure it is cooled down somewhat before adding the lemon juice.  Also, pro-tip: never add cream to a sauce with lemon already in it as that will almost always result in curdling the cream; instead, do it in the order prescribed here:  Reduce cream sauce, off the heat, allow to cool, and stir in lemon juice at the end.

Serve lamb with rice pilaf, Caesar Salad, and garlic cream sauce on the side.