New Mexico Style Chicken Chili Verde

I’ve been making this for 20 years – it was the first thing I ever learned to make.  I hope you enjoy it as much as my family, friends and I do.
I was inspired to figure out how to make this on a high school trip to New Mexico.  Being from New England, I was used to a lot of “beef-and-potatoes” – fairly bland stuff.  I’ll never forget getting off the plane in Albuquerque, NM at the age of 16 and heading straight to a little hole-in-the-wall joint in Gallup called Sadie’s.  It was my first exposure to (somewhat) spicy food and I never knew that food could taste like this.  I’ll always remember my friends being scared to even try it, but I couldn’t resist wolfing it down even though it made my eyes water and my nose run.  These days, I don’t find it that spicy – and it’s really not – only for a New England boy who never knew that food was supposed to taste like something.

The Prep time in this dish is a bit long since there’s a lot of chopping involved; use a sharp knife to make things a bit easier.  As always, give yourself a good head start on the prep.  If you have, say, 15 extra minutes, roast your chiles (only the Hatch/Anaheim ones) ahead of time.  It will bring out their sweet smokey spicy flavor.

Time: 60 – 90 Minutes
Level: Easy
Cost: $6-8/plate
Serves: 4-6

Ingredients:

  • 1 tbsp butter
  • 2 tbsp olive oil
  • 5-6 cloves garlic, peeled and minced
  • 1 large Spanish or yellow onion
  • 1 bunch fresh cilantro, finely chopped (reserve some for garnish, if you like)
  • 4 Hatch Chile Peppers (Anaheim Chile Peppers will also work), roasted and peeled (optional), diced.  Note:  Alternatively, pre-diced, canned green chilies work fine as well – you’ll need 3, 3.5oz cans 
  • 4 jalepeño peppers, stems and seeds removed, minced
  • 1 large green bell pepper, diced
  • 2 tsp hot sauce (or to taste, optional – I use Dave’s Insanity Sauce)
  • 3 lbs boneless, skinless chicken breasts, diced
  • 1  can/box (32oz) of low-sodium chicken broth
  • 2 cans (14oz each) white beans (NOT cannellini!), drained.
  • 3 tbsp cumin powder (you read that right, it’s not a typo, I mean Tablespoons)
  • Optional: For serving – tortilla strips, corn bread, sour cream, shredded Mexican Cheese


Optional Preparation Step (not required but it makes a big difference): 

chiles
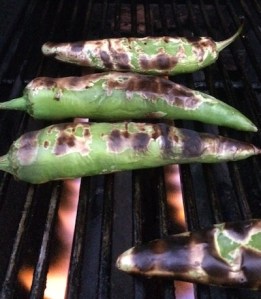
Roast your Hatch/Anaheim chiles over high heat on the grill, or under a broiler set on high – I do mine on the grill over Mesquite wood.  Wait for the skins to blister and are mostly blackened (yes, don’t be afraid to burn them, that skin is coming off anyhow), then flip and repeat on the opposite sides.  Once thoroughly roasted, place them in an airtight container (Tupperware, or simply a large bowl with a plate on top)- this will steam them in their own heat.  After about 20 minutes, remove the chiles from the container and transfer to a cutting board.  Peel the skins off and remove seeds and stems; if you blackened your chiles well, the skins should come off quite easily; if not, you can try peeling them under cold running water.  Consider using rubber gloves for the peeling process if you’re using Hatch Chiles- hot pepper hands are the worst!

Main Preparation Instructions

Dice onion; mince garlic; chop cilantro (this mixture is also known as a sofrito) – combine and reserve in a medium size bowl and set aside.  Dice Hatch (or Anaheim) chiles, jalapeños, bell pepper – combine and reserve in a separate bowl.  Dice chicken, set aside and reserve.  Open two cans of white beans, drain.  Locate cumin, set aside.

Cooking Instructions

In a large stock-pot (or very large skillet or saucepan), add butter and olive oil and melt over medium high heat.  When butter is just barely melted, reduce heat to medium and stir gently to coat the bottom of the pot.  Carefully add onion and cilantro and sauté until onions are mostly translucent, 3-4 minutes.  Add garlic and sauté until fragrant, 1-2 more minutes.

Note:  It is very important not to burn the garlic-onion-cilantro mixture (the sofrito).  If you don’t have a lot of experience gauging how hot the oil/butter mixture is, you can test it by dropping ONE tiny piece of the diced onion into the pan.  If it sizzles loudly, crackles, or jumps out of the pot spattering hot oil everywhere, it’s too hot.  The onion should only react slightly.  If it turns out it’s too hot, remove the pan from the heat for a minute or two until it cools down a bit.

Stir the sofrito continuously to ensure nothing gets stuck to the bottom of the pan and sauté until mixture begins to meld together, 3-5 minutes more.  (Did I say don’t let it burn?).

Add Hatch/Anaheim Chiles, jalapeños, and bell pepper and continue to saute until no longer stiff and crunchy, another 5-7 minutes.

Add hot sauce, if using.

Add chicken to pot and mix everything together well.  Continue stirring until chicken turns white all around.

Add cumin and mix in well.

Add chicken broth and beans – there should be enough liquid to cover everything in the pot once it’s been stirred together.  If there isn’t, add a bit of water until everything is covered by at least 1/4 inch of liquid.

Cover, and bring to a rolling boil.

Remove cover, reduce heat to medium-low, and allow to simmer down, 1 hr and 20 minutes, or until desired consistency is achieved.  (Now is a good time to crack open a beer).

Just prior to serving, turn the heat off and stir continuously for 10 minutes, or until your arms fall off.  This will make it so that the chili is cool enough to eat; it also will break down the chicken into nice ‘strings’ giving it the consistency of pulled chicken.  It also aids in the final thickening to give it that nice chili texture.

Note:  If the chicken isn’t breaking down to the desired texture, you can speed the process up using a potato masher.

Serve with Tortilla strips, sour cream, cheese and cornbread.

Arugula Salad with Lemon and Olive Oil

This is my go-to salad for serving alongside barbecued or grilled meat.  The pepperiness of the arugula, combined with the jolt of fresh acidity from the lemon juice and the sharp flavor of freshly grated Parmesan cheese is the perfect compliment to a smoky savory piece of meat or poultry fresh off the grill.  And it couldn’t be simpler.

Time: 5 minutes

Ingredients

  1. 10oz fresh arugula (it looks like a lot, but it will wilt quickly when dressing is introduced)
  2. 3 TBSP cup Olive Oil
  3. Juice of one lemon
  4. 8oz freshly grated Parmesan cheese, or to taste
  5. Salt and freshly ground pepper to taste.

Instructions

Place arugula in a large salad or mixing bowl.  Add olive oil and lemon.  Grate Parmesan cheese over top, add salt and pepper.  Toss and serve immediately.

Note:  This salad doesn’t last long on the counter top, so make it directly before serving the rest of the meal.

This recipe is featured in a complete meal, served alongside Santa Maria Tri Tip, grilled corn, and grilled garlic bread. Find the complete meal here.

8 Tips for Making the Perfect Burger

“And If I’m in luck, it’s broiled hockey puck…” (Tom Lehrer, “She’s My Girl”)
Ah, the glorious hamburger.  So delicious.  So simple.  Or is it?

We’ve all been there.  At least I have.  Burgers that are either still frozen in the middle, or turned into broiled hockey pucks.  Over the years, I’ve come up with a few techniques that will ensure you get the perfect burger every time.

This post isn’t as much a “recipe” as it is “a technique.”  So without further ado, here are my 8 tips for cooking a perfect burger every time.

Use only fresh ground beef.  Forget that frozen crap. 

Freezing breaks things down at the molecular level, which is okay for long-cooked soups and stews because they’ve already been broken down in the cooking process, but for beef, forget it.  Use fresh ground beef.  Period

Use beef that’s at least 20% fat (so, 80-20).

I know there are those fat-o-phobes out there who insist on using 90-10 because they believe that it’s a “healthier option” but if you want a good burger, it’s got to have some juiciness to it.  The only way to ensure this is by making sure that it doesn’t dry out on the grill, so a 20% fat content is a must.

Form the patties yourself. 

It’s cheaper that way.  Don’t add anything to them and try to handle them as little as possible in the formation process.  When you form them, make them flat and at least 1/4 inch larger in diameter than the buns you intend to put them on.  They’ll shrink on when you cook them, and no one likes to take their first bite of burger only to find that there’s a golf-ball of beef somewhere in the middle of the bun surrounded by toppings.  Speaking of which…

thumbburger
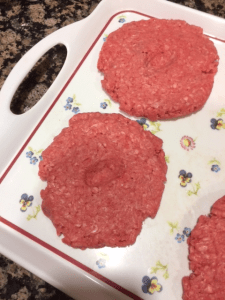
Use your thumb to make an indentation in the center of each patty.  This will ensure that when they plump up on the grill, they don’t over plump.

If you’re going to season your patties before they hit the heat, now is the time.  Never work seasoning into the meat.  A light dusting just prior to placing them on the grill should be good enough.


Your cooking surface doesn’t matter (grill, cast iron, griddle), but it has to be HOT.

Like, really hot.  It doesn’t matter if it’s a grill, a griddle, or a cast-iron skillet.  It’s gotta be screamin’ hot.  This is not low-and-slow cooking, this is hot-and-fast.  You’ll want your cooking surface to be 400F minimum.  How do you know when it’s hot enough?  If you’re using a flat surface, such as a griddle or cast iron pan, a droplet of water or two should sizzle and disappear instantly.  Conversely, on the grill, you can use the “hand test” – you shouldn’t be able to hold your hand three inches above the grill grates for more than about 2 seconds.  Want to take the guess work out of it?  Spend a few bucks on one of these babies.  Once it’s hot enough, place your patties on a HOT surface, thumb-indent side UP.

Flip them ONCE. 

How do I know if they’re ready to flip?  When I see a puddle of juice beginning to collect inside the hole I made with my thumb.  Usually 3-4 minutes per side.  Never smash your burgers down with a spatula.

If you’re adding cheese, put it on in the last minute or so of cooking.

The cheese doesn’t need to melt off the burger and into the grill grates or onto the cooking surface.  Best way to accomplish this?  Let your cheese come up to room temperature beforehand and add it at the last minute – it’ll be a lot softer that way.

Use High Quality Buns

See the bun in the featured picture at the top of this post?  That’s a brioche roll.  They’re $1.49 for 8 of them in the bakery section of my local grocery store (the “Pantry Essentials brand – the cheapest brand at my store, fit only for little-league baseball cookouts, are $1.99 for 8, by the way).  If you want to move your burger from “standard” to “gourmet” use a great roll instead of a standard burger bun.

And here ends my tips for making the perfect burgers.  Any other thoughts out there?

Santa Maria Tri-tip, Grilled Corn, Arugula Salad and Garlic Sourdough Toast

A California Central Coast classic, this meal is the perfect complement to a warm summer evening spent near the grill with friends and family.

Time: 60 – 90 Minutes
Level: Intermediate
Cost: $6-8/plate
Serves: 4-6

About This Meal

Tri-tip is a California classic cut of beef that comes from the bottom of the sirloin.  It is flavorful and tender and does not need a lot of complicated marinades or spice rubs to make it delicious.  Most grocery stores in California carry it year round, as does Costco.  It usually ranges anywhere from $4.99 – $7.99/lb.  In this meal the major expense is the beef; everything else is relatively inexpensive.

The key to grilling a delicious tri-tip is to go “low and slow” (i.e., low temp, long cooking time) – it’s really more of a roast than a steak.  This will require setting up a 2-zone fire (cool side, hot side) on your grill so you can sear it well on the outside over high heat and then let it come up to temp on the cooler side.

In this meal, the succulent beef is complemented by grilled sourdough garlic toast, sweet grilled corn, and a lemon-peppery arugula salad for a jolt of freshness and acidity.  It pairs well with a strong California Cabernet or Zinfandel.

Stuff You’ll Need (Equipment)

  1. Grill
  2. Instant Read Thermometer
  3. Cutting Board
  4. Aluminum Foil
  5. Tongs
  6. Sharp Knife (both for trimming meat as well as carving at the end)

Ingredients

  1. 2 Tri Tip Roasts, trimmed of excess fat, 2-3lbs each
  2. Classic Santa Maria Rub (Recipe follows)
  3. 2/3 cup Olive Oil, plus some for drizzling
  4. 1 loaf sourdough bread, halved lengthwise
  5. Clove of Garlic
  6. 1/4 cup Mayonnaise
  7. 1 tbsp Dijon Mustard
  8. 10oz fresh baby arugula
  9. 1 lemon
  10. Grated Parmesan cheese
  11. 4 Ears Corn, on the cob, completely shucked
  12. Smoking Wood Chips or Chunks (optional)

For the Santa Maria Rub
Couldn’t be easier.  2 parts granulated garlic powder to 1 part kosher salt, to 1 part coarsely ground black pepper.  Make it by the Tablespoon and you should have enough for two, 2lb Tri-Tips.

2zonegrill
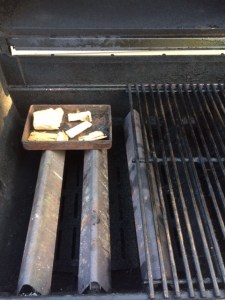
To Prepare the Grill
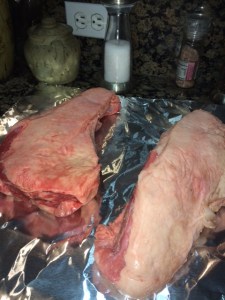
Build a 2-zone fire, or if using gas, light only one or two burners.  Place some wood chunks in a small cast iron skillet or smoker box (available from Home Depot) over the lit burners/hot charcoal.  I prefer chunks over chips because they last longer.  In terms of what wood to use, my typical go-to is a combination of pecan and apple.  Hickory and Oak would work well with this recipe too (but beware – Hickory makes everything taste like bacon… which is either good or bad).  On my grill, I usually use only one grill grate – that way I can slide the meat from hot to cool side without having to pick up the meat itself.  It also allows me access to the smoker box if I want to add more wood half way through the cook.

To Prepare the Tri-Tip

untrimmedtritip
Two untrimmed tri-tip steaks

Begin with two, 2lb(ish) tri-tip steaks.  Chances are that even if you bought them “trimmed” some additional trimming will be necessary.  Most tri-tips are sold with a pretty thick fat-cap on one side of the meat that will need to be mostly removed.  While you may have heard it said that “fat = flavor” this is only partially true.  Marbled, internal fat (like you would find on a ribeye) does impart some flavor, but thick layers of outer fat won’t break down in the time that it takes to cook a tri-tip and the result will be flare-ups and your guests just cutting away all the fat – and the delicious rub – with it at the dinner table.  So trim it off.


Tri-Tip trimmed of excess fat and outer fatcap.


To do this, simply take a sharp knife in one hand and begin to lift the fat-cap with the other.  Run the blade between the meat and the fat; if you trim off some meat in the process, that’s okay – the key is to use long, smooth cuts rather than short quick ones.  If you do the latter, your meat will look like someone attacked it with a machete.


rubbedtritip
Tri-Tip Rubbed with Santa Maria Rub


Once you’ve got it trimmed up, you’ll want to season it with your Santa Maria Rub.  First, drizzle a tiny bit of olive oil onto each tri-tip and rub it all over so there’s something for the seasoning to stick to.  I usually prefer to do this over and sheet of aluminum foil – easy clean up.  Next, use one hand to sprinkle the rub over the meat and the other hand to rub it on.  You’ll need to go pretty heavy – when you’re done, it should almost look like it’s been rolled in sand.


Important Tip:  Your beef should be at the same temperature throughout when you put it on the grill.  You may have read that you ought to throw it out on the counter to let it come up to room temperature, but don’t do that unless you have time to get it up to room temperature all the way through.  The reason for this?  If you only get the first 1/4 to 1/2 inch up to room temperature, that part will cook a hell of a lot faster then the still-cold center.  That will create a ring of gray, overdone meat around the outside.  If you want it to be nice and crusty on the outside and perfect medium rare through the center, just leave it in the fridge until you’re almost ready to throw it on the grill.  It will take longer to cook through, but not that much longer, and the results will be way better.

Now, off to the grill.

tritipongrillThe Cook

Start by searing the tri-tip over high heat on the hot side of the grill.  Contrary to popular belief, this has absolutely nothing to do with “searing in the juices.”  A piece of meat is not a balloon; it won’t pop if you stick a thermometer in it to check the internal temperature.  The purpose of searing a piece of meat is to create a beautiful, delicious crust on the outside thanks to a nifty scientific thing called the Maillard reaction.  Sear each side for about 5 minutes, with the lid closed, or until a nice crust has developed, and then move the tri-tip to the cool side of the grill.  The temperature at grate level on the cool side of the grill should be around 300F – You may need to turn down the heat a bit to accomplish this.  Also, spend the $5 on a cheap oven thermometer at Home Depot and place it on the grill grate to be sure you’ve got this right.

tritipongrill2
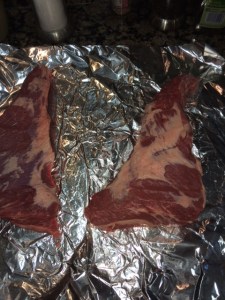
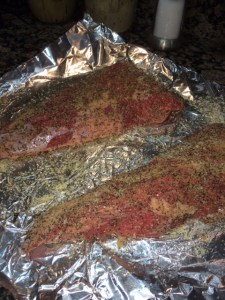
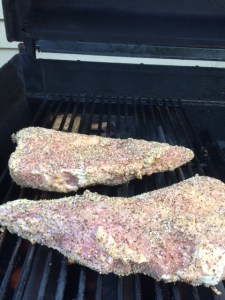
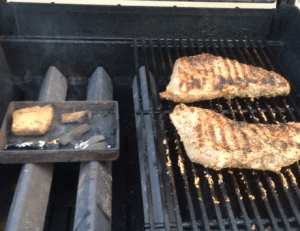
Once you’ve got the tri-tips nice and browned on each side and moved them to the cooler side of the grill, you’ll want to place the fatter ends toward the heat source, and the skinny ends away from the heat source so that everything cooks evenly.

At this point, assuming you’ve got your temperature stabilized at grate-level, move the smoker box to the middle of the grill (as pictured above) to maximize smokiness, and shut the lid.  You’ll want to check the tri-tips in about 15-20 minutes with an instant read thermometer.  You’re shooting for an internal temperature of 135F.  Remember:  Better to check more often than not – once you go over, you can’t go backwards.  That being said, tri-tip is a pretty forgiving piece of meat, so anything between 130F – 140F will be fine.  Less than 130F, and you’ll get gelatinous raw; over 140F, shoe leather.

The Salad, the Bread, and the Corn

rawbread
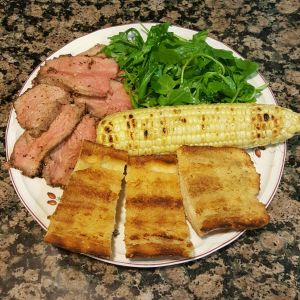
While you’re waiting for the meat to come up to temp, it’s a good opportunity to wash a few dishes and then begin preparing your sides.  Begin by dumping the arugula into a large bowl and set it aside (you’ll want to dress it at the last minute – more on that below).

Half your sourdough loaf lengthwise and lay face-up on a cutting board.  Combine the Olive Oil, Mayo, and Mustard in a small bowl, whisk to combine, and brush it onto the sourdough halves.

Shuck the corn and discard the husks.

Back to the grill.

Once you’ve achieved an internal temperature of around 135F on your tri-tips, pull them off the grill, transfer them to a carving board, and cover them with aluminum foil.  You’ll want to let them rest for 15-20 minutes, which is about the amount of time it will take to grill the corn and the bread.


grilledcorn

Begin with the corn, and grill it naked over high heat.  At this point, you’ll want to turn on another burner on your gas grill or stoke your coals a bit to get the temperature back up.  I’m convinced that this is the best way to grill corn.  You’ll want to grill it for about 12 minutes, rotating it every so often to ensure even cooking.  Once the kernals start to pop and turn brown, and the corn turns a deep yellow color, it’s ready to come off the grill.  Transfer it to a plate and wrap tightly with aluminum foil to allow it to finish cooking in its own steam.


Once you’ve got the corn wrapped up, it’s time to toast the bread.  This is arguably the most difficult part of this whole process because the oil in the bread is going to want to start fire and burn everything to a crisp when it drips off the bread through the grill grates.  To offset this problem, here’s what I do:  First, lay the bread face up on the hot grill to allow the oil to sink into the bread a bit.  Leave it there, covered, for 1 minute.  Then, flip it over and watch it like a hawk.  If it tries to burn, move it to the cool side of the grill.  Move it back once any flare-ups are out.  Continue this process for another 3-5 minutes until it’s golden brown.  Once inside, cut a clove of fresh garlic in half and rub the cut side all over the warm bread.

Lastly, drizzle 1/4 cup olive oil over the arugula, add the juice of 1 lemon, season with salt and pepper, add the grated Parmesan cheese (to taste) and toss.

And there you have it.  Let me know how it turns out for you.  It was pretty damn good for me and the family last night.

finaltritip

Good Luck!

The Intrepid Gourmet


Deciding to Cook: A Leap of Faith into the Culinary World

It takes some chutzpah to decide you’re going to learn how to cook.

There’s always the dread of screwing up – of serving a piece of meat or chicken that’s burnt to a crisp on the outside and still gelatinous raw in the middle; of embarrassing yourself and your guests as both you and they politely attempt to gnaw on some barely recognizable, Frankensteinian version of what was supposed to be a simple hamburger, all while secretly hoping that no one gets poisoned; of spending hard-earned money at the grocery store and then spending hours in the kitchen, only to end up putting something inedible on the dinner table and having to order takeout anyway; of starting a fire and then having to read the directions on a fire extinguisher before dousing flames that are becoming increasingly… large.

I’ve been there.  And I’ve done all of these things and worse.  I’m not some great gourmet; I’ve never been to culinary school, and even after 15 years of cooking experience I still sometimes make dinners that suck.  I, like you, am simply another home cook muddling his way through recipes and experiments in the kitchen.

So why, you ask, would I start a cooking blog?

I firmly believe that anyone can learn to cook.    All it takes is a bit of courage, a little know-how and some practice to make better-than-restaurant-quality food in your own kitchen.  Many people believe that there are two types of people in this world – those who can cook, and those who can’t.  But I tend to agree with what my grandfather used to say:  “If you can read, you can cook.”  All it takes is being willing to boldly go where someone else already has gone before, taking a first leap of faith, and seeing what happens.

I began cooking for myself in college because I didn’t have the money to eat out every night and couldn’t bring myself to eat the sludge that was served in the dormitory cafeterias.  That was over 15 years ago now, and in that time I’ve learned a thing or two that might be helpful to someone out there.  At this point, most of what I produce in the kitchen (although not everything) is pretty damn delicious.

My friends, family, and co-workers regularly ask me to share my recipes and my knowledge with them. At dinner time, my kids whip out their phones and take pictures of the food on their plates (many of these pictures will be featured in this blog).  I hope this all means that I must not be too bad at what I do.  I also hope this blog might inspire someone out there to try their hand in the kitchen.  If this blog inspires one person to head to the grocery store and then their kitchen instead of the nearest crap-fast-food joint (or as my family calls it, “grr burger”) then it’s worth it.

This blog is therefore dedicated to people who love food and the sense of community and camaraderie that only sharing a delicious meal can bring, and who want more of that in their lives.  It is dedicated to anyone who has ever said “I can’t cook” but secretly always wished they could.  It is dedicated to people, like me, who don’t exactly have the cash on hand to spend premium dollars at expensive restaurants, but would still prefer not to eat McDonalds, Chinese take-out, frozen pizza, helper-roni and “grr burger” most nights of the week.  Lastly, this blog is dedicated to those who have real lives and real jobs and therefore don’t have hours to spend in the kitchen every night.  To that end, my commitment to you, my friend, is this:

  1. Most of the recipes in this blog shouldn’t take more than 60-90 minutes of active prep and cook time to prepare as long as there’s a little hustle involved – most will take less, a few will take more, but in the case of the latter that means there will be time to drink a beer while something smokes on the BBQ or simmers down on the stove.  (Or you can do what I do, and drink a beer while you hustle.)
  2. Most of the recipes on this blog should be the same price as – or cheaper than – fast food.  That means that I’m shooting for recipes that are in the range of $6-8 per plate.  Again, many will be less, a few will be more.  I’m not trying to compete with Ramen noodles or helper-roni in terms of price point here; if you want that, I can’t help you.  But if you want to learn to cook something that would cost mucho dinero in a quality restaurant (and maybe even taste better) for the same price as “grr burger” then I probably can.
  3. The recipes in this blog should be easy to follow.  One of the most daunting things about learning to cook is grabbing a cookbook, collecting the ingredients, and then not know what the hell the writer is talking about (i.e., “add X, deglaze and reduce…”)  If I use terms like these, I promise to at least explain them if not write a whole other blog post on them.
  4. The meals in this blog should be complete.  There’s nothing worse than finding a great recipe on the internet, going to the store feeling confident that you can pull it off, and then finding yourself standing in the check-out line thinking “Dammit.  What the hell am I going to serve with this?”  To that end, each post will include a main dish, several side-dishes, and a wine or beer pairing.  (Note:  You’re on your own for dessert until I can get my wife, the most amazing baker I’ve ever known, to contribute to this blog.)

So there you have it – the reason this blog exists.  I invite you to try the recipes contained herein and contact me if you have any questions.  I’m happy to help and inspire.

Good luck!

Jim G – The Intrepid Gourmet