Easy New England Clam Chowder

This version of a New England classic is as easy as it is delicious.  Perfect for a cold night, it is garnished with bacon bits and oyster crackers and is best served with a rustic, crusty bread (for dipping) or warm biscuits.
Growing up in Massachusetts my family and I used to take an annual vacation down to a little island called Planting Island just off of Cape Cod.  I remember gathering clams from the muck in the shallow, brackish waters behind the causeway that led to the island.  My cousin would then make a delicious chowder.  This recipe, however, uses canned clams rather than fresh ones because fresh ones are an enormous pain in the rear end to gather, scrub, steam and de-sand.  A true New Englander would probably shoot me, but being a California transplant fresh clams are in short supply and I’ve never noticed an appreciable difference.  Without further ado, here goes:

Time: 60 Minutes
Level: Easy
Cost: $4-6/plate
Serves: 4-6

Ingredients

  • 2 Tbsp butter, divided
  • 4 slices bacon, chopped
  • 1 large white onion, diced
  • 1.5 – 2 cups celery, diced
  • 3-5 cloves garlic, minced or pressed
  • 1 bunch fresh parsley, finely chopped
  • 2 tsp tobasco (optional)
  • 1/2 tsp cayenne pepper (optional)
  • 2 lbs Yukon Gold potatoes, peeled and chunked
  • 1 15oz can low sodium chicken broth
  • 1 bottle clam juice
  • juice from 4 (4oz) canned clams (3 cans minced, 1 chopped)
  • 1 cup heavy cream
  • 2 Tbsp cornstarch dissolved in 2 Tbsp cold water (optional for thickening; this is called a slurry, by the way) OR
  • Optional for roux, if you like a really thick chowder…
    1. 1/4 cup vegetable oil
    2. 1/4 cup flour

Instructions

  1. In a large saucepan, sauté bacon until nearly all the fat is rendered and bacon is well browned (Note:  You’re going to brown it a lot more than you would when you’re cooking breakfast, you want to be able to crush it in your hands to make bacon bits!)  Remove bacon from pan with slotted spoon and set aside on paper towels to drain.
  2. Remove pan from heat and melt 1 Tbsp butter in bacon fat.  Reduce heat to medium and return the pan to the stove
    1. Note:  Make sure the fat has cooled somewhat; you don’t want hot bacon grease splattering everywhere in the next step!  Also, it will burn your ingredients and the whole meal will taste burnt.  This is really important, and is the only place where you can really screw up this recipe.  If you’re not sure how hot the fat is, toss ONE little piece of onion into the fat; if it crackles loudly and grease spatters everywhere, it’s still too hot.  You basically don’t want anything to react when you toss it in the pan.
  3. Add onion, celery and parsley to pan and sauté in bacon fat until onion is translucent, 3-5 minutes.  (This combination of stuff is called a sofríto, by the way).
  4. Add garlic and sauté until fragrant, 1-2 more minutes.
  5. If using, add Tabasco and cayenne and saute until fragrant, 1 minute (Trust me on this, use these ingredients – I know it sounds crazy in clam chowder but it adds a nice zing without being overpowering)
  6. Add potatoes, chicken broth, bottle of clam juice, and juice from canned clams.  If there isn’t enough liquid to cover the potatoes by at least 1/2 inch, add warm water until the potatoes are submerged.  Cover, bring to a rapid boil, remove cover, reduce heat to a simmer, and allow liquid to reduce and sauce to thicken until potatoes are cooked through, 20 – 30 minutes (test the potatoes by sticking a fork in them).
  7. Once sauce has reached desired consistency and potatoes are done, stir in clams, cream, and remaining butter.  Bring to a simmer and allow to cook for 5 minutes more (clams don’t take long to cook).
  8. If your chowder isn’t thick enough, add the slurry of cornstarch and water OR
  9. Optional, if you like a really thick chowder:  Heat 1/4 cup vegetable oil in a small saucepan and slowly whisk in the flour all while continuously whisking.  Incorporate the flour and continue to stir, until the mixture becomes a light blond color.  Remove from heat and continue to whisk vigorously.  After 1-2 minutes, add 1/4 cup of the soup mixture to the roux and continue to whisk vigorously (did I mention to whisk vigorously?  Don’t stop whisking!)  Once the soup mixture is incorporated into the roux, add the contents of the sauce pan back into the chowder and stir.  It will thicken tremendously.
  10. Turn off heat and stir for 3 -5 minutes to aid the cooling process and help flavors marry.

Serve into bowls and garnish with reserved bacon bits and oyster crackers.  Serve with bread or biscuits.

The Best Grilled Chicken

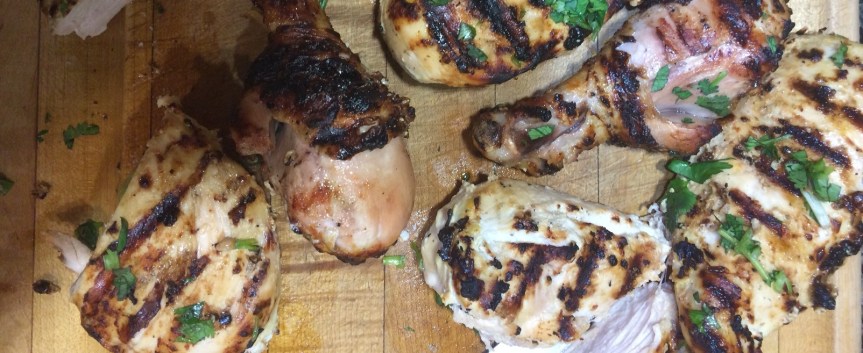
Chicken – especially chicken breast – is one of those things that tends to strike fear into the heart of every enthusiastic backyard griller.  Grilled chicken though, should be moist and delicious and a simple alternative to burgers and dogs.  Never fear, this fool-proof recipe can take as little as 45 minutes to prepare start to finish, and is a guaranteed crowd pleaser.

Time: 60 – 90 Minutes
Level: Easy
Cost: $6-8/plate
Serves: 4-6

Ingredients

  • 6 boneless, skinless chicken breasts
  • 4 chicken drumsticks (if you have a few people who like dark meat)
  • 2 cups plain Greek Yogurt (I prefer the original stuff, not the low fat stuff)
  • Juice of 2 lemons
  • 2 TBSP olive oil
  • Pinch saffron or saffron salt (Trader Joe’s sells a decent little jar of Saffron for about 6 bucks)
  • 1 TBSP Dijon mustard (not that yellow crap)
  • 3-4 cloves fresh garlic, minced
  • bunch fresh cilantro

Instructions

Whisk all ingredients except chicken and cilantro in a large bowl until well combined.  Marinate chicken in mixture for at least 20 minutes, or up to 1 hour.  (You can do this by dumping the chicken in a freezer bag with the marinade, tossing it in the bowl with the marinade, etc – whatever works.  The key is making sure the chicken is well coated and gets to sit with the acidity of the marinade for a minimum of 20 minutes).

Set up grill for 2-zone cooking, shooting for 400F at grate-level on the hot side.  Lightly oil grill grates to ensure chicken doesn’t stick (if it does, it isn’t the end of the world – it just means you didn’t wait long enough before trying to flip it).  Using tongs, remove chicken from marinade, shaking of the excess, and grill on the hot side of the grill until nicely charred, 7-10 minutes (discard excess marinade).  Flip chicken with tongs and repeat on the other side.  Transfer chicken to cool side of grill and allow to cook through until an instant-read thermometer registers 155F – 160F for white meat chicken, or, for dark meat chicken, shoot for 165F- 170F – if you’re doing both, give the dark meat a 10 minute head start.  Remove chicken from grill, cover with foil, and allow to rest for 10 minutes.  While chicken is resting, finely chop cilantro.  Sprinkle chopped cilantro over chicken and serve.

I like to serve this dish Mediterranean style with rice pilaf, pita bread, and hummus on the side.

Note:  The yogurt marinade is a little messy on the grill.  For this recipe in particular, I recommend leaving the grill on high or medium high while the chicken is resting to allow the excess to burn off, and then scraping down the grill grates while they are still hot.

Hack Your Gas Grill: Use it as a Smoker

If you’ve got a gas grill, you can still turn out some truly amazing, authentic BBQ.  Here’s how.

I know there are those people out there who are going to hate this post.  Trust me, I understand.  But ultimately, I’m about results – And if the technique yields sound results, then it’s a sound technique.  I have a BBQ smoker, and I love it – but most of the time I don’t have 12 or 15 hours to sit around and fiddle with a fire, and I if I can bring a 12 hour cook down to a 5 hour cook and turn out some BBQ that’s nearly indistinguishable from what I produce on my smoker, I’m down.  Also, many people may not have room for two or three cookers in their back yard (like I do).   This post is dedicated to BBQ lovers who want more of that smoke-kissed flavor in their lives.

In this post, we’ll be exploring two things:  First, how to use your gas grill as a smoker – and some of the sciencey stuff that goes on behind the scenes when using smoke.  Second, we’ll talk briefly about what types of wood to use and how.

Things You’ll Need

Grill

Smoker Box and/or Cast Iron Skillet

Wood Chunks

Stand Alone Oven Thermometer

Decent Instant-Read Thermometer

Meat

BBQ Rub (try Classic BBQ Rub, if you like).

The Key

Basically, the key to this whole thing is this:  You’ve got to learn to think of your grill as an oven.  That’s it.  Most of the time, we think of our grills as… grills.  In other words, we sear food (burgers, steaks, whatever) directly over high heat until it’s done.   We’re using primarily conduction and some convection to get heat into the food. When you roast or bake something, you’re using a little bit of convection and mostly radiation.  In other words, it’s heat in the form of waves penetrating your food.

Smoking is simply baking and/or roasting something in the presence of smoke.

I remember one Thanksgiving, the oven caught fire.  Faced with trying to figure out how to cook a 15lb turkey with no oven, I turned to my grill.  I lit one burner and plonked the bird down on the cool side of the grill and everything turned out fine, albeit a little dry.  That’s where the lightbulb went on.  Since then, I’ve developed a technique that I think is pretty damn solid.

The Technique

They say a picture is worth a thousand words, and Bon Appetit has a great picture to explain this, so I’m just going to use theirs:

grilldiagram

A:  Single Burner Lit, B:  Pan for catching drippings, C:  Smoker Box, D:  Smoke, E:  Meat

All that being said, there’s a few modifications I’d make to the picture above:

  •  Remove all but one of your grill grates so you can slide the food from hot to cold without picking it up, if need be.
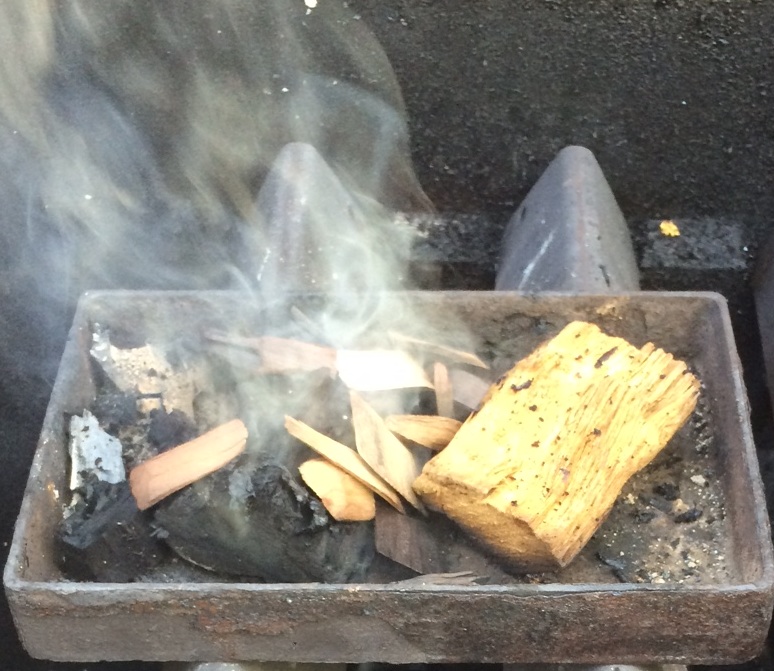
  • Place the smoker box directly on the flavorizer bar (as in the cover photo for this post), NOT on the grill grate.  Basically, I’ve never been able to get anything to smoke on the grill grate – not enough conductive heat.
  • Leave the lid off the smoker box, or simply use a small cast iron pan.
  • Use wood chunks instead of chips.  Chips burn up way too fast, whereas chunks will smolder for an hour or more.  The only time I use chips is as a starting agent; i.e., place some chips down on the smoker box with a few chunks on top just to accelerate the process a bit.
  • Don’t bother to soak your wood chunks (or chips) ahead of time.  This does nothing, other than make it take longer for them to start smoking.  I’ve timed, by weight, how long it takes wood chunks soaked for 24 hours, 1 hour, and not at all, from the time they start smoking to the time they burn up, and it’s the same.  What’s not the same is the amount of time it takes for them to start smoking.  Soaking wood chunks just extends your pre-heating phase.  Trust me, don’t waste your time.
  • Do keep a trigger spray bottle handy.  Sometimes when you open the lid (which you shouldn’t do too often) a lot of oxygen will very suddenly make its way to the wood chunks and they will burst into flame.  No need to soak them – just a couple squirts to calm them down again and shut the lid… continue on your merry way.
  • Invest in a $5 stand-alone oven thermometer to place on the grill grates.  Chances are the thermometer built into the hood of your grill (if you have one) reading as much as 50F different than the actual temperature at grate-level.
  • Shoot for 275F at grate level.  Actually, anywhere between 275F and 300F is fine.  275F is my go-to temperature for smoking just about anything, even if I’m using a traditional smoker.  Many people will say that’s high, but it’s basically been proven that the only difference between 225F and 275F is the amount of time it takes to get something up to temperature (duh), but might mean more time in the presence of smoke.  However, competition BBQ teams these days are sometimes smoking brisket at north of 300F.  The reason?  Once something has been basking in smoke for more than three hours, any appreciable difference thereafter begins to fade in a damned hurry.
  • Put about an inch or so of water into the drip pan beneath the meat.  This will eliminate the possibility of any flare ups from rendered fat, and keep everything underneath the hood nice and moist.

How to Smoke Stuff:  Cooking Times and Temps

These are fairly rough – but predictable – cooking times for various meats I’ve done using this technique.  Make sure to generously season your meat with a good BBQ Rub so that there’s something for the smoke to stick to.

I always use a two-step process.  During the first phase (three to four hours) you get smoke onto the meat.  During the second phase, you finish getting the meat up to temp (190F – 205F) by wrapping it in foil.  It’s such a common practice that it actually has a name – the Texas Crutch. I won’t go into a lot of detail here, but in between the two phases you’ll meet the nemesis of every BBQ Pitmaster – the Stall.  It basically happens at about 165F for most meats and basically, for an extended period of time, your meat will just sit there and do nothing at 165F.  Wrapping your meat at this point will help speed up the process.

Pork Butt (5-7lb): About 5 hours, 3.5 hours in the smoke, 1.5 hours wrapped in foil on the grill.  Wrap at about internal temp 165F, place it back on the grill for another and pull when internal temp is 190F – 205F

Brisket (6lb):  About six hours.  Wrap at 4 hr mark (roughly 165F), finish off for 2 hrs.  Pull at 190F.

Turkey Breasts X 3 (1lb each):  About 2.5 hours.  No need to wrap in foil (i.e., “crutch”) while cooking, just pull them at 165F, wrap them up in foil with some butter and let them rest for 20 minutes.

Types of Wood to Use

BBQ wood falls into two categories:  hard woods and fruit woods.  My go-to combination is equal parts Pecan (a hard wood) and Apple wood (a fruit wood), but I also use oak, hickory, cherry, peach and mesquite.  Here’s a basic run-down on some basic types of wood and how to use them, organized from strongest to weakest flavor:

Mesquite (hardwood).  Hot temperature, fast burn time. The mother of all hard woods, mesquite has a strong, earthy, leathery flavor.  It’s really only useful for very short cooks (less than 30 minutes).  Nothing can ruin a piece of meat quicker than too much mesquite.  However, it’s quite good on lamb, burgers and roasted green chiles and other veggies.  It quickly overpowers poultry, pork, and fish.

Hickory (hardwood).  Hot temperature, long burn-time.  The most commonly used hardwood, it’s pretty safe to use on anything other than fish.  Be warned:  It makes everything taste like bacon (which is either good or bad, depending on how you look at it).

Oak (hardwood).  Hot temperature, medium burn time.  Not as strong as hickory, and slightly sweeter.  Safe for use on anything except fish.  Good for slightly longer cooks as it’s flavor is more mild.  Post Oak is the go-to in Texas BBQ, and for Santa Maria BBQ the go-to is Red Oak.  White Oak is the mildest and is slightly reminiscent of Pecan.

Pecan (hardwood).  Medium temperature, medium burn time.  Mild, sweet and yet strong enough to stand up to even the gamiest of meats.  Great on anything.  Imparts a slightly nutty flavor.  If I had to use only one wood for the rest of my life, this would be it.

Cherry (fruitwood).  Medium temperature, long burn time.  The strongest of the fruitwoods, it penetrates meat fairly quickly and imparts a rich, earthy flavor.  It also tends to turn meat dark pretty quickly.  Good on poultry and fish, and as a mixer with another hardwood.  In my opinion, it makes beef too sweet.

Apple (fruitwood).  Medium temperature, medium burn time.  My go-to fruitwood.  It takes a long time for it to penetrate meat, so it works well in combination with another hardwood.  That being said, it’s awesome on fish by itself.

Peach (fruitwood).   Low temperature, long burn time.   Probably the mildest of the fruitwoods, peach is good for cold smoking fish and cheese, but not much else, in my opinion.

Note:  Never, ever use pine or anything coniferous – the resin will ruin your grill and impart a nasty, acrid taste to everything.  The one exception to this is if you’ve got some cedar planks that you have soaked for a while, they can be used to make some damned fine salmon – but that’s a whole other technique on a whole other post.

Happy Smoking!

The Intrepid Gourmet



Seared Lamb Loin with Garlic and Lemon

Lamb tends to be one of those things that people either love or hate.  For a long time, I hated it because the only way I’d ever had it prepared was slow braised in a crockpot, stew-style, and served with mint jelly.  While that may be some people’s cup of tea, it wasn’t mine.  Then I figured out that lamb could be prepared much like steak – served medium rare.  When served like this, it has a rich, complex flavor that makes an excellent alternative to beef.

Time: 60 Minutes
Level: Easy
Cost: $8-10/plate
Serves: 4-6

This particular recipe uses lamb loins although lamb chops would work just as well.  Lamb loins look like tiny T-bone steaks – which is essentially what they are, just from a lamb instead of a cow (i.e., tenderloin on one side and strip steak on the other).  As such, they are totally delicious.  Because they’re small, they don’t have a lot of meat on them.  My boys and I can easily polish off about four; my wife will eat two.  Even still, if you can find them on special it makes for a pretty economical meal.  Also, this recipe is SUPER easy.

Ingredients

  1. 12 – 16 Lamb Loins (serves 3-4 hungry folks)
  2. 3 TBSP Olive Oil
  3. 6-8 garlic cloves (finely minced or pressed)
  4. juice of one lemon
  5. kosher salt and freshly ground black pepper, to taste.


Method

Consider trimming a bit of fat off the outside of the lamb loins if they’re particularly fatty.  1/4 to 1/8 inch or so is probably good.  I probably should have done that for this recipe; I will next time.  In either case, no biggy – they came out great.

Place lamb loins in large tossing bowl and add olive oil.  Toss to coat.  Add garlic, lemon, salt and pepper.  (Note:  Normally I don’t like garlic presses, but in this case I’ll usually opt to press my garlic because it’s easier than mincing them into a paste, which is really what needs to happen).  Cover and refrigerate for as little as 20 minutes or as long as 12 hours.

If preparing in the kitchen, preheat the oven to 300F.  Line a baking sheet with oven-safe parchment paper for easier clean up.  Add 1 TBSP olive oil to a cast iron or copper skillet, and heat to very hot until oil is shimmering and smoking slightly.  Sear lamb loins in batches, 2-3 minutes per side or until nicely browned.  Don’t overcrowd the pan.  Transfer lamb loins to baking sheet and bake 15-20 minutes or until an instant read thermometer reads 130F for medium-rare.  Let rest for 10 minutes before serving.

If preparing on the grill, build a 2-zone charcoal fire or alternatively, on a gas grill,  light one or two burners only.  Shoot for 300F at grate level on the cool side (don’t rely on your grill’s thermometer, spend $5 on an oven thermometer at Home Depot and place it on your grill grate to ensure an accurate reading).  Add a couple of mesquite wood chunks, if you like (mesquite is perfect for this meal because of it’s strong flavor and the short smoking time involved).

Sear lamb loins on hot side of grill with the lid open for 3-5 minutes per side or until nicely browned.  Transfer to cool side and close the lid.  Grill for 15-20 minutes or until an instant read thermometer reads 130F for medium-rare.  Let rest for 10 minutes before serving.

Remember:  In order to achieve a piece of meat that is perfect medium-rare end to end and seared on the outside (see picture) the meat needs to be the same temperature throughout when the cooking process begins.  I recommend going straight from the fridge to the grill/pan without letting it come up to temp on the countertop.  For more information see The Secret to Perfect Beef Roasts and Steaks.

Serve with steamed asparagus or green beans and rice pilaf.

Pairs well with Malbec (Argentina), Shiraz (Australia) or Red Zinfandel (California)


Cooking 101: Using Heat

Cooking is about heat.  Being able to control heat , understanding how heat enters food, and what happens to food when it does, is a fundamental skill to master if you want to learn to cook. Fortunately, once you’ve got an understanding of what’s going on, it’s not that hard to figure out.

If you’ve cruised around this website much, you’ve probably gotten the picture that I have a horror of things that are burnt on the outside and gelatinous raw in the middle – that’s because figuring out how to use heat was one of the biggest hurdles I had to jump in order to become a decent cook.  For me, figuring it out it was a lot of trial-by-fire (sometimes literally).

I’m willing to bet that the #1 reason people struggle with cooking is the inability to control heat which stems from a lack of understanding the basics of what it is and how to use it.  I myself struggled with this for a long time – sometimes I still do if I’m not paying attention – but I hope that this post will shed some light on a few techniques that will improve your hand in the kitchen.

To get started, let’s get some definitions out of the way:

Types of Heat Transfer

  1. Conduction happens when heat is transferred through direct contact.  Thermal energy (the jiggling of molecules) being transferred through molecular contact.  This usually happens pretty quickly.  So, for example, if you have something with a lot of thermal energy stored in it (say, a hot cast iron skillet that’s been sitting on the stove for a few minutes), and a good conductor (say, olive oil), and you throw a steak on there, it’s going to cook pretty quick; i.e., a lot of the thermal energy stored in that skillet is transferred rapidly to the outside of your steak.
  2. Convection is when molecules that that have a lot of thermal energy trade places with ones that don’t, and take that energy with them when they move around.  For example, if you’re trying to boil some water on the stove, the molecules closer to the heat source will have more thermal energy transferred to them than the ones that are farther away.  If you stir a pot as it’s reaching boiling temperature, the whole thing will come up to temp more quickly.
  3. Radiation is when heat waves (i.e., infrared waves, or microwaves) penetrate a material and cause thermal energy to build up inside the material.  For example, when you throw a steak or a burger on the grill, you’re probably getting a little bit of conduction from the hot grill grates as it comes into contact with the food, but the majority of heat transfer into the food is coming directly from the heat source – your charcoal or your gas flavor bars.

Techniques Using Heat

There are a lot of ways to transfer heat into food: Steaming, boiling, sous-vide, sautéing, baking, smoking, broiling, grilling, pan frying, deep frying – even microwaving – but the thing is that most of these techniques fall into one of three categories:

  1. Low and Slow.  Low cooking temp, long cooking time.  Primarily radiation in the form of infrared waves and convection.  This includes techniques such as baking and smoking (which is essentially baking something in the presence of smoke; smoke does little to aid in heat transfer, but it does impart a wonderful flavor).
  2. Hot and Fast.  High cooking temp, short cooking time.  Conduction and radiation.  This includes techniques such as broiling, grilling, sautéing, pan frying and steaming.
  3. Immersion.  Medium cooking temp, medium cooking time, requires liquid.  Primarily conduction; includes boiling and deep frying.

As I discussed in last week’s Technique of the Week, the key to cooking almost anything is to get it to come up to temperature evenly and uniformly throughout – whether it be a 4lb roast beef in the oven (baking) or some minced onions in a frying pan with some oil (sautéing).

Okay, so, how is any of this useful?  Because precise heat control means precise cooking.

Example #1 If you’re going to cook a 4lb roast, you’re going to want to sear it using conduction (i.e. broiling or grilling), and then use radiation (i.e., baking) to bring it up to the desired temp in a uniform fashion.

Pro Tip:  Think of your grill as an oven.  Always use the ‘two-zone’ technique – one side for hot-and-fast conduction, the other side for low and slow radiation.

Example #2  Let’s say you’ve got some burgers you want to throw on the grill.  No need to low and slow them – just use high heat and a good conductor (cast iron skillet), or a lot of radiation (hot grill).  See 8 Tips for Making the Perfect Burger.

Example #3  Let’s say you’re making chili.  You’re essentially using immersion – you’ve got a lot of liquid in the pot, and it’s going to boil down over time to the desired thickness.  You’ve got to watch the heat, because as the chili thickens up, it will absorb heat more easily.  If you’re not careful, conduction will take over and you’ll burn stuff to the bottom of the pot.

Remember, practice makes perfect.  I’ve burned or under-done my fair share of things, but once I got the hang of controlling heat and more often than not using a 2-stage process (searing in one phase and essentially baking in another phase) everything became easier.  Hopefully this will make it easier for you too.

Otherwise, we’re all just stuck eating salads.

Good luck!

——————–

*The cover photo and featured photo for this post: courtesy en.wikipedia.org s.v. ‘grilling’