New Mexico Sopapillas

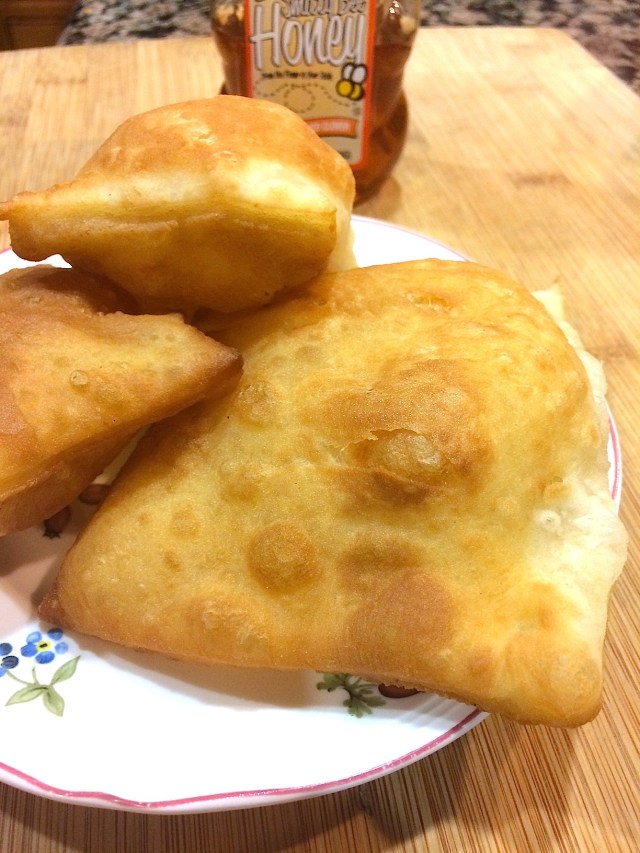
I love these guys – puffy, airy little pastries designed to do one thing: be a delivery mechanism for awesome flavors.  They are a staple of New Mexican cuisine, and as far as I can tell, almost exclusive to it as well.
Sopapilla literally means “little soup pillow” and that’s what they are best at – sopping up delicious sauce from the plate, or soaking in delicious chili.  My first encounter with a sopapilla was at a Sadie’s in Albuquerque, NM back when I was in high school.  This was also the first time I encountered Chili Verde, chili in general, and food that was legitimately spicy.  I had been wanting to try to make these for years, but for a whole variety of reasons never got around to it until the other night, and they were amazing.  Sprinkled with a bit of cinnamon sugar or a drizzle of honey, they also make an awesome breakfast.  Also, this was REALLY easy.

Time: 30 minutes
Level: Easy
Cost: Really, really cheap seeing as they’re made from stuff you probably have on hand
Makes:  Approximately 18-24 sopapillas

Ingredients

  1. 3 cups all purpose flour, plus perhaps 1-2 TBSP
  2. 2 tsp double-acting baking powder
  3. 1 tsp salt
  4. 1 cup whole milk
  5. 1/4 cup warm water
  6. 6 TBSP unsalted butter, melted
  7. 1.5 quart (48 oz) vegetable or canola oil, for frying

Instructions

  1. Combine dry ingredients (1-3) in a large mixing bowl and whisk to combine.
  2. Create a well in the bowl using the dry ingredients, it should look like a little volcano; a mound of ingredients with a little hole, perhaps 2 inches in diameter, in the top.
  3. Combine wet ingredients (4-6) in a 2 cup measuring cup and whisk briefly to combine.
  4. Add about half of the wet ingredients to your flour-mixture volcano.  Using your hands, begin scooping the dry ingredients from the edges of the volcano into the wet ones on top.  Add the rest of the wet ingredients and continue to mix until a rough dough has formed.  If your dough is super sticky, coat it with 1 TBSP flour.  Once the dough is fairly consistent, coat with 1 more TBSP flour and cover with plastic wrap or a clean towel.  Punch down and fold a few times to make sure everything is really worked together.  Allow dough to rest for 20 minutes.
  5. Once dough is rested, remove it from the bowl and divide into two parts.  Place one part back in the bowl and cover while you work with the other part.  On a lightly floured work surface, use a rolling pin to roll the dough out to about 1/8 inch thick, trying to get it as consistent as possible.  Cut off rounded edges to make a rectangular piece of dough and discard the trimmings.  Cut dough into rectangles approximately 1.5″ x 2″.  Repeat with the remaining dough.
  6. Heat oil in a large pot to 375°F – 400°F
    • Cook’s Note:  When frying stuff, I’ve found that my 5qt sauté pan is actually the perfect size.  480z of oil comes do about 2″ deep, which is all you really need to fry just about anything.  The fact that it’s fairly wide (12″ across) means that the oil will come up to temperature more quickly and I can fry things in larger batches.  There’s only one serious drawback:  A sauté pan has a handle, and handles can be accidentally knocked, and the potential for knocking a large volume of 400°F oil onto yourself or the floor is a VERY bad thing.  So, if you use your sauté pan for this, PLEASE make sure the handle is pointed AWAY from you, toward your stove, and well away from any place it could be inadvertently knocked.
  7. Once oil is up to temp, carefully slide a sopapilla into the oil.  It will submerge, sizzling quite a bit, and then float to the top.  Then the magic happens:  Before your very eyes, it will puff into a beautiful little pillow.  Continue to fry for 2-3 minutes until golden brown, and the flip with a slotted spoon to brown the other side.  Once you’ve done one as a tester, you can probably do 3-4 at a time.
    • Cook’s Note:  If your sopapilla doesn’t puff, chances are your oil isn’t the right temperature.  It’s got to be hotter than 350°F but no hotter than about 410°F.  Remember:  Every time you add a sopapilla to the oil, it’s going to bring the overall oil temp down a couple of degrees.  This is why I recommend starting with your oil somewhere between 375°F – 400°F.   Either that or you’re trying this at high-altitude.  In either case, if after a few test batches your sopapillas don’t puff, don’t worry – they’re still tasty.
  8. Once fried, remove sopapillas to a plate lined with a paper towel to drain.  Repeat until all sopapillas are fried.  They can be kept warm in a 200°F oven for 30-45 minutes.  Also, they refrigerate pretty well and can be gently reheated in a 325°F oven until just warmed through, about 5 minutes.

Peruvian Style Roast Chicken with Jalapeño-Cilantro Sauce

This delicious, succulent chicken served with a green sauce similar to a creamy chimichurri is a sure crowd pleaser.  This version is a loose adaptation of J. Kenji Lopez-Alt’s  grilled recipe featured on his blog Serious Eats.  While it could also work out quite nicely on the grill, this version is executed in the kitchen and is one of the best things I’ve made in a long time.

Time: 90 minutes (30 minutes inactive)
Level: Easy/Intermediate
Cost: About $4/plate (depending on which pantry essentials you have on hand)
Serves: 3-6

Ingredients

For the Chicken:

  1. 1 whole chicken broken down into 8-10 parts, plus a couple of extra breasts or thighs if you’re feeding a crowd
  2. 4 tsp kosher salt
  3. 2 TBSP ground cumin
  4. 2 TBSP paprika
  5. 1 tsp coursly ground black pepper
  6. 2 TBSP granulated garlic
  7. 2 TBSP white wine vinegar
  8. 2 TBSP olive oil
  9. 3/4 cup white vermouth
  10. 1 shallot (or 1/2 white onion), diced
  11. 3 cloves garlic, minced
  12. juice of 1 lemon

For the Green Sauce:

  1. 3 jalapeño peppers, relatively finely diced, stems removed (and seeds and membranes removed if you don’t like the heat)
  2. 1 bunch fresh cilantro, large stem portions removed
  3. 3 cloves garlic, minced
  4. 2 tsp dried oregano
  5. pinch Kosher salt
  6. juice of two limes
  7. 2 TBSP red wine vinegar
  8. 1  shallot (or 1/2 white onion), minced
  9. 1/3 – 1/2 cup sour cream

Prep

For the Chicken:

  1. Begin by brining your chicken.  In a large bowl, mix together 6 cups cold water and 1/4 cup kosher salt.  Whisk until salt is dissolved.  Add chicken and refrigerate for at least 30 minutes, or up to two hours.
  2. Combine dry spice rub ingredients (ingredients 2-6) in a bowl or tupperware container and whisk or shake vigorously to combine.
  3. Prep ingredients 7-12 and arrange your mise-en-place

For the Green Sauce:

Combine all ingredients in a food processor or blender and blend until smooth.  Pour into appropriately sized container and refrigerate.

Cook:

  1. Preheat oven to 375°F
  2. Remove the chicken from the brine and pat dry with paper towels.  In a large tossing bowl, add 2 TBSP olive oil and 2 TBSP white wine vinegar and toss to coat.  Add 1/2 of dry spice mix and toss to coat again.  Add remaining spice mix and toss to coat a third time.
  3. Heat 3 TBSP of a high smoke-point fat (I used bacon fat this time, but grapeseed oil, vegetable oil, or ghee would also work) in a large sauté pan, until very hot (350°F – 375°F)
  4. Place half of chicken, skin side down, into the skillet and brown for 4-5 minutes, or until golden brown.  Flip chicken over and brown 2-3 minutes more.  Remove from pan and set on a wire rack placed on a rimmed baking sheet.  Repeat with remaining chicken.  You should have a nice fond in the bottom of your pan.
  5. Add onion or shallot to pan and sweat until very fragrant, 3-4 minutes, and some of the fond begins to incorporate into the onion.  Add garlic and sauté until fragrant but not burned, 1 minute more.
  6. Add vermouth and flambé.  Bring to a boil and scrape up any brown bits still stuck to the bottom of the pan.  Reduce sauce to an almost syrup-like consistency, and then baste chicken using a spoon.
  7. Place chicken in oven and roast until breasts are 150°F – 160°F and thighs and legs are 160°F – 170°F
  8. Remove from oven, place on a serving platter, and squeeze lemon juice all over chicken.   Let rest for 10 minutes.  Spoon green sauce over chicken and serve.

Note:  I served this with some garlic toast and a bacon-avocado Caesar Salad, using the bacon bits from which I rendered the fat in Step 3 of the cooking process.  It was delicious.


Honey Glazed Chipotlé-Lime BBQ Chicken

This BBQ Chicken is tangy, sweet, spicy and fresh.  All the right flavors and a unique twist on classic BBQ chicken.  Searing the chicken in a hot skillet ahead of time renders out a good bit of fat and leads to perfectly crispy skin.  Finish either on the grill or in the oven and follow the instructions below to get perfect, bite-through skin and a beautiful end product.

Time: 60 minutes
Level: Easy
Cost: About $4/plate (depending on which pantry essentials you have on hand)
Serves: 3-6

Ingredients

For the Glaze

  1. 1 small onion or normal sized shallot, finely diced
  2. 3-5 cloves garlic, minced
  3. 1 TBSP unsalted butter
  4. 1 can Adobo Chiles in sauce
  5. 1 7oz can tomato sauce
  6. Juice of 4 limes
  7. 1 TBSP low sodium soy sauce
  8. 1/4 cup honey

For the Chicken

  1. 1 or 2 4-5lb fryer chickens, broken down into 8-10 parts, depending on how many you’re feeding  (figure that a chicken will feed 3-4 people)
  2. 1/4 cup Kosher salt
  3. Drizzle of Olive Oil
  4. 3-6 TBSP flour
  5. 2-4 TBSP paprika
  6. Freshly ground black pepper

Instructions

PART ONE:  Begin by brining your chicken:

Once you’ve got your chicken broken down into parts, place the chicken parts in a large bowl and cover with cold water.  Add about 1/4 cup salt and mix around with your hands until the salt is mostly dissolved in the water.  Refrigerate for at least 30 minutes, or up to 2 hours.

Cook’s Note:  You can skip this step if you’re in a rush, but even 30 minutes in a light brine will lead to a considerably juicer and product.

PART TWO:  While the chicken is brining, make your glaze:

  1. Melt butter in a sauté pan or large frying pan over medium heat until foamy but not browned (use non-stick here if you like).
  2. Add onion and garlic and sauté until fragrant and onions are mostly translucent, 3-5 minutes
  3. Add can of chiles, along with their sauce, and sauté with onions and garlic, another 3 minutes, or until chiles barely being to caramelize
  4. Add tomato sauce, lime juice and soy sauce and stir to incorporate well
  5. Stir in honey and reduce, stirring continually, until mixture has thickened and a light glaze begins to appear.
  6. Off the heat and allow to cool

PART THREE:  While your glaze is cooling off, prepare the chicken:

  1. Preheat oven to 350°F or begin preheating grill (see Part 5, below).
  2. Remove chicken from the brine and pat dry with paper towels.  Place chicken in large mixing or tossing bowl and drizzle with olive oil.  Toss to coat.
  3. Add flour, paprika and pepper to the bowl with the chicken (if you didn’t brine ahead of time, add a generous pinch of kosher salt here as well).  Toss again to coat and let stand at room temperature for 10 minutes.

PART FOUR:  While your chicken is standing, finish your glaze

  1. Add your glaze to a blender or food processor and pureé until mixture has the consistency of marinara sauce
  2. Divide your mixture into two separate bowls (for two batches) and reserve

PART FIVE:  Cook the chicken

  1. Begin by heating 3 tablespoons ghee, clarified butter, grapeseed oil, vegetable oil or Canola oil in a cast iron or stainless steel skillet until shimmering and very hot (any oil or fat with a high smoke point will work fine here)
  2. Add half the chicken pieces to the hot skillet, skin side down, and brown, 5-6 minutes.  Flip and continue to brown the other side, another 3-4 minutes.  (Note:  If your chicken is still stuck to the pan when you try to flip it, it isn’t ready.  Wait until a light prodding with a set of tongs sets it free and flip).  Remove, reserve, and repeat with remaining chicken pieces.

If Finishing On The Grill

  1. Light a gas grill on one side only, or alternatively bank charcoal on a charcoal grill to one side, creating a hot side and cool side of the grill.  Add a few wood chips for extra smokey flavor.
  2. Place seared chicken on the cool side of the grill, skin side down.  Place the breasts farthest away from the heat and the dark meat closer to the heat.  Baste chicken with first batch of glaze.  Flip, so that the chicken is skin side up, and baste again.  Discard any glaze that remains from this batch.
  3. Cover the grill and cook until breasts reach an internal temperature of 150° – 160°F and thighs and legs are 160° – 170°F.
  4. After about 15 minutes, use the second batch of glaze to baste your chicken a second time.  Use this opportunity with the grill open to take your chicken’s temperature with an instant read thermometer.  Be sure to leave chicken skin side up.
  5. When chicken is up temp, move chicken over to hot side of grill and cook, starting skin side down, until nicely charred.  Repeat on the other side.
  6. Remove, and allow to rest, skin side up, for 10 minutes before serving.  DO NOT COVER WHILE RESTING – your perfectly crispy skin will get all soggy!

If Finishing in the Oven

  1. Set chicken on a wire rack over a baking sheet, skin side down.  Baste chicken with first batch of glaze.  Flip, so that the chicken is skin side up, and baste again.  Discard any glaze that remains from this batch.
  2. Bake in 350°F oven until breasts reach an internal temperature of 150° – 160°F and thighs and legs are 160° – 170°F.
  3. After about 15 minutes, use the second batch of glaze to baste your chicken a second time.  Use this opportunity with the oven open to take your chicken’s temperature with an instant read thermometer.  Be sure to leave chicken skin side up.
  4. When chicken is up temp, switch oven to BROIL – HIGH and cook for 2-3 minutes, until nicely darkened.  Watch carefully that it does not burn.
  5. Remove, and allow to rest, skin side up, for 10 minutes before serving.  DO NOT COVER WHILE RESTING – your perfectly crispy skin will get all soggy!


Chicken Chili II (Updated Version)

Recipes change over time.  As we spend more time in the kitchen and become better cooks, we learn new things; as we learn new things, we incorporate them into the dishes we already know how to make.  That’s ultimately how a dish becomes “ours” – when we’ve come to know it so well through years of making it that is truly our own.  In my mind, though, even when a dish has become “ours” it has never reached perfection – and even after nearly 20 years, I’m still learning new things.
This has the same ingredient list (with the addition of 3 TBSP of flour, a couple of other spices, and some celery) as my original recipe, but the ingredients are treated differently and cooked differently to maximize depth of flavor.  The primary difference is that this method involves browning the chicken breasts first along with a spice mixture whereas in the original the chicken is not browned and the spices are dumped in just prior to adding the broth and reducing liquid.
This is how I’m making my chili these days:

The Prep time in this dish is a bit long since there’s a lot of chopping involved; use a sharp knife to make things a bit easier.  As always, give yourself a good head start on the prep.  If you have, say, 15 extra minutes, roast your chiles (only the Hatch/Anaheim ones) ahead of time.  It will bring out their sweet smokey spicy flavor.

Time: 60 – 90 Minutes
Level: Easy
Cost: $6-8/plate
Serves: 4-6

Ingredients:

  • 3 lbs boneless, skinless chicken breasts (about 6 breasts)
  • 3 TBSP flour
  • 3 TBSP cumin powder (you read that right, it’s not a typo, I mean Tablespoons)
  • 1 TBSP paprika
  • 2 tsp cayenne pepper
  • Salt and pepper
  • 2 TBSP vegetable or canola oil
  • 2 TBSP olive oil
  • 1 large Spanish or yellow onion
  • 4 jalepeño peppers, stems and seeds removed, minced
  • 1 large green bell pepper, diced
  • 1 cup celery, diced (about 3 stalks)
  • 5-6 cloves garlic, peeled and minced
  • 4 TBSP (about half a bunch, not including stems) fresh cilantro, finely chopped
  • 4 Hatch Chile Peppers (Anaheim Chile Peppers will also work), roasted and peeled (optional), diced.  Note:  Alternatively, pre-diced, canned green chilies work fine as well – you’ll need 3, 3.5oz cans 
  • 1-2 tsp hot sauce (or to taste, optional – I use Dave’s Insanity Sauce because I like it spicy!)
  • 1  can/box (32oz) of low-sodium chicken broth
  • 2 cans (14oz each) white beans (NOT cannellini!), drained.
  • Optional: For serving – tortilla strips, corn bread, sour cream, shredded Mexican Cheese

Optional Preparation Step (not required but it makes a big difference): 

chiles
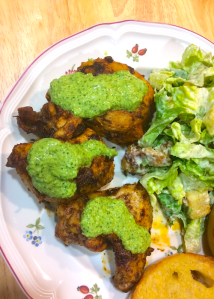
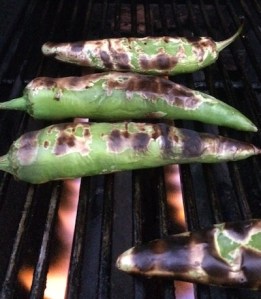
Roast your Hatch/Anaheim chiles over high heat on the grill, or under a broiler set on high – I do mine on the grill over Mesquite wood.  Wait for the skins to blister and are mostly blackened (yes, don’t be afraid to burn them, that skin is coming off anyhow), then flip and repeat on the opposite sides.  Once thoroughly roasted, place them in an airtight container (Tupperware, or simply a large bowl with a plate on top)- this will steam them in their own heat.  After about 20 minutes, remove the chiles from the container and transfer to a cutting board.  Peel the skins off and remove seeds and stems; if you blackened your chiles well, the skins should come off quite easily; if not, you can try peeling them under cold running water.  Consider using rubber gloves for the peeling process if you’re using Hatch Chiles- hot pepper hands are the worst!


Main Preparation Instructions

  1. Dice onion, jalepeños, green bell pepper and celery; combine in a medium bowl and set aside.
  2. Mince garlic and chop cilantro – combine and reserve in a small size bowl and set aside.
  3. Dice Hatch (or Anaheim) chiles and reserve in a separate bowl (or open cans thereof).
  4. Open two cans of white beans, drain.
  5. Get chicken broth ready.
  6. In a large tossing or mixing bowl, add chicken breasts (whole).  Drizzle with olive oil and toss to coat.  Add flour, cumin, paprika, cayenne, a pinch of kosher salt and a few generous grinds of fresh black pepper.  Toss to coat again.

Cooking Instructions

In a large stock-pot (or very large skillet or saucepan), add vegetable and olive oil and heat over medium heat.  When oil is hot and shimmering, but not quite smoking,  Carefully add 2 -3 of the coated chicken breasts and brown, 3-4 minutes on each side, without overcrowding the pan – you will probably need to work in batches.  Once all the chicken breasts are nicely browned, remove them from the pan and transfer to a carving board (note I did not say cutting board).  The chicken does not need to be cooked through at this point.  You will now have a beautiful, spicy fond on the bottom of your pan.

Lower the heat and add onion, celery, green bell pepper and jalapeño peppers to the pot (make sure the pan isn’t too hot when you do this).  Sauté over medium heat, stirring to prevent burning.

Note:  If you don’t have a lot of experience gauging how hot the pan is, you can test it by dropping ONE tiny piece of the diced onion into the pan.  If it sizzles loudly, crackles, or jumps out of the pot spattering hot oil everywhere, it’s too hot.  The onion should only react slightly.  If it turns out it’s too hot, remove the pan from the heat for a minute or two until it cools down a bit.

As the vegetables sweat out their moisture, scrape up the fond in the bottom of the pan and incorporate into the mixture.

Once vegetables have sweat out most of their moisture and most of the fond is incorporated, carefully add the cilantro and garlic to the mixture.  Continue to sauté until very fragrant, 2-3 minutes.


Add Hatch/Anaheim Chiles and hot sauce, if using.  Stir well to combine and lower the heat to low, stirring occasionally to allow flavors to marry, 5-7 minutes.

Meanwhile, while flavors are marrying, dice chicken breasts into cubes on cutting board (this may be a bit messy due to liquid having been released, so use a cutting board to catch the juices).

Add chicken to pot, along with any juices accumulated on the cutting board.

Add chicken broth and beans and stir well to combine – there should be enough liquid to cover everything in the pot once it’s been stirred together.  If there isn’t, add a bit of water until everything is covered by at least 1/4 inch of liquid.

Cover, and bring to a rolling boil.

Remove cover, reduce heat to medium-low, and allow to simmer down, 1 hr and 20 minutes, or until desired consistency is achieved.  Stir occasionally to prevent anything from sticking to the bottom of the pan.  If a lot of fat begins to accumulate on the top, you may wish to skim some of it off.  (Now is a good time to crack open a beer).

Just prior to serving, turn the heat off and stir continuously for 10 minutes, or until your arms fall off.  This will make it so that the chili is cool enough to eat; it also will break down the chicken into nice ‘strings’ giving it the consistency of pulled chicken.  It also aids in the final thickening to give it that nice chili texture.

Serve with Tortilla strips, sour cream, cheese and cornbread.


Cuban Pulled Pork & Mojo Sandwiches

This amazing pulled pork can be thrown together in as little as 20 minutes, and then you can set it and forget it while it slow-roasts all day.  Dinner will be waiting for you when you get home.  Initially I was worried about this one.  I was afraid that a pork loin, which is a pretty lean cut, would dry out in the slow cooker.  But marinating it ahead of time and letting it soak in it’s own juices rendered a product that was juicy and unbelievably tender.

Prep: 20 minutes
Marinate: 2 hrs – 8 hrs
Cook: 4 hrs slow-cooker on HIGH; 8 hrs slow-cooker on LOW
Total Time: 4.5 to 16.5 hours
Total Active Time: 20 – 30 minutes
Level: Easy
Cost: About $4 per plate
Serves: 4-6

Ingredients

For the Pork

  1. 1 3-4lb pork loin, trimmed of silver skin and cut in half or in thirds, depending on the size of your slow cooker
  2. 4-6 cloves garlic, finely minced
  3. 1 medium yellow onion, diced
  4. Zest from one orange
  5. Zest of 2-3 limes
  6. 1.5 cups orange juice
  7. 1/2 cup fresh squeezed lime juice (about 6-8 limes)
  8. 1/4 cup olive oil
  9. 2 tsp ground cumin
  10. 2 tsp ground oregano
  11. 1/2 tsp red pepper flakes
  12. a few generous grinds black pepper

For Mojo Sandwiches (per sandwich)

  1. 1 Croissant
  2. 2 slices ham (not honey)
  3. 2 slices Swiss cheese
  4. Dill pickle chips
  5. Dijon mustard

Instructions

For the Pork

Combine all ingredients except pork in a large mixing bowl and whisk until thoroughly combined.  Add pork to marinade refrigerate, covered, for at least 2 hours or overnight.

Once pork is finished marinating, remove from marinade (do not discard the marinade) and pat dry with paper towels.  Heat oil over medium-high heat in a large skillet or sauté pan until shimmering and just slightly smoking (about 375°F).  Add pork and brown on all sides, 5-7 minutes.

Using cooking spray, spray the inside container of slow-cooker until lightly coated.  Add browned pork and reserved marinade.  Cook on LOW for 7-8 hours or on HIGH for 4 hours.

When pork is finished, use two forks to shred pork.  Serve over steamed white rice or as part of Mojo Sandwiches (recipe follows).

For the Sandwiches

Halve a croissant lengthwise and slather both cut sides generously with Dijon mustard.  Add one slice of Swiss Cheese, followed by a generous helping of pork, followed by a few pickles, followed by a slice of ham and another slice of Swiss cheese.