Perfect for a cold winter’s night, this hearty stew takes about 30 minutes to prep and then cooks all day (or part of the day, depending on your method). The addition of red wine makes it quite similar to beef bourginon, but this version also includes potatoes. It can be made in the slow cooker or in the oven.
Time: 30 minutes (active prep), 4-8 hours (in the slow cooker), 4 hours in the oven.
Level: Easy
Cost: About $4 per plate
Serves: 4- 6
Ingredients
3 lbs chuck roast (to be cubed after browning it; more on that later)
1-2 TBSP olive oil or clarified butter
4-60z bacon, sliced into lardons
Salt and Pepper to taste
2 lbs white potatoes, cubed
1 yellow onion, diced
4-5 celery stocks, chopped into 1.5 inch pieces
2 lbs carrots, peeled and chopped into 1.5 inch pieces
4-5 garlic cloves, minced
8 oz Crimini or Baby Bella mushrooms, halved or quartered depending on their size
1 cup sturdy red wine (such as Cabernet, Shiraz, or Zinfandel)
1/2 cup concentrated beef stock
3 TBSP all purpose flour
2 TBSP Worcestershire sauce
1 TBSP Soy Sauce
1-2 tsp cayenne pepper, depending on how much zing you want to add, optional
Instructions
Note: If going the slow cooker route, every time the instructions say “Remove and reserve” you can just dump whatever it is into the slow cooker.
Preheat oven to 275°F (or if using slow cooker, coat the bottom of the slow cooker with cooking spray).
Begin by heating bacon and 1 TBSP olive oil or clarified butter in a large skillet or dutch oven over medium heat. Sauté bacon until fairly crispy and most of the fat has rendered. Remove with a slotted spoon and reserve.
Next, pat the roast dry with paper towels and season aggressively with salt and pepper on all sides. Sear the roast on all sides until golden brown. Remove roast and allow to rest on a cutting board while continuing to the next steps.
Add onion, celery and carrots to the pot and sauté until onions are translucent and vegetables begin to soften, 5- 7 minutes, scraping up any brown bits that may begin to loosen as the onions begin to sweat. Add garlic and sauté until fragrant, 1-2 more minutes. Remove all items from the pan with a slotted spoon and reserve.
Add mushrooms to the pan and sauté until lightly caramelized and they have absorbed most of the fat/liquid in the pan (mushrooms are like little flavor sponges). Once the pan is beginning to look a bit dry on the bottom, add 1/4 cup brandy and flambé.
Add bacon, onions, celery, carrots and garlic back into the pan with the mushrooms. Add soy sauce, Worcestershire sauce and cayenne pepper and stir to combine.
Add red wine and beef stock and bring to a boil, continuing to stir to scrape up anything that might still be on the bottom of the pan. Stir in flour. Reduce heat and allow liquid to simmer, reducing by about 1/3 to 1/2.
Meanwhile, while the liquid in the pan is reducing, cube the beef on the cutting board and add it directly back into the pot. Add potatoes.
If finishing in the oven, give everything a good stir to combine and then cover and place in a 275 degree oven for 3-4 hours.
If finishing in a slow-cooker, dump the whole mess into the slow-cooker, give everything a good stir to combine, and cook on LOW for 8 hours or HIGH for four hours. Personally, I have found the low, slow 8 hour cook in the slow cooker to yield the best results.
This delicious chili requires minimal effort and can be made on the stove top or in a slow-cooker. It is spicy, rich and perfect for a cold winter night. Serve with extra jalapeños, avocados and diced white onions as well as a dollop of sour cream and Mexican cheese. This chili can be made a day ahead of time, refrigerated and reheated. It’s even better after all the flavors have had a chance to meld together. Also, remember: This is frontier food – it was originally cobbled together from whatever was laying around when high-end ingredients were scarce, so feel free to experiment and have fun. This recipe is a jumping off point to highlight the basics, where you go from here on your chili adventure is up to you!
Time: 2 hrs on stove top; 4 hrs slow-cooker on HIGH; 8 hrs slow-cooker on LOW
Level: Easy
Cost: About $5 per plate
Serves: 4-6
Ingredients
3 lbs beef chuck roast or stew meat, cut into 1 or 1.5 inch cubes
Kosher salt and Pepper, to taste
8 oz bacon, diced into lardons
1 cup celery (about 4 stocks), diced
1 large white onion, diced
4-6 cloves garlic, minced
4 jalapeño peppers, diced
1 large green bell pepper, diced
1 6oz can Chipotle chilés in Adobo sauce, minced
1 TBSP Worcestershire sauce
3 TBSP flour
1 cup chicken broth ( or 1 14oz can if finishing on stove top)
1/2 cup coffee (liquid, not grounds… I used what was left in my cup from this morning)
Optional (Beans and Tomatoes in chili are actually somewhat contentious. Read more about the debate here, but remember: Cooking is about experimentation, having fun, and doing what you want. So do as you will.
2 14oz cans red kidney beans
1 14oz can petite diced tomatoes
1/4 cup (or more) Masa Harina (instant cornflour – the key thing here being ‘instant’)
Instructions
Add bacon lardons to a large sauté pan or dutch oven, and cook over high heat until crisp and most of the bacon fat has rendered, about 10 minutes. Remove with a slotted spoon and reserve.
Season beef cubes aggressively with kosher salt and pepper and cook in the bacon fat until nicely browned. Remove with a slotted spoon and reserve.
Drain off all the fat in the pan except 1-2 TBSP, reduce heat to medium. Carefully add celery and onion (take care that the pan is not too hot; you don’t want this stuff to burn!) and sauté until fragrant and onions are mostly translucent, 3-5 minutes. Add garlic and continue to sauté until fragrant, 1-2 more minutes. Add jalapeños, green bell pepper, Adobo chiles and Worcestershire sauce and cook another 3-5 minutes, stirring constantly, until peppers are soft.
Add 14oz can chicken broth, kidney beans and tomatoes (if using), and coffee. Stir in flour and mix everything well. Add bacon and browned beef. Liquid should be almost covering the contents of the pot but not quite. Stir once more to incorporate.
If finishing in the oven:
Preheat oven to 325°F. Bring chili to a boil and then reduce to a simmer. Place chili into oven with lid on but slightly ajar (perhaps 1/4″ – 1/2″ gap) and cook until beef is tender, about 4 hours.
If finishing in a slow cooker:
Coat the inside of the slow cooker with cooking spray. Add all items to a slow cooker; cover completely and cook on LOW for 8 hours or HIGH for 4 hours until beef is tender and falling apart.
To Finish:
In the last 10-15 minutes of cooking, stir in 1/4 cup (more or less) of masa harina until desired texture is achieved. It should be thick and chunky, not watery soup. Any Texan will tell you this is the ONLY way to thicken your chili, but if you don’t have masa harina available a slurry of 1/4 cup cornstarch and 1/4 cup cold water will work just fine.
Serve with sliced avocado, diced onion, green onions, fresh minced cilantro, shredded cheddar cheese (or my favorite, finely grated Cotija cheese) and warm corn tortillas
This classic gaucho-style steak is a sure crowd-pleaser and is a unique way to serve grilled steak on a warm summer evening. Because it uses an inexpensive cut of meat, it’s also easy on the wallet.
1 bunch flat leaf Italian parsley, leafless part of stems removed
4-6 cloves fresh garlic, pressed or minced into a chunky paste
1 heaping tablespoon powdered dry oregano (I actually prefer the powdered version better for this recipe as it mixes into the sauce more easily)
1 tsp crushed red pepper flakes (or less, if you want to tone it down)
juice of 2 lemons
2-3 TBSP red wine vinegar
1 small shallot, minced
2-3 grinds each salt and freshly ground pepper
About 1/2 cup olive oil
For the Bread:
1 long french sourdough baguette, sliced into 1/4 inch thick pieces
2 garlic cloves, halved
Drizzle of olive oil
Freshly ground course salt (or in a pinch Kosher salt)
For the Steak:
1-2 London Broil steaks, depending number of people and their appetites.
Salt and pepper, to taste
Dash of cayenne pepper
Drizzle of olive oil
Directions
For the Chimichurri Sauce:
Combine all ingredients EXCEPT olive oil into a food processor or blender. Hit ‘pulse 5 or 6 times to give everything a few good chops. Add about 1/3 of the olive oil and hit pulse 5 or 6 more times. Then, with the motor running, slowly drizzle the remaining olive oil into the mixture until desired consistency is achieved. Pour into a serving bowl, cover, and refrigerate for at least 30 minutes. Can be made up to two days in advance.
For the Bread:
Slice bread into 1/4 inch thick slices. Brush both sides with olive oil. Toast bread on both sides on grill until golden brown, or alternatively, place on a baking sheet and broil on high for 1-2 minutes each side (if you choose the broiling method, watch it like a hawk – I’ve incinerated my fair share of crostini’s this way). While bread is still warm, salt with freshly ground coarse sea salt or Kosher salt and rub both sides of crostinis generously with cut side of garlic halves.
For the Steak:
Preheat grill to high heat on one side (1 to 2 burners lit). Pat steaks dry on both sides with paper towels. Again, on both sides, brush steaks lightly with olive oil and season generously with Kosher salt and freshly ground black pepper. Add a light dusting of cayenne pepper if desired. Grill steaks over direct, high heat, about 6 minutes per side for a 1 inch thick London Broil, or until internal temp reaches 115F- 120F.
Note:Trust me on the temperature thing here, this piece of meat is best served on the rare end, and its density picks up a lot of heat resulting in a surprising amount of carry-over cooking for such a small piece of meat. I’ve turned a lot of them into shoe leather because I took my eye off of them for a mere second. With this cut, over 125F = ruined.
Let rest for 10 minutes and slice thinly across the grain.
Final Assembly:
Place 1-2 strips of steak onto each crostini and top with chimichurri sauce (or allow guests to do this for themselves). Serve with Arugula Salad and a strong red wine, such as Malbec, Shiraz or Cabernet
Lamb tends to be one of those things that people either love or hate. For a long time, I hated it because the only way I’d ever had it prepared was slow braised in a crockpot, stew-style, and served with mint jelly. While that may be some people’s cup of tea, it wasn’t mine. Then I figured out that lamb could be prepared much like steak – served medium rare. When served like this, it has a rich,complex flavor that makes an excellent alternative to beef.
This particular recipe uses lamb loins although lamb chops would work just as well. Lamb loins look like tiny T-bone steaks – which is essentially what they are, just from a lamb instead of a cow (i.e., tenderloin on one side and strip steak on the other). As such, they are totally delicious. Because they’re small, they don’t have a lot of meat on them. My boys and I can easily polish off about four; my wife will eat two. Even still, if you can find them on special it makes for a pretty economical meal. Also, this recipe is SUPER easy.
Ingredients
12 – 16 Lamb Loins (serves 3-4 hungry folks)
3 TBSP Olive Oil
6-8 garlic cloves (finely minced or pressed)
juice of one lemon
kosher salt and freshly ground black pepper, to taste.
Method
Consider trimming a bit of fat off the outside of the lamb loins if they’re particularly fatty. 1/4 to 1/8 inch or so is probably good. I probably should have done that for this recipe; I will next time. In either case, no biggy – they came out great.
Place lamb loins in large tossing bowl and add olive oil. Toss to coat. Add garlic, lemon, salt and pepper. (Note: Normally I don’t like garlic presses, but in this case I’ll usually opt to press my garlic because it’s easier than mincing them into a paste, which is really what needs to happen). Cover and refrigerate for as little as 20 minutes or as long as 12 hours.
If preparing in the kitchen, preheat the oven to 300F. Line a baking sheet with oven-safe parchment paper for easier clean up. Add 1 TBSP olive oil to a cast iron or copper skillet, and heat to very hot until oil is shimmering and smoking slightly. Sear lamb loins in batches, 2-3 minutes per side or until nicely browned. Don’t overcrowd the pan. Transfer lamb loins to baking sheet and bake 15-20 minutes or until an instant read thermometer reads 130F for medium-rare. Let rest for 10 minutes before serving.
If preparing on the grill, build a 2-zone charcoal fire or alternatively, on a gas grill, light one or two burners only. Shoot for 300F at grate level on the cool side (don’t rely on your grill’s thermometer, spend $5 on an oven thermometer at Home Depot and place it on your grill grate to ensure an accurate reading). Add a couple of mesquite wood chunks, if you like (mesquite is perfect for this meal because of it’s strong flavor and the short smoking time involved).
Sear lamb loins on hot side of grill with the lid open for 3-5 minutes per side or until nicely browned. Transfer to cool side and close the lid. Grill for 15-20 minutes or until an instant read thermometer reads 130F for medium-rare. Let rest for 10 minutes before serving.
Remember: In order to achieve a piece of meat that is perfect medium-rare end to end and seared on the outside (see picture) the meat needs to be the same temperature throughout when the cooking process begins. I recommend going straight from the fridge to the grill/pan without letting it come up to temp on the countertop. For more information see The Secret to Perfect Beef Roasts and Steaks.
Serve with steamed asparagus or green beans and rice pilaf.
Pairs well with Malbec (Argentina), Shiraz (Australia) or Red Zinfandel (California)
Anyone can cook a hunk of meat. But doing it to perfection? That’s the tricky part. So what’s the secret?
I’ll always remember the first time I saw The Matrix my junior year of high school. The special effects, the amazing “bullet-time” cinematography, the unprecedented martial arts and the gripping plot. But there was something else in that movie that stuck with me all these years. The steak. If you’ve seen this movie, you know what I’m talking about. (If you haven’t, you really should.) Anyhow, that’s right, the steak scene:
Hello gorgeous! Oh, that elusive, perfectly cooked hunk of beef. Amidst the amazing displays of Kung-Fu and fast paced action, my mouth watered. I wanted to eat that. And whether it be a steak, a roast, or something in between – when it comes to beef, the Holy Grail of beef is prepared one way: Perfectly, crustily seared on the outside and then medium rare, through and through.
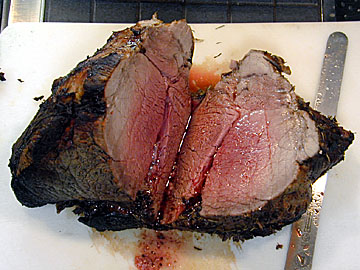
We’re probably all too familiar with a beef coming out looking like this:
Roast beef, way overdone through top 1/3 of roast. (photo courtesy en.wikipedia.org, s.v. ‘Beef’)
This, my friends, is not a good thing; at least 50% of this roast is basically inedible. Note how the very outside is a sooty black, followed by the top 1/3 of the beef being totally gray and completely overdone, followed by a bit of pinkish, followed by some pink and a gelatinous, bloody raw at the bottom. In other words (forgive the ‘artwork’ here), it looks like this:
FIGURE A: Ring 1 – Black and sooty; ring 2 – gray and tough; ring 3 – medium well; ring 4, medium rare and the only part worth eating; ring 5 – gelatinous raw center.
This is not what we want. What we want is something that looks like the steak in the cover-photo of this post, or the steak in the Matrix clip from above. In other words, we want a steak that is delicious and crusty on the outside, and a perfect medium rare through and through. We want our steak to look like this:
FIGURE B: Crusty on the outside, perfectly medium-rare throughout.
And how do we achieve this thing of beauty?
Here’s the secret: It’s got to be the same temperature through and through when it begins cooking, and it’s got to come up to temperature evenly during the cooking process.
The #1 reason for winding up with striations of doneness (Figure A) is that the beef is super cold (if not still frozen) in the middle, and the temperature goes up a few degrees for each layer until you hit the outside. How does this happen?
Because 99% of recipes I’ve read for how to cook a roast beef or a steak recommend taking your beef out of the fridge 20 to 60 minutes before cooking. BAD IDEA. A while back, I had a beautiful New York Strip Roast that was in the 4lb range. I took it out of the fridge and stuck an instant read thermometer in it right away; and it was about 40F through and through. After being out on the counter for 1 hour, the outside was up to room temperature, the first inch or so was about 60F, the second inch was about 55F, the third inch was about 45F and most of the middle was still the same temp, about 40F. In other words, the way it was on the counter-top mirrored the way it came out of the oven, less 90F. So the middle was a perfect medium-rare at 130F; the next layer was a nice medium at 135F, the next layer was well-done at 145F, and the rest of it was about 155-160F (i.e., ruined).
The #2 Reason is using a roasting pan. A roasting pan will cause the roast to cook unevenly because the inside of the pan will trap heat while the outside won’t. Your oven might be the same temperature inside, but the roasting pan won’t be. So, instead of using a roasting pan, place a spare grill grate or cooling rack on top of a disposable drip pan filled with about 1/2 of water, and place your beef on top of that.
So here’s the thing: Whether it be a 4lb roast or a nice steak, you’ve got to either (A) leave it out on the counter long enough for the whole thing to reach room temperature (which in most cases, and especially in the case of a large roast “Ain’t nobody got time for that!”)… or (B) forget that whole warming up on the counter thing and just start cooking it as soon as it comes out of the fridge. Yes, it’s going to take longer to cook that way, but at least it will cook evenly. (And besides, it takes a long time for meat to reach room temperature on the counter top, so you’re either waiting while it’s on the counter, or waiting while it’s cooking.)
The Technique
Okay, so you’ve just pulled your beef out of the fridge and you’re going to cook it. It’s going to be a two-stage process: In one phase, you’re going to sear the meat to form a nice delicious crust on the outside; in the other phase you’re going to let the whole thing come up to your desired temperature (130F) at the same time. During the “sear phase” you’re going to use screaming high heat (500F) and during the “cooking phase” you’re going to use seriously low heat (275-300F).
The vast majority of the time, I do this in the traditional order – Sear first, warm second. The only time I use a ‘reverse sear’ (bring the beef up to temperature and then searing the outside) is if I’m doing a steak or beef tenderloin roast in the kitchen on a pan with the end in mind of making a pan sauce – in that case I’ll warm the beef up at 275F in the oven and finish it off on a super hot cast iron skillet (a more specific recipe will be in another post).
Summary
For an Oven Roast Beef:
Preheat your oven to 500F. When it’s up to temp pull your roast out of the fridge, rub the top with olive oil, season generously with kosher salt and freshly cracked pepper, and place it on your grill grate or cooling rack which should already be on top of your drip pan. Place the whole thing in the center of the oven and shut the door. Roast for at 500F for 10 to 12 minutes or until a nice crust has formed on the outside. Pull the roast out of the oven, and let the oven come down to 275-300F. When it’s down to temperature, stick it back in the oven roast until an instant read thermometer yields a reading of 120-125F. For a large roast, carry-over cooking will bring the roast up another 10F while it rests, meaning that at serving time it will be a perfect 130-135F (the larger the roast, the greater the carry-over).
For a steak on the grill:
If using gas, light two burners on one side for the ‘hot side’ and leave the other side as the ‘cool side’ – if using charcoal, bank your coals to one side. Pull your steaks out of the fridge and rub with olive oil and then season generously with kosher salt and fresh ground pepper. Place them on the hot side of the grill, about 2-3 minutes per side with the lid open, and then place them on the cool side of the grill with the lid shut. Pull them when an instant read thermometer reads 130-135F (for steaks, the carry-over effect is much less, because they’re much smaller).
To pan fry a steak in the kitchen:
Preheat your oven to 275 – 300F. Pull your steaks out of the fridge, rub them with olive oil, and then season generously with kosher salt and fresh ground pepper. Place them in the oven on a baking sheet for about 15-20 minutes, or until internal temp is around 110-115F. While the steaks are warming up in the oven, heat a cast iron, stainless steel, or copper skillet to screaming stupid hot. When the steaks come out of the oven, place them in the pan for 1-2 minutes per side to sear and form a nice crust. Remove steaks from pan and set aside. If you wish, you can use the remaining bits in the pan to make a nice pan sauce for your steaks.
Also, you could always try your hand at sous vide which takes this principal to its maximum, ultimate conclusion. No matter what you try, follow these tips and get ready to up your red meat game!


 This delicious chili requires minimal effort and can be made on the stove top or in a slow-cooker. It is spicy, rich and perfect for a cold winter night. Serve with extra jalapeños, avocados and diced white onions as well as a dollop of sour cream and Mexican cheese. This chili can be made a day ahead of time, refrigerated and reheated. It’s even better after all the flavors have had a chance to meld together. Also, remember: This is frontier food – it was originally cobbled together from whatever was laying around when high-end ingredients were scarce, so feel free to experiment and have fun. This recipe is a jumping off point to highlight the basics, where you go from here on your chili adventure is up to you!