Steaks Sous Vides – The Perfect Steak

It doesn’t get much better than this people.

If you’ve spent much time reading this blog, you know that I’m all about temperature, because temperature is the only reliable way to gauge how your food is going to turn out.

Of course temperature and heat are different things.  Heat is about how much energy you’re putting into your food whereas temperature is a way to read how much heat is in food already.

Think about it like this:  If you decide to slow-roast a piece of meat on your smoker or in your oven at a low temperature over a period of hours, you’re putting a little bit of heat into it over a long period of time.  Conversely, if you sear a steak over a hot grill or in a hot cast iron pan, you’re putting a lot of heat into it very rapidly.

The reason it’s hard to cook that perfect steak, which is medium rare bumper to bumper with a crusty, golden edge is because there’s almost no way to cook it on low enough heat for it to turn out truly perfect.  Even slowly bringing your steak up to temperature in a 200°F oven before searing it (the method I generally recommend) is going to leave striations of doneness to a small degree.  Put too much heat in and it’ll be a bullseye of doneness with only the very center cooked correctly.

Enter the Sous Vide cooker – the solution to all of your protein problems.  No more striations of doneness, no more raw centers, no more accidentally-well-done food.  Just perfect, all the time.

How does this work?  Basically, when you cook something sous vide you hold the entire piece of protein at exactly the temperature you want for an extended period of time so no matter how much time it takes, you never overcook it.

So, what exactly is sous vide?  Sous vide is the process of cooking something in a water bath which is set to an exact temperature.  Essentially, what you do is you vacuum seal you protein in a plastic bag, either using a vacuum sealer or the water displacement method (I use the latter method; it’s cheaper and has never caused me any problems) to get all the air out of the bag and drop it in a pot of water that’s being held at a constant temperature until it’s cooked through; then you simply finish it off over high heat to sear the outside and there you have it – perfectly cooked food.

This is, in fact, the way high end steakhouses typically cook their steak.  Ever wonder how a table of five can order three different cuts of steak, one rare, two medium-rare, one medium, and one medium-well and they all arrive at the table at the same time, perfectly cooked, exactly as ordered, edge to edge?  The answer is sous vide.  They’ve had those steaks sitting in different water baths at different temperatures for hours, waiting to be finished off on a hot grill and brought to your table.

That’s the secret.

You can achieve these results at home too.  There are three ways to do this:

  1. Stove top method.  Heat water in a large pot to exactly the temperature you want, verify using a thermometer, and constantly fiddle with the temperature for hours until you’ve got whatever it is you’re making cooked through.  Forget it.  Too much time, too hard.
  2. Beer Cooler method.  This works astonishingly well.  Essentially, you get your water bath to a few degrees higher than your cooking temperature and the insulated walls of the cooler should hold your water at a relatively constant temperature for a few hours; long enough to cook a steak.  J. Kenji Lopez-Alt describes the process here.
  3. Purchase a sous vide immersion circulator.  It used to be that these things were too pricey for the average home cook, but due to the popularity of the sous vide method of cooking they are becoming increasingly affordable.  Generally, they’ll run you anywhere from $75-$150.  I got mine at Aldi for $49.99.  So far so good.

No matter what method you use, you really owe it to yourself to try cooking something sous vide the next time you have a couple hours.  Here’s a short recipe for the steak featured above.

Ingredients

For the Garlic-Herb Butter:

  1. 1 stick salted (yeah, i know) butter, room temperature
  2. 3 tablespoons fresh parsley, minced
  3. 2 tablespoons fresh basil, minced
  4. 3 sprigs fresh thyme, minced
  5. 2 cloves garlic, smashed into a paste (or squished in a garlic press)

For the Steak:

  1. 2 steaks (filet, strip, or ribeye), 1.5 – 2 inches thick (the thicker the better, ask your butcher to cut you a few steaks if the ones in the case are less than 1.5 inches thick – remember, you’re searing these off at the end and it is possible to overcook your steak during that process).
  2. 2 cloves garlic, smashed
  3. Fresh herbs (such as rosemary, thyme, etc), optional
  4. Kosher salt and freshly ground black pepper

Instructions:

For the Garlic-Herb Butter:

  1. Mix all ingredients together in a small bowl until very well combined.
  2. Using plastic wrap, roll the butter into a log shape and twist the ends off (like a tootsie roll)
  3. Refrigerate until needed.

For the Steak:

  1.  Heat a water bath to 130°F for medium rare (135° for medium, anything past that forget the whole sous vide thing and just incinerate it on your stovetop; it’s easier that way).
  2. Season steaks generously with salt and pepper.  Toss each steak individually in a food-grade gallon size freezer bag along with the smashed garlic clove and herbs, if using.
  3. Using the water displacement method, seal the steaks in their bags.
  4. Introduce steaks to water bath and make sure they’re fully submerged, weighing them down if necessary.
  5. Hold steaks in the water bath at a constant temperature for at least 2 hours and not more than 4 hours.
  6. Remove steaks from bags and pat very dry with paper towels (Note:  they will look really weird – grayish brown and mushy – after coming out of the water bath; don’t worry, all is well).
  7. Sear the steaks over high heat, either in a cast-iron pan or ripping hot grill (surface temperature of heating surface should be 400°F – 500°F), 15-30 seconds per side.
  8. Remove steaks from heating surface and allow to rest; while resting, top steaks with sliced rounds of garlic herb butter and tent lightly with foil until butter is melted, 3-5 minutes
  9. Slice and serve


Jalapeño Cheddar Soup

Ah, fall.  Labor Day festivities over, it’s finally time to embrace the fact that summer has finally drawn to a close.  Now is the time to embrace leaves turning color, a crispness to the air, a change in the light.  Fall is a time for flannel shirts, cooler days – and of course soup.

Of course here in SoCal that’s all mostly a fantasy; it’ll be triple digits – or at least mid-90s – most days here through at least Halloween, if not Thanksgiving.

But that isn’t going to stop me from making soup.

Several years ago, I had the opportunity to spend quite a bit of time in a town called Big Bear up in the mountains of the San Bernardino National Forest, where autumn came early up at elevation and you could almost forget that you were only a couple hours away from the screaming urban sprawl that is Los Angeles.  My wife and I frequented a restaurant up there called Madlon’s (now closed) which was run by a couple of Cordon Bleu trained chefs.  Their food was amazing.  One of the best things on the menu was their Jalapeño Cheddar Soup.  The chef-owners of the restaurant, Rob and Chelsea, became friends and they were generous enough to share their recipe with me.

The recipe that they gave me was designed to make about 5 gallons of the stuff, so I’ve adapted it here for the home kitchen.  I share it here with their permission and with gratitude for their generosity.

Time:  90 minutes
Cost:  About $15 (for the whole pot)
Difficulty:  Easy

Ingredients:

  1.  2 tablespoons bacon fat, clarified butter, or regular unsalted butter
  2.  2 tablespoons olive oil
  3. 1 medium yellow onion, finely diced
  4. 3 ribs celery, diced
  5. 3 jalapeño peppers, minced, seeds and ribs removed
  6.  2 cloves garlic, minced
  7.  2 8oz cans tomato sauce
  8.  1.5 cups dry white wine
  9.  16oz grated cheddar cheese
  10.  2 tablespoons cornstarch + 2 tablespoons cold water
  11.  Approximately 1 pint heavy cream (to taste preference)
  12. 1 teaspoon white-wine vinegar or sherry vinegar

Instructions

  1.  In a heavy-bottomed sauté pan or large skillet, melt fat and oil over medium high heat.  Add onion, celery and jalapeños and sweat until onions are translucent and celery and jalapeños are soft, 3-5 minutes.  Add garlic and continue to cook, stirring constantly, until very fragrant, 1-2 minutes more.
  2.  Add white wine and deglaze the pan
  3.  Add tomato sauce and bring to a boil, then reduce to a simmer.  Cover (or mostly cover) and allow soup to simmer 30 minutes until vegetables are very tender and flavors have developed.
  4.  Using an immersion blender, purée the contents of the pot until very smooth
    1.   NOTE:  Make sure the head of the immersion blender is fully submerged before turning it on, unless you like hot soup explosions.
    2.   NOTE:  You can purée the soup in batches in a regular blender, but be careful.  Make sure that (1) you don’t fill the blender more than half way and (2) make sure that you leave adequate venting at the top of the blender.  If you don’t the steam will create a pressure monster and hot soup will be all over your kitchen in a hurry.  Most blenders have a removable stopper in the lid.  I recommend removing this and covering the hole with a kitchen towel.
  5. Once the soup is puréed, transfer soup to a small stock-pot or large saucepan.  Bring to a simmer and stir in cheese.  Allow cheese to fully melt, stirring occasionally.
  6.  Stir in heavy cream, a little at a time, until desired texture and color is achieved.  Return to a simmer.
  7. If the soup still isn’t thick enough (which it probably won’t be), add a slurry consisting of 2 tablespoons cornstarch and 2 tablespoons cold water.  Add and stir to thicken.
  8. Remove soup from heat and stir in vinegar.
  9. Serve with grilled cheese, crusty bread, or enjoy on its own.


Steak Fajitas

Steak soaked in a zesty citrus marinade and then grilled to perfection; serve with pico de gallo, homemade gaucamole, sour cream, roasted peppers and onions and Mexican cheese.  Easy, cheap and delicious.

Ingredients:

For the Steak

  1. 2.5lb London Broil or Tri-Tip Roast
  2. 1/2 cup orange juice
  3. 1/2 cup lime juice (approximately 6 limes)
  4. Zest of 1 lime
  5. 3-4 cloves garlic, minced
  6. 2 tsp chile powder
  7. 1/2 tsp cayenne pepper
  8. 1 TBSP kosher salt
  9. 1 TBSP coarsely ground black pepper.
  10. 1 cup mesquite wood chips (optional)

For the Pico de Gallo

  1. 1 Large yellow onion, finely diced
  2. 2-3 Roma tomatoes, finely diced
  3. Large pinch Kosher salt
  4. 2 jalapeño peppers, minced
  5. juice of one lime
  6. 2-3 TBSP cilantro, finely chopped

For the Guacamole

  1. 3-4 large, ripe Haas avocados (or 6-7 little organic ones)
  2. 1 jalapeño pepper, minced
  3. 1 3.5oz can hatch green chiles (optional)
  4. 4 TBSP pico de gallo (above)

For the Fajita Mix (peppers and onions)

  1. 2 TBSP olive oil
  2. 3-4 cloves garlic, minced
  3. 1 each: Red bell pepper, green bell pepper, yellow bell pepper
  4. 1 large yellow onion, halved and sliced into half-rings

For Serving

  1. Medium size yellow corn tortillas, 3-4 per person
  2. Freshly grated Cotijá cheese
  3. Shredded Mexican Cheese
  4. Sour Cream

Prep:

For the Steak

  1.  Whisk ingredients 2-9 together in a medium size mixing bowl.
  2. Transfer steak to large 1-2 gallon ziplock bag.  Add marinade to bag with steak and massage to incorporate well.  Refrigerate for 2-4 hours, or up to 8 hours.  Flip bag over half way through marinating process if possible.

For the Pico de Gallo

  1. Dice tomatoes first.  Add to colander and sprinkle with Kosher salt.  Toss gently to season and allow to sit in the sink 20 minutes.  Tomatoes will give up much of their moisture making your pico less watery.
  2. Prepare onions, jalapeños, lime and cilantro.  Stir to combine.
  3. Add tomatoes to mixture and stir to combine again.  Cover and refrigerate until ready to serve.

For the Guacamole

  1.  Halve avocados and remove pits.  Spoon avocado out of shells into a medium to large mixing bowl.
  2. Add ingredients 2-4 and mash well using a potato masher.  (Note:  Guacomole is best served right away.  If left in contact with air too long it will oxidize and turn brown.  If preparing a couple hours in advance, smooth guacomole in bowl, drizzle with lime juice, and cover with plastic wrap with the plastic wrap in full contact with the guacamole).

For the Fajita Mix (peppers and onions)

  1. Prepare all ingredients as directed
  2. Add to a 10-12 inch cast iron skillet and stir (or toss if you’re strong enough; cast iron is heavy) to combine.

Cook

  1. Light 1 or 2 burners if using gas; if using charcoal light 1 chimney starter full of lump charcoal and set grill up for 2-zone cooking.  Make sure the grill is good and hot.  Just prior to grilling steak, add 1 cup mesquite wood chips, if using.  Click HERE for more information on grilling and smoking.
  2. Remove steak from marinade and pat dry.  Discard leftover marinade.
  3. Place steak down on hot side of grill and sear, approximately 5 minutes per side, until nicely browned.  Transfer to cool side of grill.
  4. Add cast iron skillet to hot side of grill and close the lid.  Sauté fajita mixture in cast iron until nicely caramelized and soft, 15 – 20 minutes.  Stir occasionally.  Steak and vegetables should finish at roughly the same time, but if they don’t just remove the one that is done and tent with aluminum foil.
  5. Once steak and Fajita mixture are done, remove and allow to rest for a few minutes
  6. Warm tortillas on a griddle or in a frying pan.  Sprinkle with cotijá cheese and continue to toast until cheese is melted.
  7. Slice steak thinly across the grain on the bias using a sharp knife

Serve

Plate Steak, Pico de Gallo, Guacamole, Fajita mixture, shredded Mexican cheese and sour cream together.  Have eaters assemble fajitas at table as desired.


New Mexico Sopapillas

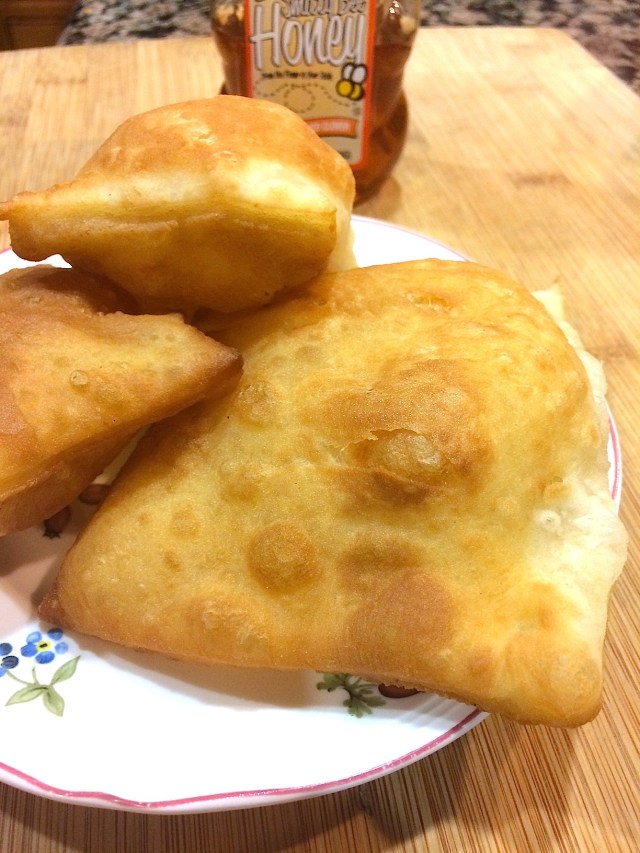
I love these guys – puffy, airy little pastries designed to do one thing: be a delivery mechanism for awesome flavors.  They are a staple of New Mexican cuisine, and as far as I can tell, almost exclusive to it as well.
Sopapilla literally means “little soup pillow” and that’s what they are best at – sopping up delicious sauce from the plate, or soaking in delicious chili.  My first encounter with a sopapilla was at a Sadie’s in Albuquerque, NM back when I was in high school.  This was also the first time I encountered Chili Verde, chili in general, and food that was legitimately spicy.  I had been wanting to try to make these for years, but for a whole variety of reasons never got around to it until the other night, and they were amazing.  Sprinkled with a bit of cinnamon sugar or a drizzle of honey, they also make an awesome breakfast.  Also, this was REALLY easy.

Time: 30 minutes
Level: Easy
Cost: Really, really cheap seeing as they’re made from stuff you probably have on hand
Makes:  Approximately 18-24 sopapillas

Ingredients

  1. 3 cups all purpose flour, plus perhaps 1-2 TBSP
  2. 2 tsp double-acting baking powder
  3. 1 tsp salt
  4. 1 cup whole milk
  5. 1/4 cup warm water
  6. 6 TBSP unsalted butter, melted
  7. 1.5 quart (48 oz) vegetable or canola oil, for frying

Instructions

  1. Combine dry ingredients (1-3) in a large mixing bowl and whisk to combine.
  2. Create a well in the bowl using the dry ingredients, it should look like a little volcano; a mound of ingredients with a little hole, perhaps 2 inches in diameter, in the top.
  3. Combine wet ingredients (4-6) in a 2 cup measuring cup and whisk briefly to combine.
  4. Add about half of the wet ingredients to your flour-mixture volcano.  Using your hands, begin scooping the dry ingredients from the edges of the volcano into the wet ones on top.  Add the rest of the wet ingredients and continue to mix until a rough dough has formed.  If your dough is super sticky, coat it with 1 TBSP flour.  Once the dough is fairly consistent, coat with 1 more TBSP flour and cover with plastic wrap or a clean towel.  Punch down and fold a few times to make sure everything is really worked together.  Allow dough to rest for 20 minutes.
  5. Once dough is rested, remove it from the bowl and divide into two parts.  Place one part back in the bowl and cover while you work with the other part.  On a lightly floured work surface, use a rolling pin to roll the dough out to about 1/8 inch thick, trying to get it as consistent as possible.  Cut off rounded edges to make a rectangular piece of dough and discard the trimmings.  Cut dough into rectangles approximately 1.5″ x 2″.  Repeat with the remaining dough.
  6. Heat oil in a large pot to 375°F – 400°F
    • Cook’s Note:  When frying stuff, I’ve found that my 5qt sauté pan is actually the perfect size.  480z of oil comes do about 2″ deep, which is all you really need to fry just about anything.  The fact that it’s fairly wide (12″ across) means that the oil will come up to temperature more quickly and I can fry things in larger batches.  There’s only one serious drawback:  A sauté pan has a handle, and handles can be accidentally knocked, and the potential for knocking a large volume of 400°F oil onto yourself or the floor is a VERY bad thing.  So, if you use your sauté pan for this, PLEASE make sure the handle is pointed AWAY from you, toward your stove, and well away from any place it could be inadvertently knocked.
  7. Once oil is up to temp, carefully slide a sopapilla into the oil.  It will submerge, sizzling quite a bit, and then float to the top.  Then the magic happens:  Before your very eyes, it will puff into a beautiful little pillow.  Continue to fry for 2-3 minutes until golden brown, and the flip with a slotted spoon to brown the other side.  Once you’ve done one as a tester, you can probably do 3-4 at a time.
    • Cook’s Note:  If your sopapilla doesn’t puff, chances are your oil isn’t the right temperature.  It’s got to be hotter than 350°F but no hotter than about 410°F.  Remember:  Every time you add a sopapilla to the oil, it’s going to bring the overall oil temp down a couple of degrees.  This is why I recommend starting with your oil somewhere between 375°F – 400°F.   Either that or you’re trying this at high-altitude.  In either case, if after a few test batches your sopapillas don’t puff, don’t worry – they’re still tasty.
  8. Once fried, remove sopapillas to a plate lined with a paper towel to drain.  Repeat until all sopapillas are fried.  They can be kept warm in a 200°F oven for 30-45 minutes.  Also, they refrigerate pretty well and can be gently reheated in a 325°F oven until just warmed through, about 5 minutes.

Peruvian Style Roast Chicken with Jalapeño-Cilantro Sauce

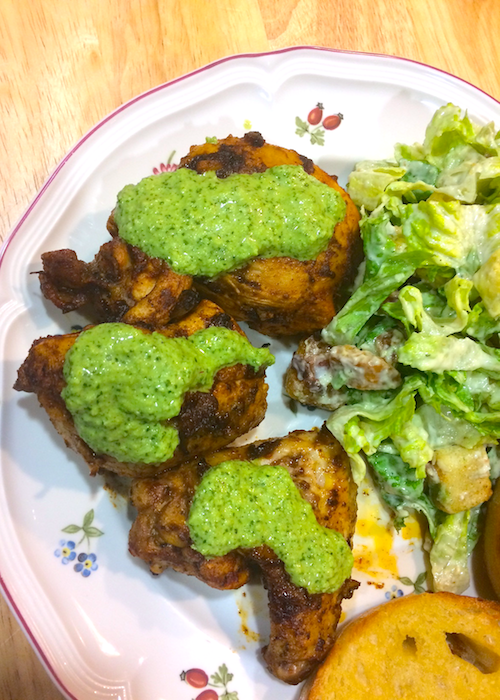
This delicious, succulent chicken served with a green sauce similar to a creamy chimichurri is a sure crowd pleaser.  This version is a loose adaptation of J. Kenji Lopez-Alt’s  grilled recipe featured on his blog Serious Eats.  While it could also work out quite nicely on the grill, this version is executed in the kitchen and is one of the best things I’ve made in a long time.

Time: 90 minutes (30 minutes inactive)
Level: Easy/Intermediate
Cost: About $4/plate (depending on which pantry essentials you have on hand)
Serves: 3-6

Ingredients

For the Chicken:

  1. 1 whole chicken broken down into 8-10 parts, plus a couple of extra breasts or thighs if you’re feeding a crowd
  2. 4 tsp kosher salt
  3. 2 TBSP ground cumin
  4. 2 TBSP paprika
  5. 1 tsp coursly ground black pepper
  6. 2 TBSP granulated garlic
  7. 2 TBSP white wine vinegar
  8. 2 TBSP olive oil
  9. 3/4 cup white vermouth
  10. 1 shallot (or 1/2 white onion), diced
  11. 3 cloves garlic, minced
  12. juice of 1 lemon

For the Green Sauce:

  1. 3 jalapeño peppers, relatively finely diced, stems removed (and seeds and membranes removed if you don’t like the heat)
  2. 1 bunch fresh cilantro, large stem portions removed
  3. 3 cloves garlic, minced
  4. 2 tsp dried oregano
  5. pinch Kosher salt
  6. juice of two limes
  7. 2 TBSP red wine vinegar
  8. 1  shallot (or 1/2 white onion), minced
  9. 1/3 – 1/2 cup sour cream

Prep

For the Chicken:

  1. Begin by brining your chicken.  In a large bowl, mix together 6 cups cold water and 1/4 cup kosher salt.  Whisk until salt is dissolved.  Add chicken and refrigerate for at least 30 minutes, or up to two hours.
  2. Combine dry spice rub ingredients (ingredients 2-6) in a bowl or tupperware container and whisk or shake vigorously to combine.
  3. Prep ingredients 7-12 and arrange your mise-en-place

For the Green Sauce:

Combine all ingredients in a food processor or blender and blend until smooth.  Pour into appropriately sized container and refrigerate.

Cook:

  1. Preheat oven to 375°F
  2. Remove the chicken from the brine and pat dry with paper towels.  In a large tossing bowl, add 2 TBSP olive oil and 2 TBSP white wine vinegar and toss to coat.  Add 1/2 of dry spice mix and toss to coat again.  Add remaining spice mix and toss to coat a third time.
  3. Heat 3 TBSP of a high smoke-point fat (I used bacon fat this time, but grapeseed oil, vegetable oil, or ghee would also work) in a large sauté pan, until very hot (350°F – 375°F)
  4. Place half of chicken, skin side down, into the skillet and brown for 4-5 minutes, or until golden brown.  Flip chicken over and brown 2-3 minutes more.  Remove from pan and set on a wire rack placed on a rimmed baking sheet.  Repeat with remaining chicken.  You should have a nice fond in the bottom of your pan.
  5. Add onion or shallot to pan and sweat until very fragrant, 3-4 minutes, and some of the fond begins to incorporate into the onion.  Add garlic and sauté until fragrant but not burned, 1 minute more.
  6. Add vermouth and flambé.  Bring to a boil and scrape up any brown bits still stuck to the bottom of the pan.  Reduce sauce to an almost syrup-like consistency, and then baste chicken using a spoon.
  7. Place chicken in oven and roast until breasts are 150°F – 160°F and thighs and legs are 160°F – 170°F
  8. Remove from oven, place on a serving platter, and squeeze lemon juice all over chicken.   Let rest for 10 minutes.  Spoon green sauce over chicken and serve.

Note:  I served this with some garlic toast and a bacon-avocado Caesar Salad, using the bacon bits from which I rendered the fat in Step 3 of the cooking process.  It was delicious.